
Create a Dynamic Teams Broadcast Group

Dynamic Teams Broadcast Group (Sort of)
You would think with the creation of AAD Dynamic Groups you would be able to create a Dynamic Teams Broadcast Group. Well, it is not the case. One thing Microsoft Teams does not do well is integrate into the rest of the M365 ecosystem. I do not know why that is but what I do know is that it is a huge pain point with M365 Administration.
What I can do in this article is show you a way to achieve something like a dynamic Teams Broadcast Group but not. It is very similar to a post I wrote about MS Teams contact Provisioning. Spoiler alert, it uses AAD Dynamic groups to help!
Creating a Dynamic Teams Broadcast Group
The first thing you will need to do is get a dynamic list of the users you would like to be in this group. A good example is a group with all licensed users in your organization. As users enter or leave, this group will grow or shrink accordingly. This article should get you started.
Here is an example of a rule you would put in your AAD Dynamic Group to get all active users:
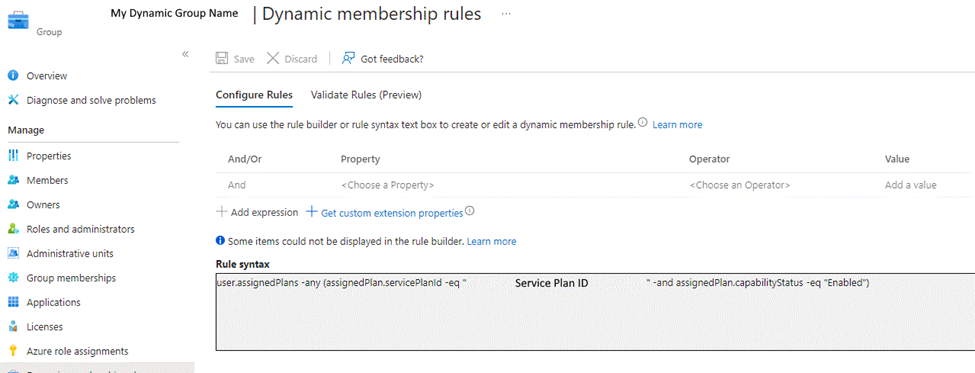
This is how you can get your dynamic list of users who will be part of the team’s broadcast group. Unfortunately, there isn’t a way to put them into the Microsoft team directly, but in the next step I can show you how to do it relatively quickly.
Adding Users to the Microsoft Team
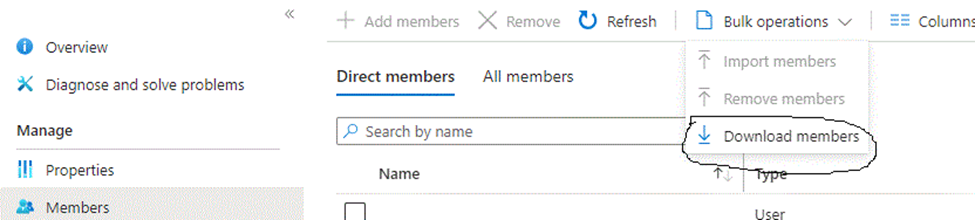
Now I will assume that this Team has just been created and has no members in it. We are going to create a list from the dynamic group we created from the last step in CSV format. You will need to go to the AAD Dynamic group you created and download the user list:
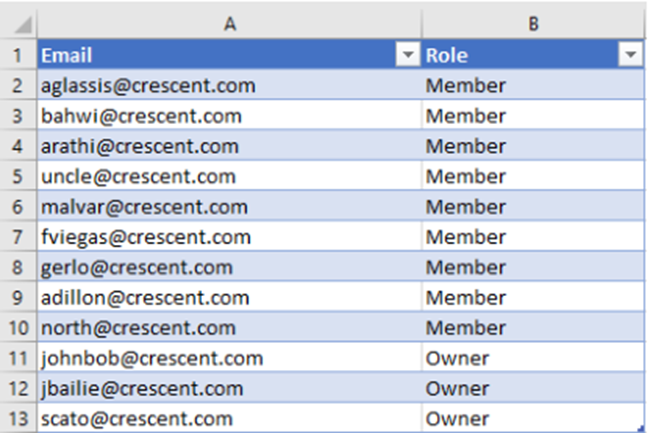
Create it like this using two Column’s (Email and Role):
You will need to get the MS Teams Group ID for the PowerShell script you will need in the next step. Login to Teams in PowerShell:
Connect-MicrosoftTeamsThen run this command:
Get-Team | Where {$_.DisplayName -eq "Enter you Team Name Here"} | Select -ExpandProperty GroupIDOnce you get this information you can put it into the following script:
$TeamID = "ID you got from last step"

#Get users from the CSV

$TeamUsers = Import-Csv -Path "<Path to CSV File> "

#Iterate through each user from the CSV and add to Teams

$TeamUsers | ForEach-Object {

       Add-TeamUser -GroupId $TeamID -User $_.Email -Role $_.Role

       Write-host "Added User:"$_.Email -f Green
Now that each user in the group has been added to the Team your list has been completed. What if the list changes? On to the next step.
Changing Users in the Teams Group
You can do these one of two ways. You can user the Add-TeamUser or Remove-Teamuser cmdlet if you plan on keeping close tabs on this group. Or if you let it get away a bit, you can do the following – reset the group. Do the following and run this script:
Connect-MicrosoftTeams

$TeamGUID = "<Your Team ID>" # this is the group team ID #

$users = Get-TeamUser -GroupId $TeamGUID | where-object {$_.role -eq "member"}

Foreach ($user in $users) {

    $UPN = $user.User

    Remove-TeamUser -groupid $TeamGUID -user $UPN

    Write-Host $UPN
Then run the script at the beginning of the article to add all the members back.
Final Thoughts on Dynamic Teams Broadcast Group
I know it seems a bit tedious to execute the steps to achieve a Dynamic Broadcast Group in Microsoft Teams but until they integrate Teams with the rest of M365, you will probably have to more administration this way. Here’s hoping.
Stop “Allow my organization to manage my Device”
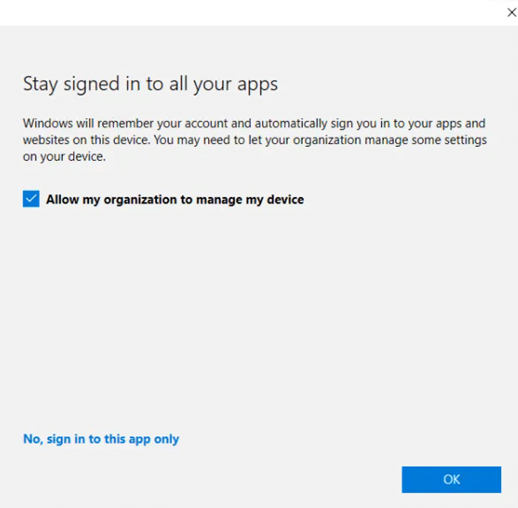
In this modern world, we often get invited to our customer’s tenants as a guest for better collaboration. For example, in Microsoft Teams we may be likely to log on to a shared computer and need to use Teams. Every time we do, we always get a popup asking the question “Allow my organization to manage my device”. This does not only apply to Teams, but most Microsoft 365 applications. So, what is the right choice here?
When it comes to this notification, we don’t like it very much to begin with, but there are 4 choices for the end user:
- Click OK. Since it’s a blue button, this is where most users will just click without thinking. This will register the user’s device to Azure AD (Azure AD registered device) and possibly enroll to MDM or MAM, depending on what is the current state of this device and the configuration of MDM and MAM. This setting also remembers this user’s credentials on this device for other apps.
- Uncheck the “Allow my organization to manage my device, then click OK. This will not register the user’s device to the external Azure AD, but it will remember the users credential on the device for other apps.
- Choose “No, sign in to this app only”. This will not register the user’s device to the external Azure AD, and it will only remember the user’s credential for this app.
- Close the window by clicking on X. This will just close the notification and does nothing.
We can always make detailed instructions for our users and let them know which option they should use. They won’t read it. Also do we really want to give the users options to register the device with other tenants. We can force the choice.
How can I Stop “Allow my organization to manage my Device”
As I mentioned before, if the user checks “Allow my organization to manage my device“, and chooses OK, this device will be Azure AD registered to the external tenant, this might not be our desired result. We really don’t want our devices to register to another company’s corporate tenant. And we also don’t want to see other companies’ devices in our tenant. Right?
You can find the answers from Microsoft documentation
Do it Through the Registry
Here’s the key:
HKLM\SOFTWARE\Policies\Microsoft\Windows\WorkplaceJoin, “BlockAADWorkplaceJoin”=dword:00000001
When using this registry, your users will no longer see this notification when they login to ex. Microsoft 365 apps or Microsoft Edge with another work or school account, device will not be registered to another Azure AD tenant (Azure AD register), but this also means there is no Single Sign-On feature for those additional accounts, and it might still have other unexpected impacts that we have not found yet..
There is extra information about this registry and Hybrid Azure AD join planning, details can be found in
Deploy as script from Intune
For Intune managed devices you would typically deploy this as a PowerShell script. This simple script looks like this:
#Setting registry key to block AAD Registration to 3rd party tenants.
$RegistryLocation = "HKLM:\SOFTWARE\Policies\Microsoft\Windows\WorkplaceJoin\"
$keyname = "BlockAADWorkplaceJoin"
#Test if path exists and create if missing
if (!(Test-Path -Path $RegistryLocation)){
Write-Output "Registry location missing. Creating"
New-Item $RegistryLocation | Out-Null
}
#Force create key with value 1
New-ItemProperty -Path $RegistryLocation -Name $keyname -PropertyType DWord -Value 1 -Force | Out-Null
Write-Output "Registry key set"I then deployed this as required to all my Windows 10 Corporate devices. This script must run as “system”.
That’s all you need to do if you want to stop this annoying prompt from bothering your users every single day they collaborate with external parties in Teams or other places.
Quickly Provision a Phone in Teams Admin
Quickly Provision a Phone in Teams Admin
If you license users for Teams Phone Standard you will need to Quickly Provision a Phone in Teams Admin. It also happens if you unlicensed a user for Teams and then reconsidered. It drops the phone number, and it will have to be re-provisioned
Follow the Steps below and you will have the users phone number back in no time!
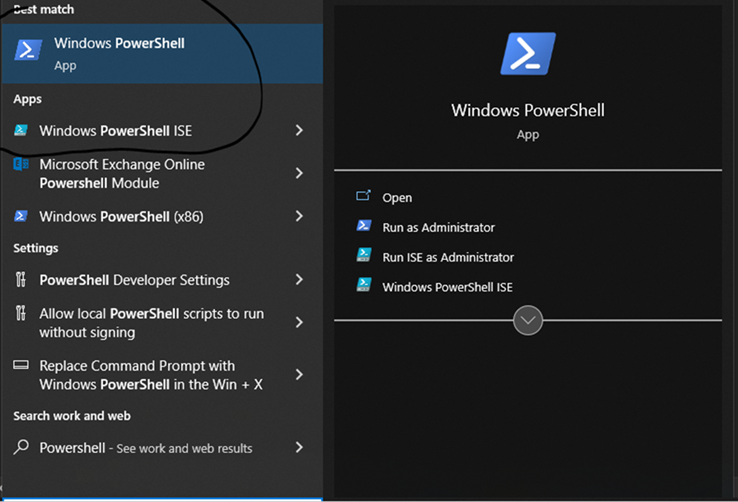
Open PowerShell
Star PowerShell from Windows. You can either choose Windows PowerShell or Windows PowerShell ISE. I prefer ISE since I can cut and paste code and run it from the console a lot easier:
Install and Connect to the Teams Module
When the box is loaded. Install the module:
Install-Module -Name MicrosoftTeams
Then Connect:
Connect-MicrosoftTeams
You may want to put this into a nifty PowerShell script that automates the process if you feel you are going to be provisioning or de-provisioning phones quite often.
User Numbers when you Provision a Phone in Teams
Here I will show you not only how to add a user telephone number but also remove a telephone user number. Of course, removing a user number is important when they either change numbers or do not need the number anymore (i.e. – leave the organization).
Add User Number
Here is the example of setting the telephone number, assigning a default policy and enambling voicemail.
Set-CsPhoneNumberAssignment -Identity userid@<tenant.domain> -PhoneNumber '+1XXXXXXX' -PhoneNumberType DirectRouting

Grant-CsOnlineVoiceRoutingPolicy -Identity userid @<tenant.domain>  -PolicyName "Policy Given to You by your Telco Provider" – or one you or your admin created

Set-CsOnlineVoiceMailUserSettings -Identity userid @<tenant.domain> -VoicemailEnabled $true
Remove User Number
In this example the user has the phone number and any policy assigned to them removed.
Grant-CsOnlineVoiceRoutingPolicy -Identity userid @<tenant.domain> -PolicyName $null

Remove-CsPhoneNumberAssignment -Identity userid @<tenant.domain>  -RemoveAll
There you have it. A way to Quickly Provision a Phone in Teams Admin.
Assigning Microsoft Licensing Gives Errors
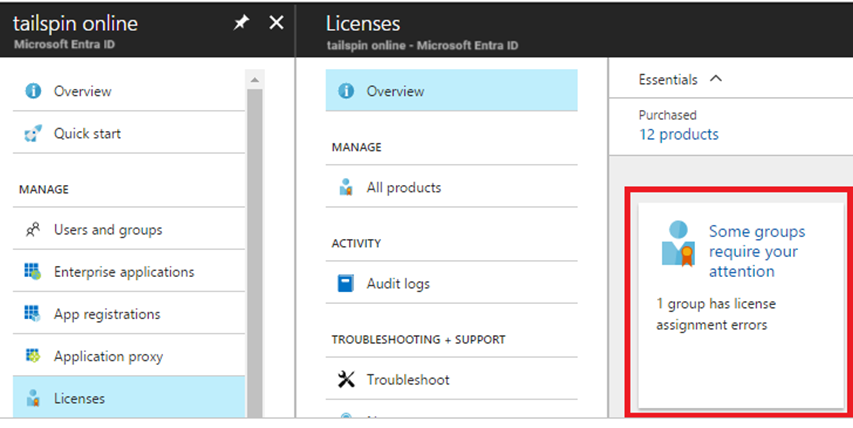
Have you ever had an issue where Assigning Microsoft Licensing Gives Errors? Depending on how you license your users, it could be because you use a combination of Group licensing and manual licensing. If you use more than one third party to purchase licenses, I wouldn’t be surprised if you run into this.
I will give an example. This has happened in the past when trying to assign an Exchange Online Plan 2 license for a user. There is some inherited licensing that cause errors when trying to remove the Exchange Plan1 license and add the Exchange Online Plan 2 license.
The cause in this case was the Microsoft Teams Standard License inherited from the Group licensing in Azure. To be able to assign the new exchange license I had to do the following:
Steps To Successfully Assign License
- Remove the user from the Group Licensing Group in Azure AD
- Remove all licenses the user has in the admin portal (User Details)
- Re-add the above licenses except the Exchange Online Plan 1 license. You would add the Exchange Online Plan 2 license and Save Changes in the Admin Portal (User Details).
- Re-add the user to the Group License Group in Azure AD.
- Re-provision the users phone number.
This is a good process to follow regularly as it will come up from time to time. Don’t worry, repetition helps with learning so if you forget and run into this error a few time you will get the hint LOL.
Re-Add User Number When Assigning Microsoft Licensing Gives Errors
Set-CsPhoneNumberAssignment -Identity userid@<tenant.domain> -PhoneNumber '+1XXXXXXX' -PhoneNumberType DirectRouting

Grant-CsOnlineVoiceRoutingPolicy -Identity userid@<tenant.domain> -PolicyName "<Policy your Telco gave you or one you set up>"

Set-CsOnlineVoiceMailUserSettings -Identity userid@<tenant.domain> -VoicemailEnabled $true
If you don’t check the teams phone number provisioning you may end up with a problem like this. Double check the MS Teams portal to ensure the phone number was added back. This is a bit of a pain, but it works.
Automatically Add Signature to Outlook with VB Script
Microsoft has added the ability for email signatures to roam. This is great news for users who use Outlook on multiple devices as it stores signature settings at the mailbox level and not directly in Outlook’s settings. You want to Automatically Add Signature to Outlook but sometimes, you can’t.
If the signature is created programmatically for you by your IT admin or roaming signatures are turned off (also done by your IT admin) you will have to find other ways.
I will show you two ways. One way if you are an administrator and another way if you are a user.
Create a Signature for Your users as an Administrator
This might fall out of your skill set. It does require some scripting and HTML programming knowledge. Don’t worry, there are a lot of articles on the internet to help you with this. I will walk you through the steps.
Get familiar with the names of the names of the attributes in AD. You will be referring to them as you write the script that renders the HMTL code. The code will be written to a file and then placed in the %AppData%\Microsoft\Signatures\ location as an HTML file.
Here is the sample vbs code for a simple signature:
On Error Resume Next

Dim strUser,strName,strTitle,strMail,strPhone,strFax
Dim strCompany,strLocation,strAddress,strCity,strState
Dim strZip,strWeb,strInfo,ADObject

strSourceDir=replace(wscript.scriptfullname,wscript.scriptname,"")

Set fso=CreateObject("Scripting.FileSystemObject")
Set objSysInfo = CreateObject("ADSystemInfo")
Set WshShell = CreateObject("WScript.Shell")

                            'Active Directory Info Object
Set ADObject = CreateObject("ADSystemInfo")

strUser = ADObject.UserName

                            'Active Directory Connection
Set objUser = GetObject("LDAP://" & strUser)

                            'Pull Active Directory Info for this User

strOutlookVersion = Left(objOutlook.Version, 2)
strUserid = objUser.userPrincipalName
strFName = objUser.FirstName
strLName = objUser.LastName
strTitle = objUser.Title
strEmail = objUser.mail
strPhone = objUser.telephoneNumber


Dim objFSO, objWsh, appDataPath, pathToCopyTo, plainTextFile ,imagePath
Dim plainTextFilePath, richTextFile, richTextFilePath, htmlFile, htmlFilePath, SigFilename

Set objFSO = CreateObject("Scripting.FileSystemObject")
Set objWsh = CreateObject("WScript.Shell")
appDataPath = objWsh.ExpandEnvironmentStrings("%APPDATA%")
pathToCopyTo = appDataPath & "\Microsoft\Signatures\"

'Create HTML Signature


htmlFilePath = pathToCopyTo & "ACMESignature.htm"
Set htmlFile = objFSO.CreateTextFile(htmlFilePath, TRUE)
htmlfile.WriteLine("<html>")
htmlfile.WriteLine("<head>")
htmlfile.WriteLine("<p>" & strFName & " " & strLName & "</p>")
htmlfile.WriteLine("<p>" & strTitle & "</p>")
htmlfile.WriteLine("<p>" & "Acme Company" & "</p>")
htmlfile.WriteLine("<p>" & "P. " & strPhone & "</p>")
htmlfile.WriteLine("<p>" & "E. " & "<a href=""strEmail"">" & strEmail& "</a>" & "</p>")
htmlfile.WriteLine("</body>")
htmlfile.WriteLine("</html>")

htmlFile.Close

'Applying the signature in Outlook’s settings.
Set objWord = CreateObject("Word.Application")
Set objSignatureObjects = objWord.EmailOptions.EmailSignature

'Setting the signature as default for new messages.
objSignatureObjects.NewMessageSignature = "ACCSignature"

Set objFSO = Nothing
Set objWsh = Nothing

'Connect to Registry
Dim objShell, RegKey
Set objShell =  CreateObject("WScript.Shell")

Set objShell = Nothing
Create a Signature as a user
You will need some skills in HTML Coding. You can use any WYSIWYG editor to do the job. There are also a lot of tutorials on the net to do this. In this case all you need to do is create an HTML file to your liking and copy it to %AppData%\Microsoft\Signatures\ . Here is the sample html code you can save as a .html:
<html>
<head>
<p>John Smith</p>
<p>President</p>
<p>Acme Company</p>
<p>P. 555-1212</p>
<p>E. <a href="mailto:jsmtih@acme.com">jsmith@acme.com</a></p>
</head>
<body>
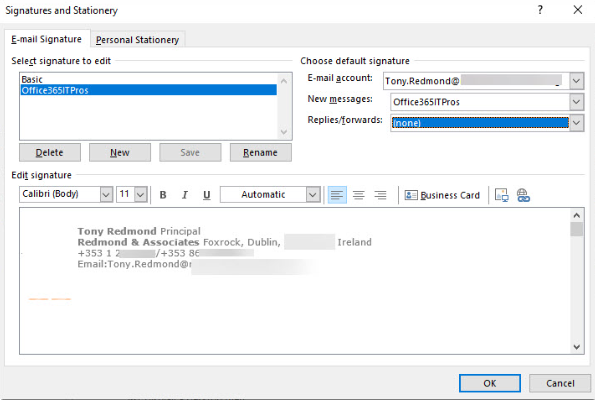
</html>The Result When You Automatically Add Signature to Outlook
Whether you programmatically add it through a script of manually ad the html file you will get this:
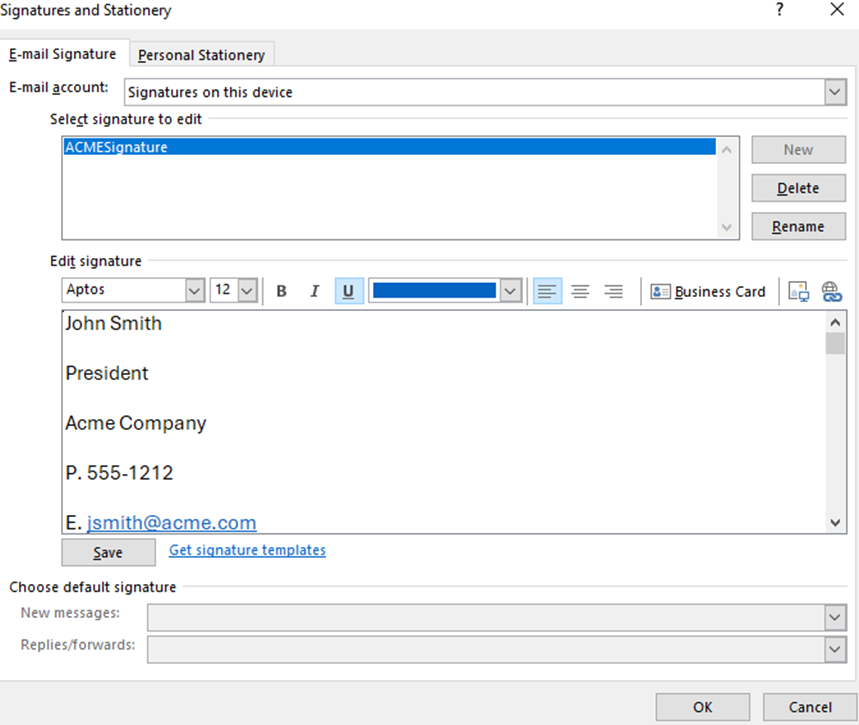
This is one of the many aspects in outlook you can automate. At least being able to Automatically Add Signature to Outlook can be easy.