
Clean Up Outlook Mail (2 Ways)

If you need to Clean Up Outlook Mail it can be very easy. You just need to do it right. In this article, I can show two ways or steps if you will that can make this process very easy. The thing is you need to do these steps in the correct order to make the most out of your clean up.
I originally wrote a smaller article on this before. But this one is more comprehensive. Let’s begin with the first step on how to Clean Up Outlook Mail…..
Step One – Clean Up Outlook Mail with Mailbox Clean Up
Using this step will be very helpful and prepare you for executing step two. More on that later.
Click File at the top left and then “Mailbox Clean Up”
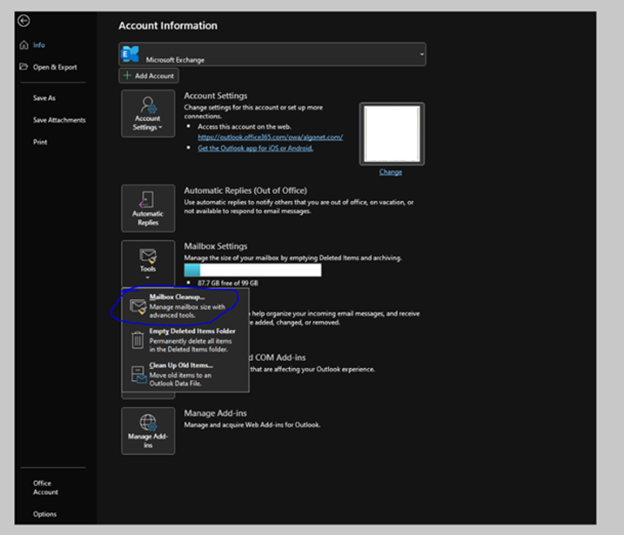
Mailbox Cleanup looks like this:

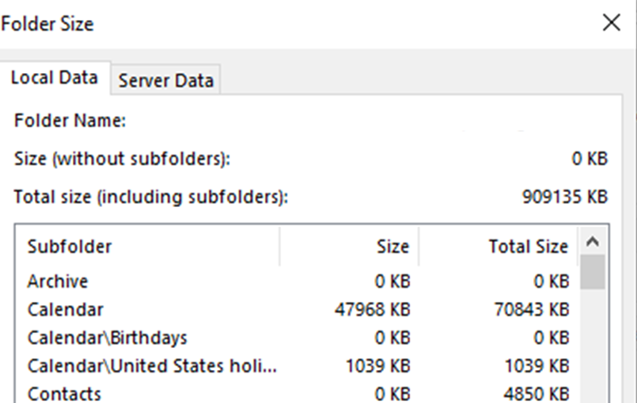
You can click “Mailbox Size”. It will show the folders in your email and give you a general idea of where items are stored.
You can look for “items older than” or “items Larger than” you can determine which items you can delete:

Once you have found what you are looking for you can highlight all the items in the result, right click, and choose “delete”:

Once you are done searching and deleting older items by date and / or size, you can empty your deleted items folder:

Now that you are done this you have (known or not) prepared for the next step…Auto-Archiving.
Step Two – Clean Up Outlook Mail with Auto-Archive
- Click File / Options / Advanced / Auto Archive Settings:
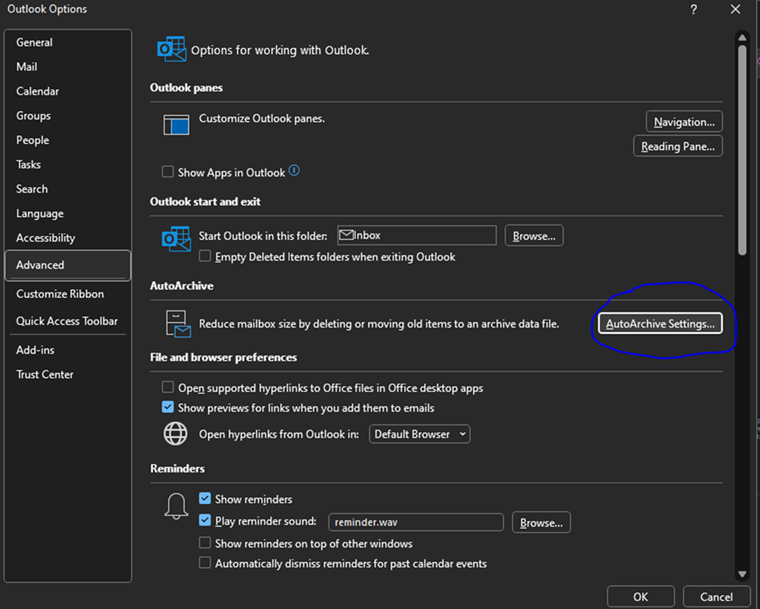
2. Once you have opened Auto-Archive Settings from options, you need to set them:
3. You will need to configure at least 4 settings. They are:
Enable Auto archive – You won’t be able to configure any other settings until you check this box.
Frequency – specify in Days how often you would like archive to run (in days).
Date to Start Auto Archive – When auto Archive runs it checks for items older than you specify and adds them to the archive. You can specify Months / Weeks / Days, or you can choose to permanently delete old items. I wouldn’t recommend this unless you are an advanced user and know how to work with .ost files.
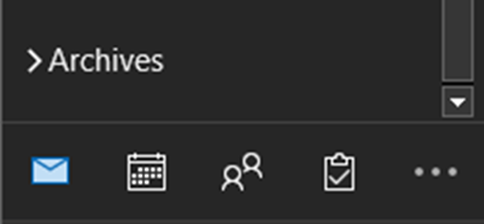
Once Auto-Archive runs once you will see it in your Outlook underneath your inbox as a searchable mail store:
Depending on the plan you have with Exchange Online, you will have limits to how much data you can store. Online it is between 50GB and 100GB (depending on how you are licensed). The Size of your Auto-Archive file can only be up to 1.5 TB. I would figure if you have that much mail you might be using your email account for more than just email storage. Maybe time to move some of that to OneDrive!
Active Teams Users in Phone Directory – 2 Steps
So, do you have users complain that when they dial for a name in your team’s main auto-attendant, they get more than Active Teams Users in Phone Directory? Maybe a user that hasn’t worked for years in the company and their name is still an option…. not really. I will explain why.
Why It Appears Like Active Teams Users in Phone Directory
I have written several articles on Teams Administration. This is just another stop on an otherwise long journey! You can do everything to rid the user of the system. You can block their sign-in, you can remove the team’s number, heck you can even take all their licenses away. But why are they still showing up in the Teams Phone Directory of your main Auto-Attendant? I will tell you why and how to remedy it in 2 steps.
Why is this happening?
Since M365 has several systems cobbled together over the years, not all aspects of information update automatically or are related to each other. MS Teams is a great example of this since it was really developed separate from the rest of M365 and shoe-horned in. I will show you later in the article how to use what is called a “dial – scope” in Teams Admin. Here are the Steps to fix this.
Create an Entra Group of Users You Want in the Directory
You can do this manually or through Dynamic Membership Rules to keep only Active Teams Users in Phone Directory. An example of a dynamic membership rule could be one based on licensing. Typically, when a user is offboarded by the organization the user is un-licensed from Teams. This would effectively remove them from the group and the directory:

But I am getting ahead of myself. On to the next step.
Create a Dial Scope for Active Teams Users in Phone Directory
I have a great article on how to set up an Auto-Attendant in Teams. This shows you how to set up an Auto-Attendant but there is a section called a Dial Scope. In this section it allows you to put a group into the dial scope. So, when the Auto-Attendant asks you to dial by name only those who are licensed for teams (and therefore active) can be searched. You can add a group to include in the search and if you want to fine tune a little bit, you can also have an “exclude” group:

Android Fully Managed Devices and Samsung Smart Sync in InTune
A challenge with Android Enterprise managed devices is the lack of ability to restore data from an old device to a new device. You want to use Android fully managed devices and Samsung Smart Sync. Other than that, there really isn’t anything else for back in the Android Enterprise. The Samsung Smart Switch is a great solution for personal devices so why not Intune enrolled devices?
It can be, but this only works out of the box for the Personally Owned Devices with Work and Corporate Owned Devices With Work Profile (the Samsung Smart Switch app is only supported in the personal profile) enrollments.
The Samsung Smart Switch app is not designed for enterprise environments and will be restricted by default.
It can be done with the more restrictive Corporate-owned Fully Managed User Devices but there are 2 steps involved. Thats what this post is about.
Android Fully Managed Devices and Samsung Smart Sync App Distribution
When looking at using the Samsung Smart Switch app on Android Enterprise fully managed devices, the app should be distributed by using Microsoft Intune. That will make sure that the backup and restore functionality will be available. The distribution of the Samsung Smart Switch app can be achieved by going through the seven steps below.
- Open the Microsoft Endpoint Manager admin center portal navigate to Apps > All apps > Android
- On the Android | Android apps blade, click Add to open the Select app type page
- On the Select “app type” page, select Managed Google Play app as App type and click Select
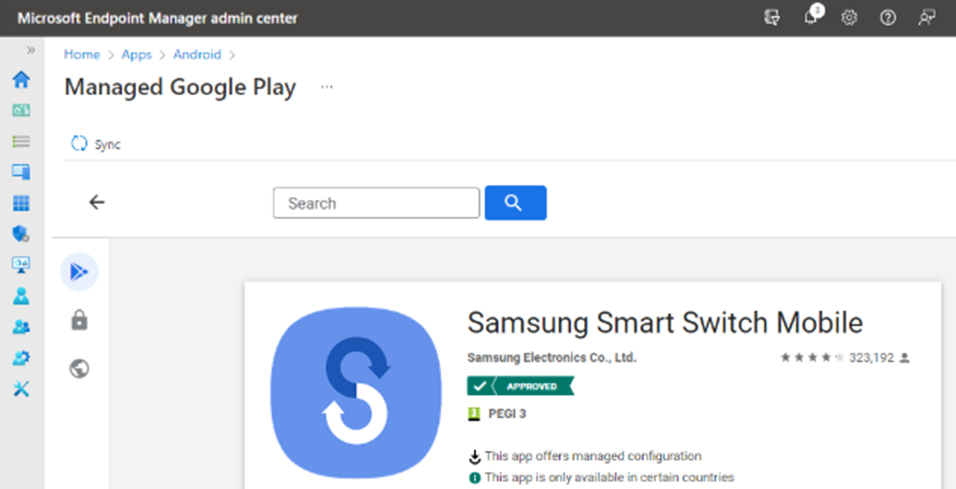
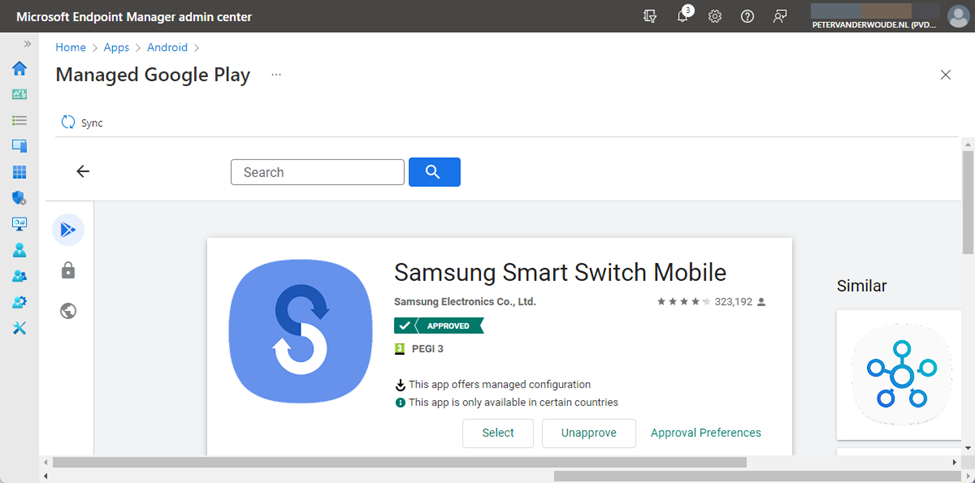
- On the Managed Google Play page, search for the Samsung Smart Switch Mobile app, select the app and click Approve
- On the Permissions dialog, click Approve
- On the Approval settings dialog, select Keep approved when app requests new permissions click Done
- Click Sync (as shown below in Figure 1) to synchronize the “approved app” to Microsoft Intune:
Configuration of the Samsung Smart Switch app
After distributing the Samsung Smart Switch app to Android Enterprise fully managed devices, the app must be configured by using Microsoft Intune. That configuration is the Allow SmartSwitch Run (allow_run) configuration key that can be enabled to make sure that the app can be used on Android Enterprise fully managed devices. The configuration of the Samsung Smart Switch app can be achieved by going through the seven steps below.
- Open the Microsoft Endpoint Manager admin center portal navigate to Apps > App configuration profiles
- On the Apps | App configuration policies blade, click Add > Managed devices
- On the Basics page, provide the following information and click Next
- Name: Provide a valid name for the app configuration policy
- Description: (Optional) Provide a valid name for the app configuration policy
- Device enrollment type: (Grayed out) Managed devices
- Platform: Select Android Enterprise
- Profile Type: Select All Profile Types, Fully Managed, Dedicated, and Corporate-Owned Work Profile Only or Personally Owned Work Profile Only depending on the devices that should get this policy assigned
- Targeted app: Select Samsung Smart Switch Mobile
- On the Settings page, provide at least the following information (as shown below in Figure 2) and click Next:
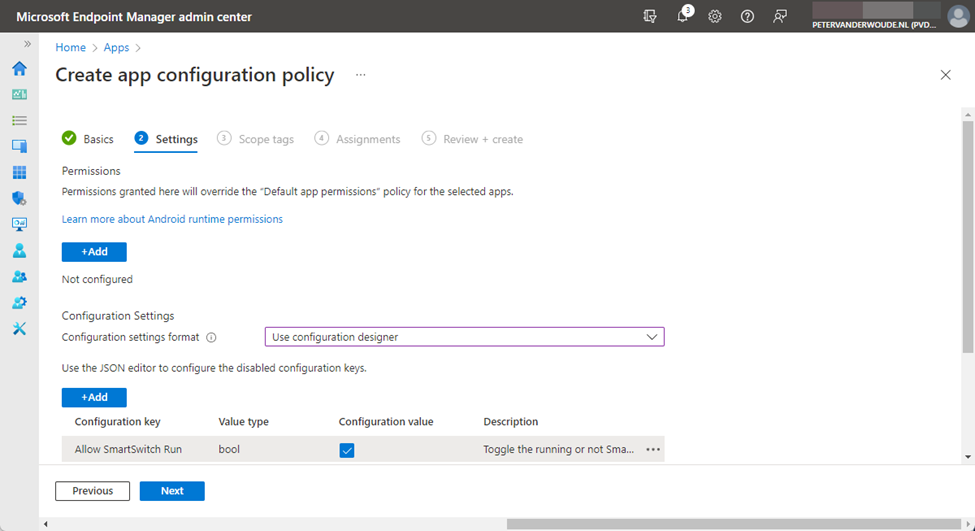
- Configuration Settings format: Select Use configuration designer
- Click Add to add the Allow SmartSwitch Run configuration key and check the box with the configuration value
- On the Scope tags page, configure the applicable scope tags and click Next
- On the Assignments page, configure the assignment by selecting the applicable group and click Next
- On the Review + create page, review the configuration and click Create
User experience with the Samsung Smart Switch app
When Android fully managed devices and Samsung Smart Sync are used together, the user experience can be simply verified by opening the app. When the configuration was not successfully applied, the message Security policy restricts use of Smart Switch will show as shown below in Figure 3, and when the configuration was successfully applied, the app will open as shown below in Figure 4. Before the user gets to that screen, many permissions must be approved to make sure that the data can be restored. After that the user can choose how to transfer data to the device. Simply walk through the app and select the device that is sending the data, or connect the device to PC
More information on Android fully managed devices and Samsung Smart Sync
For more information about Samsung Smart Switch and the configuration, refer to the following docs.