
We have all been there. You have told your users the best way to get support is to email the helpdesk, but they insist on sending a message directly to you on Microsoft Teams. This post shows you how to Get Chat Transcripts with Power Automate.
I showed you in an earlier post how to set up an auto-reply with power automate when a user sends a Microsoft Teams message to an unmonitored Help Desk client.
Why Use Get Chat Transcripts with Power Automate?
Without automation, you end up cutting and pasting an awkward trail of messages from your teams account to your Helpdesk software or an email. With the mismatched formatting between the two systems. You will be spending more time formatting the request than working on it.
How to Create the Power Automate Flow
- Go to https://make.powerautomate.com/ and sign in.
- On the left-hand side click “+Create”
- Choose Instant Cloud flow.
- Give your flow a name and select “Manually Trigger a flow”.
- Click Create.
- You will be presented flow design screen.
I prefer the classic design screen, but you are more than welcome to keep the new designer toggle on. For this post I will be using the classic designer.
I will show you the complete flow first and then I will break it down as best I can.
The Entire Flow
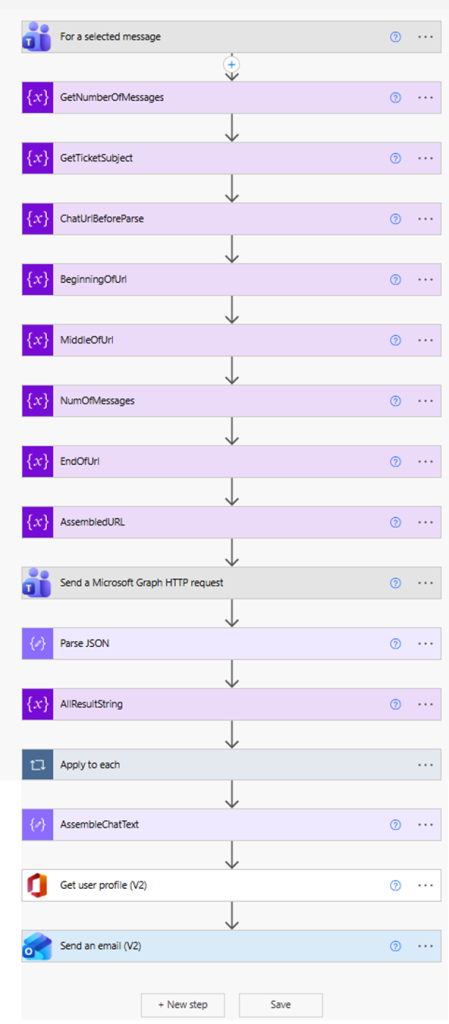
Yes, it seems like a long flow to do a simple task. Just because it seems simple doesn’t mean it is. It is just the way Power Automate rolls! Let me show you…..
Get Chat Transcripts with Power Automate Broken Down
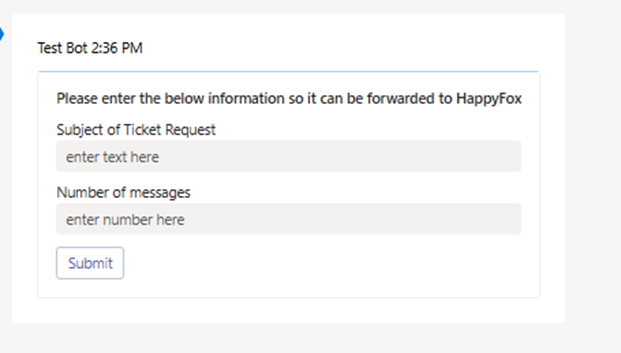
This very first step already does a lot. First, you add “for selected messages” and then edit its adaptive card:

We are going to collect some input to help extract as much information as possible from the chat transcript. It is a very simple adaptive card. All we want to know is what subject we want to give to this chat transcript (usually a description of what the issue is) and how many chat messages you want to include total (including the selected chat message).
Now, you need to load the input collected into variables to be used by the flow:

The variables you created from the adaptive cards are now part of the flows dynamic content and can be loaded into other parts of the flow. Once the variables are loaded, the next step is to get the URL of 1:1 chat. This is where the fun begins. I will show the screen shot and then explain each step:
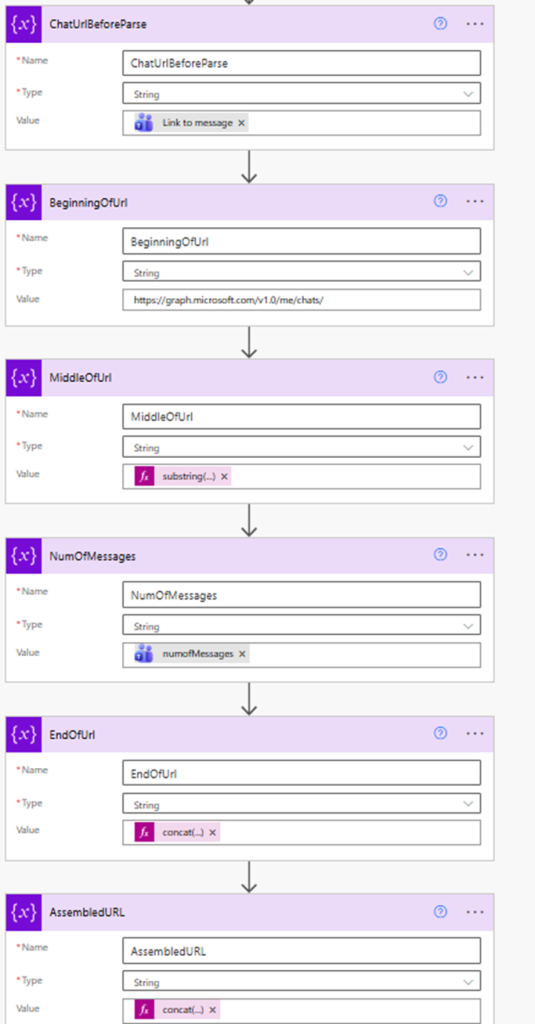
The following are all variables that use the “initialize variable” step.
ChatUrlBeforeParse – This the URL link of the team’s message. If you right-click on any message in your chats and choose “copy link”, you will get this link. The first step “for a selected message” has the dynamic content of “Message Link” which we will use to get the entire message link. We will parse it out to get the information we need to create the rest of the flow.
BeginningOfUrl – This is a static variable. All 1:1 chat links begin with https://graph.microsoft.com/v1.0/me/chats/
MiddleOfUrl – When we initialize this variable, we don’t use dynamic content but an expression (substring(variables(‘ChatUrlBeforeParse’),38,91)). This effectively gets the ChatID of the message we want get the transcript from. This is the part of the URL from “19:” to “@unq.gbl.spaces”
NumOfMessage – This is a variable that is needed to build the finished URL and it is the variable form the Adaptive card about loaded into a variable that can be used by final step “AssembeldUrl” which we will talk about soon.
EndOfUrl – When we initialize this variable, we don’t use dynamic content but an expression (concat(‘/messages?$top=’, variables(‘NumOfMessages’)), this finished the parts of the URL we need to extract the transcript.
AssembledUrl – When we initialize this variable, we don’t use dynamic content but an expression (concat(variables(‘BeginningOfUrl’), variables(‘MiddleOfUrl’), variables(‘EndOfUrl’)). The URL we need is finally put together and is ready for our next step.
Send a Microsoft Graph HTTP request
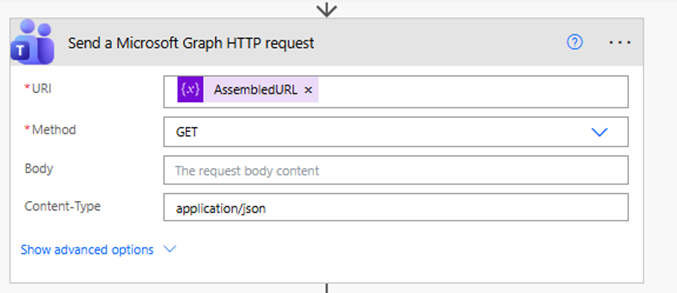
In this step, you add “send a Microsoft Graph HTTP request” as a step and us the variable “AssembledURL” as the value for you URI
Parse JSON to Get Chat Transcripts with Power Automate
Add the “Parse JSON” step next:
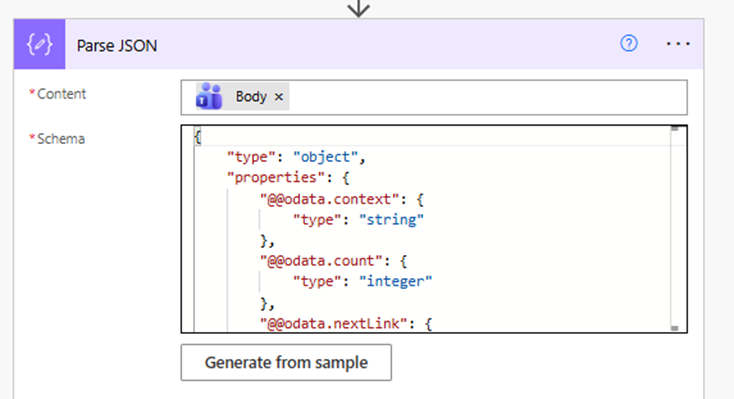
The dynamic content “Body” will be available for you to put into the content field. For the Schema click generate from sample and use this text as a sample schema:
{
    "type": "object",
    "properties": {
        "@@odata.context": {
            "type": "string"
        },
        "@@odata.count": {
            "type": "integer"
        },
        "@@odata.nextLink": {
            "type": "string"
        },
        "@@microsoft.graph.tips": {
            "type": "string"
        },
        "value": {
            "type": "array",
            "items": {
                "type": "object",
                "properties": {
                    "id": {
                        "type": "string"
                    },
                    "replyToId": {},
                    "etag": {
                        "type": "string"
                    },
                    "messageType": {
                        "type": "string"
                    },
                    "createdDateTime": {
                        "type": "string"
                    },
                    "lastModifiedDateTime": {
                        "type": "string"
                    },
                    "lastEditedDateTime": {},
                    "deletedDateTime": {},
                    "subject": {},
                    "summary": {},
                    "chatId": {
                        "type": "string"
                    },
                    "importance": {
                        "type": "string"
                    },
                    "locale": {
                        "type": "string"
                    },
                    "webUrl": {},
                    "channelIdentity": {},
                    "policyViolation": {},
                    "eventDetail": {},
                    "from": {
                        "type": "object",
                        "properties": {
                            "application": {},
                            "device": {},
                            "user": {
                                "type": "object",
                                "properties": {
                                    "@@odata.type": {
                                        "type": "string"
                                    },
                                    "id": {
                                        "type": "string"
                                    },
                                    "displayName": {
                                        "type": "string"
                                    },
                                    "userIdentityType": {
                                        "type": "string"
                                    },
                                    "tenantId": {
                                        "type": "string"
                                    }
                                }
                            }
                        }
                    },
                    "body": {
                        "type": "object",
                        "properties": {
                            "contentType": {
                                "type": "string"
                            },
                            "content": {
                                "type": "string"
                            }
                        }
                    },
                    "attachments": {
                        "type": "array"
                    },
                    "mentions": {
                        "type": "array"
                    },
                    "reactions": {
                        "type": "array"
                    }
                },
                "required": [
                    "id",
                    "replyToId",
                    "etag",
                    "messageType",
                    "createdDateTime",
                    "lastModifiedDateTime",
                    "lastEditedDateTime",
                    "deletedDateTime",
                    "subject",
                    "summary",
                    "chatId",
                    "importance",
                    "locale",
                    "webUrl",
                    "channelIdentity",
                    "policyViolation",
                    "eventDetail",
                    "from",
                    "body",
                    "attachments",
                    "mentions",
                    "reactions"
                ]
            }
        }
    }
}
Load Array into String
If you want to Get Chat Transcripts with Power Automate you will need to get the array data created by the parse JSON step and load it into a text variable that you can use to send as part of an email.
To do that we need to first initialize a variable outside of an “apply to each” step:
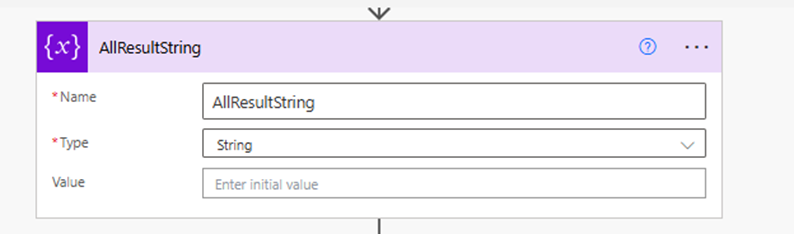
What the “Apply to each” step does is iterate through each item in the “value” of the JSON array (the entire JSON of the chat we specified from our Team Graph HTTP request) and grabs each “content” value and concatenates to our “AllResultString” variable. We are in the home stretch!
Preparing to Send the Email
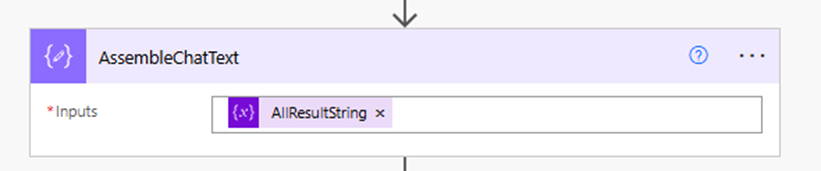
On the other side of the “Apply to each step”, we have the completed variable load AllResultString in a Variable called AssembleChatText (We will need this to put in the email we are going to send:
The next steps get the users profile and mimic a forwarded email:
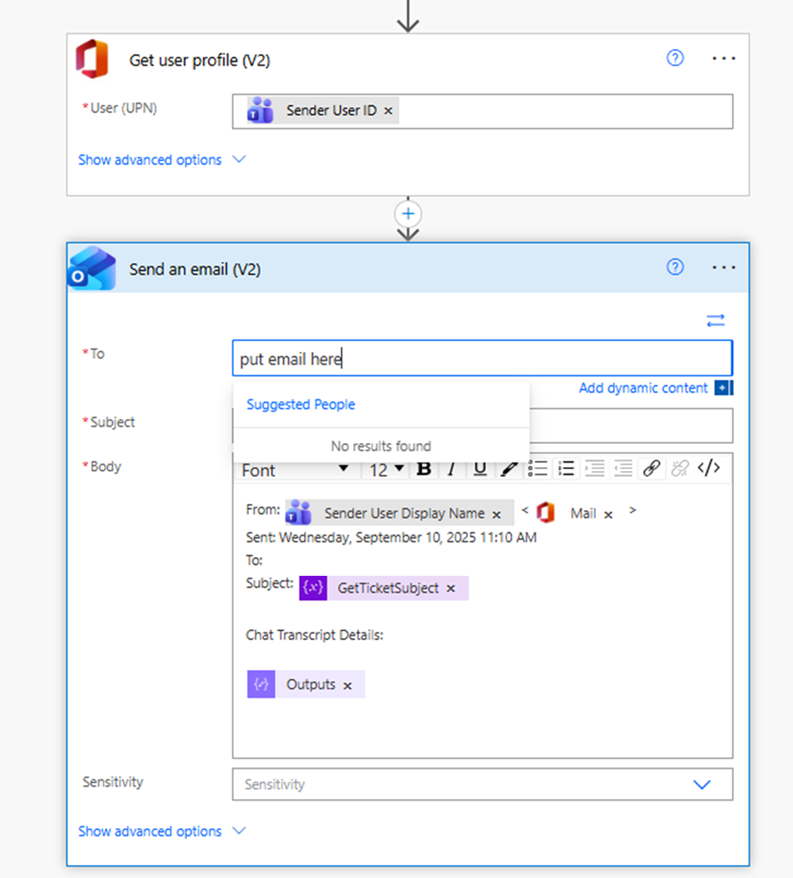
It uses the following:
To – email you specify (normally someone in your organization)
From – the user who’s chat selection you will choose).
Subject – The Subject you specified from the adaptive card at the beginning of the flow.
Chat Transcript Details – The outputs for the AssembledChatText variable
How it Works – Get Chat Transcripts with Power Automate
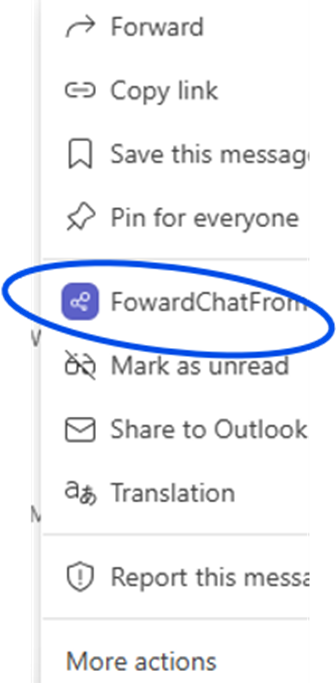
Now that you have the flow built, let’s see Get Chat Transcript with Power Automate in action. Go to the most recent chat exchange you have had with someone. Click the three dots (you might need to click “More actions) and choose your flow:
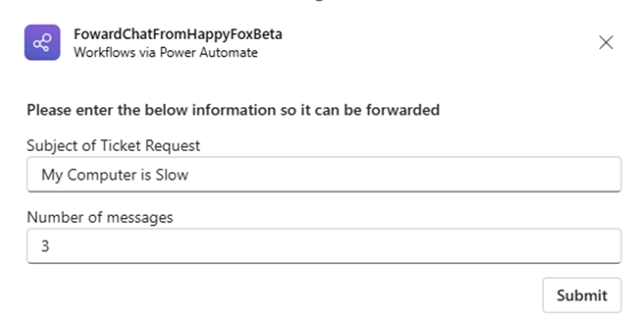
The adaptive card will show and gather the necessary information to build the graph command for the chat transcript and the subject you would like for the email forward.
An email will be sent to the address you specify in the flow with the number of chats you have specified.
How it Works
- You select first chat (from the user who initiated the request, NOT YOU) and then select “more actions” and launch the flow.
- The adaptive card shows.
- You enter the Subject for the request.
- You enter the number of messages you want. This includes the initial chat message you chose.
- Click submit.
- An email is sent to the email you specified in the flow with the chat transcript details.
Limitations of the Flow
You need to remember that Power Automate is a low code / no code solution to work process automation. Please do not expect it to be as robust as a custom coded solution using lower-level languages.
It only works if you send the most recent 1:1 chat exchange. It uses the MS Teams Graph query (?$top=X) to grab the number of chats you want from the most recent exchange. So, if you want to grab an exchange from before that it won’t work.
What will happen is if you pick a chat from say a day ago and want to extract the last three exchanges you will get the last three most recent exchanges from your 1:1 chat with this user. It won’t make sense.
This flow is for a specific use case. You have a recent chat exchange with a user and want to capture the transcript to email. That’s it.
Also, you can’t cherry pick messages in the chat. For example, you want to send a chat on email that has 7 messages in it, but you only want messages 1,3,5 and 7. It won’t do that. The best it could do is leave out X number of chats near the end of the exchange. So instead of specifying 7 messages in the adaptive card, you could specify 5, leaving out the last two if you did not want them in the email.
Conclusion of Get Chat Transcripts with Power Automate
So, you finally see how you can Get Chat Transcripts with Power Automate. Is it worth it? Of course it is. It always takes time to develop automation. Once it is in use you and your department will wonder how you got on without it! Power Automate is a Microsoft product that actually makes sense. Their ecosystem is getting very complicated and this helps out!
Dan
I am an Senior IT professional with over twenty five years experience in the field. I have supported thousands of users over the years. The organizations I have worked for range in size from one person to thousands of people. I have performed support from Help Desk, Network / Cloud Administration, Network Support, Application Support, Implementation and Security.