
Prevent Users From Changing Photos in Microsoft 365
So you will want to Prevent users from changing photos in Microsoft 365. Users, out of the box, can update their profile pictures in M365. You would think this is a good idea. For small organizations, it probably is. However, if you are a larger organization trying to maintain a professional presence, it might be problematic.
Why prevent users from changing photos in Microsoft 365?
When a user changes photos in M365, it updates several places in the M365 eco-system (Exchange, Teams, My Profile, Entra, etc.).
As I mentioned before, the main reason for preventing users from changing photos in Microsoft 365 is to ensure a professional presence. If they are allowed to update the profile picture, you can get any number of possibilities for profile picture representation (some good, some, not so good….). It could give your company a bad name if a less then tasteful photo shows up in a user’s profile photo (i.e. said employee riding a chicken LOL). That’s why making sure you restrict profile photo management in Microsoft 365 is very important for your organization.
Where can a user change their photo?
There are two main places where a user changes photos in Microsoft 365 (their profile photo). First, on the My Account page. Secondly, a profile photo can be changed by going to the following web link (https://outlook.office.com/mail/changephoto). This option used to be a “back door” to updating a profile photo but the method I am about to show you circumvents this.
It will take awhile for M365 to update, however, going forward users will NOT be able to change their photo.
How to prevent users from changing their photos in Microsoft 365 (All Non-Admin)
Mind you, not all users will be prevented from updating profile photos. In this example it is limited to a role a user has. Basically, admins will be able to (as they should) and not regular users. This should be best in most cases. You need to modify photo update settings using Microsoft Graph.
Follow the steps below to modify these settings in your organization. In our example, the only user roles allowed to change user photos will be People Administrator, User Administrator, and Global Administrator.
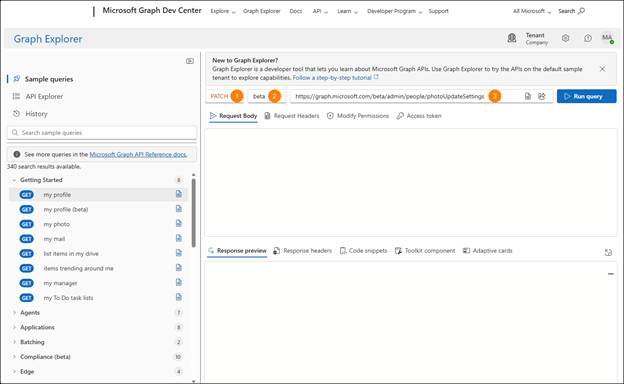
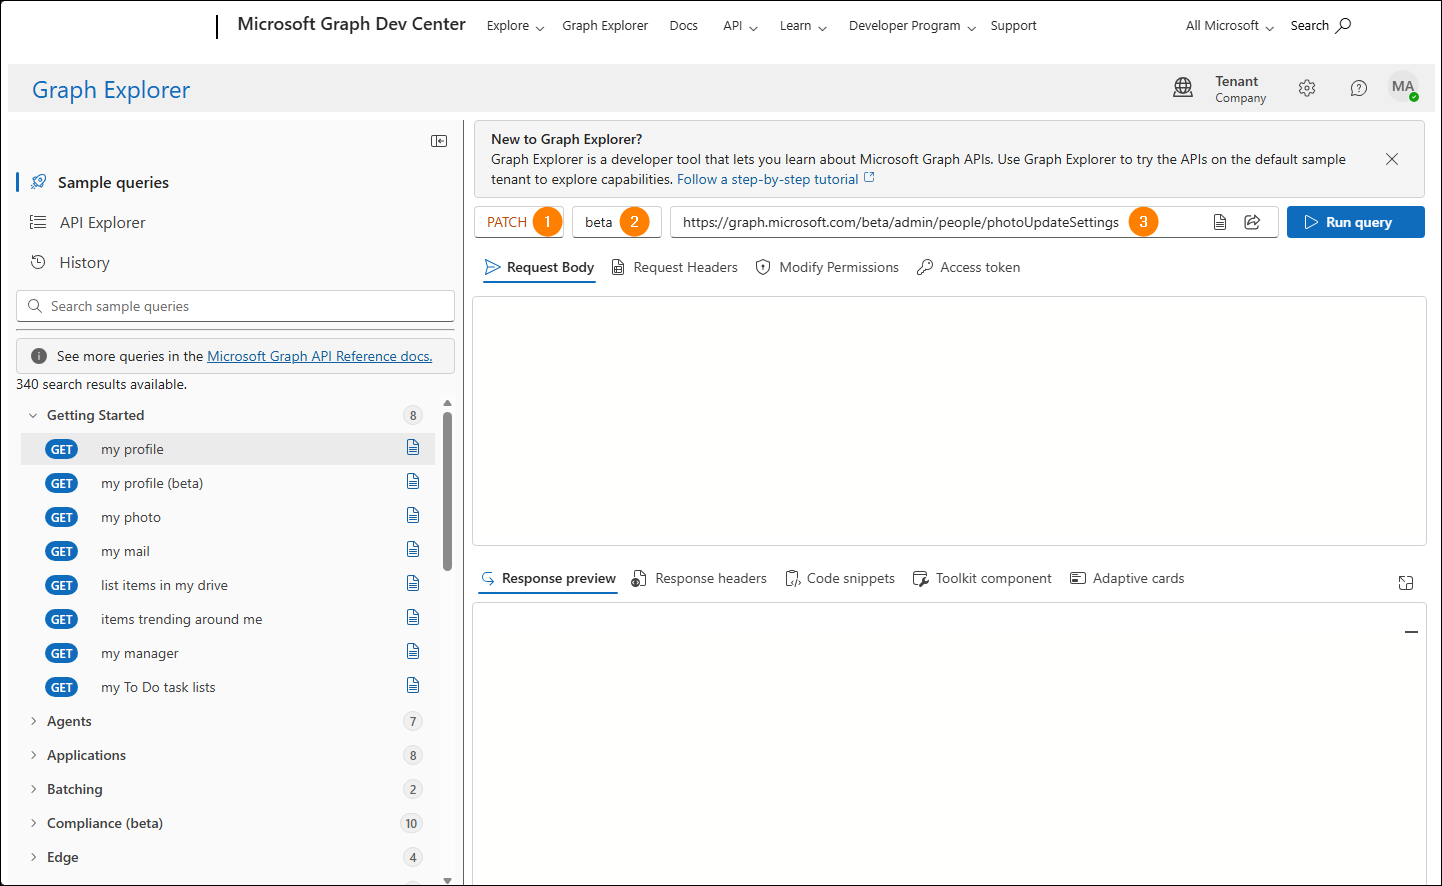
- Go to Graph Explorer, select the Sign in button in the top-right corner, and sign in using an account with the People Administrator or Global Administrator role. If you’re signing in for the first time, you’ll also be asked to accept requested permission.
- Specify query parameters:
- In the HTTP request method drop-down, select PATCH.
- In the Microsoft Graph API Version drop-down, select beta.
- In the query URL bar, enter https://graph.microsoft.com/beta/admin/people/photoUpdateSettings.
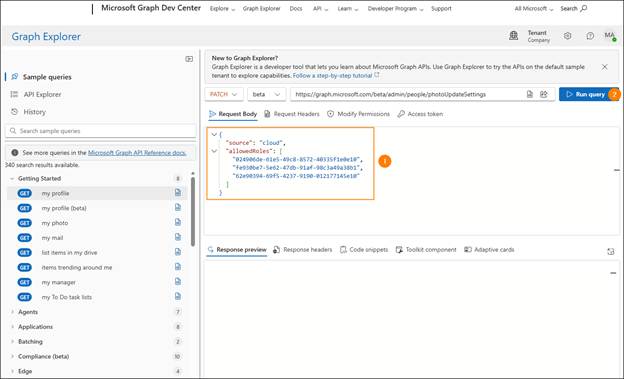
- In the text field on the Request Body tab, paste the following code:
{
“source”: “cloud”,
“allowedRoles”: [
“024906de-61e5-49c8-8572-40335f1e0e10”,
“fe930be7-5e62-47db-91af-98c3a49a38b1”,
“62e90394-69f5-4237-9190-012177145e10”
]
}
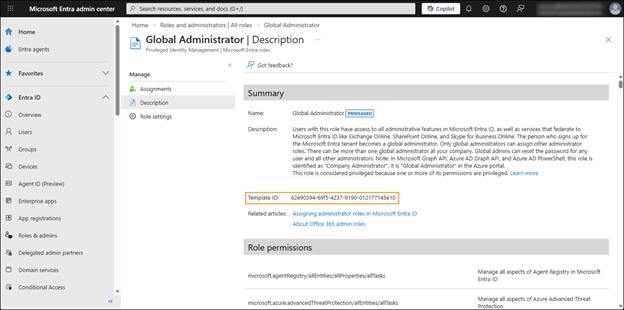
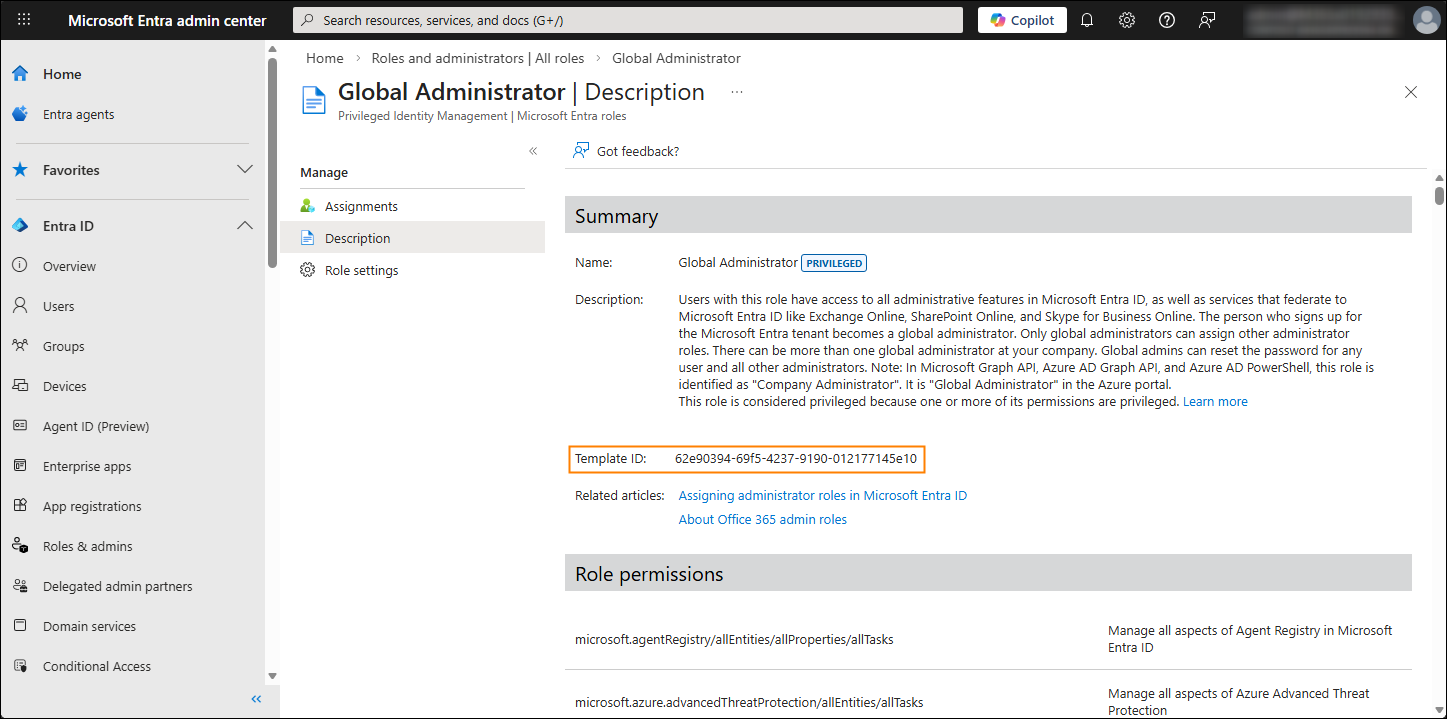
Note: In this example, the IDs in the allowedRoles array are predefined template IDs from Microsoft Entra ID that represent the People Administrator, User Administrator, and Global Administrator user roles, respectively. If you want, you can include other roles in this array by getting the template ID’s.
To do this, go to the Microsoft Entra admin center > Roles & admins. To get a role’s template ID, select it on the list and go to the Description tab (the ID will be displayed in the Template ID field included in the Summary section). I would stick to the three default roles in the example first to make sure it works. Besides, you really do need that many roles. These three should do.
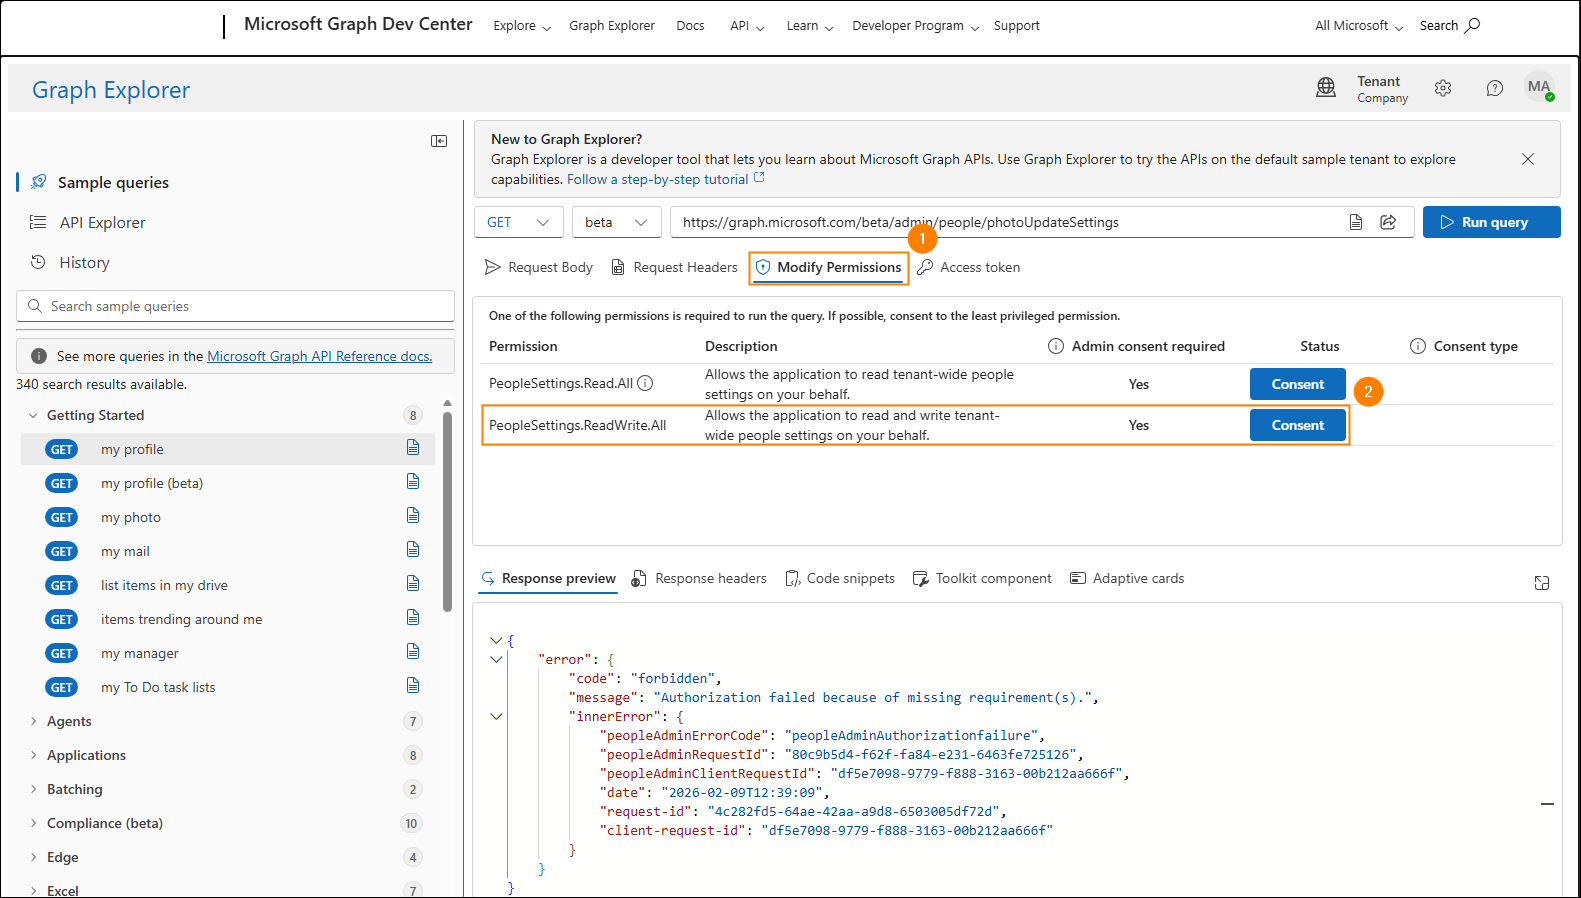
- Click Run query.
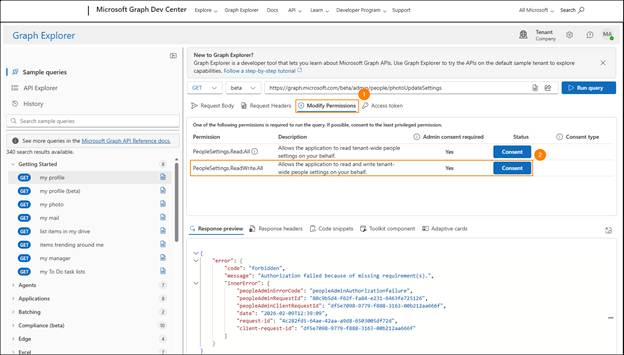
If you get a 403 error, it likely means you don’t have the required permissions. To remedy this, switch to the Modify “Permissions” tab, click “Consent”for the “PeopleSettings.ReadWrite.All”permission, and accept the requested permission. Next, run the query again.
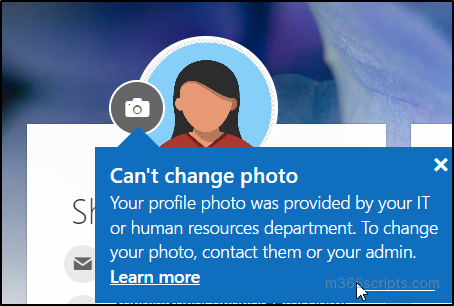
Once the changes update across your organization, only the users with the specified admin roles will be able to change their profile photos in Microsoft 365. When a user tries to change their profile photo, they will see a relevant message without being able to edit their photo in any way.
Since users can no longer edit their picture, you can manage user photos without worrying that someone will overwrite them.
You can do a lot more with Microsoft Graph and changing photos is one of them!
What if you Want to Revert Changing Photos in Microsoft 365
Maybe you had a change of heart, or maybe you don’t care anymore what users do to their profile picture (LOL)…. If you want to revert these settings and allow all users to change their photos, simply complete steps 1–4 again but remove the role IDs from the allowedRoles array in step 3. The code should then look like this:
{
“source”: “cloud”,
“allowedRoles”: []
}
When you run this query and the changes update, your users will again be able to modify their profile photos.
Importing a PST to another Users In-Place Archive

Getting the Disabled Users PST
Importing a PST to another Users In-Place Archive can be done in many ways. One, you can get a PST Exported from the disabled users Desktop Outlook Client through exporting.
You could also use the eDiscovery Export Tool if you have access to Microsoft Purview at least the eDiscovery Manager Role.
Another way is to use various 3rd party cloud service that back’s up user email and download as a PST (DRUVA, Rubrik and Cohesity come to mind).
The main goal is to get the disabled users email as a PST and then upload it to the users In-Place Archive. I have chosen the In-place Archive instead of their regular mail store for two reasons:
- It gives a logical separation of the disabled users Archive and…
- It does not count toward their mail quota in the main mail store. There are going to be using the archive eventually….
Prerequisites for Importing a PST to another Users In-Place Archive
They are as follows:
- You will need to have In-Place Archive set for the user.
- You need to have the role of Compliance Manager to import into Purview.
Importing a PST to another Users In-Place Archive
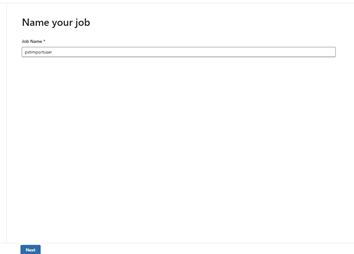
Step 1: Prepare for Upload
- Go to https://purview.microsoft.com/datalifecyclemanagement/
- Click on new import job and name the job. It can only be 2-26 characters, and no space. Click next.:
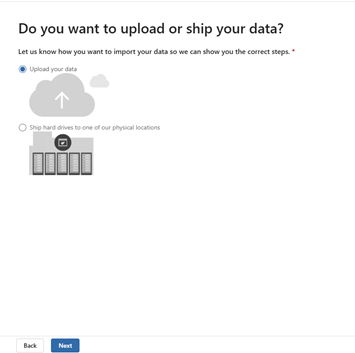
- Choose Upload Data and then Next:
Step 2: Get the SAS URL and Download AZCopy
- On the next Window, click on “Show network upload SAS URL” and copy to notepad.
- Download a Windows 64bit version of AZCopy and make sure it is in the same folder as the .pst files.
- Take note of the file location of the PST Files on your local computer and copy this path into notepad alongside the site of the URL you copied in step 4.
Step 3: Upload PST Files to Azure Storage
Now that you have the SAS URL and AZCopy installed, it’s time to start the actual upload and start Importing a PST to another Users In-Place Archive. This step involves transferring your PST files to a temporary storage location in Azure, from where they will be imported into the archive mailbox.
- Open a command prompt (or terminal if you’re using macOS or Linux).
- Use the following command to upload the PST files:
azcopy copy “C:\path\to\your\pstfiles\*.*” “SAS_URL”
*** get the file path and SAS URL from your notepad ***
Replace “C:\path\to\your\pstfiles” with the actual path where your PST files are stored.
3. Monitor the upload process. Depending on the size of the files, this may take some time. The upload progress will be displayed in your terminal window.
Step 4: Create the PST Import Mapping File
Once your PST files are uploaded to Azure, the next step is to create a PST import mapping file. This file tells Microsoft 365 where each PST file should go in the archive mailbox.
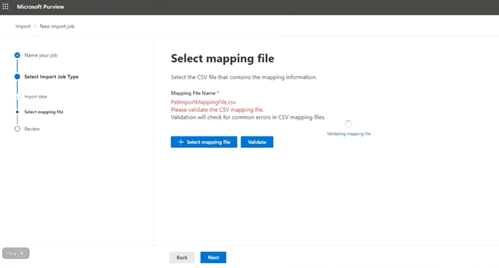
- In the compliance portal, click Create a PST import mapping file. A sample is shown here:

This file shows one line, but you may have past that is chunked in 5GB increments. They will need their own line so you will have to copy to create more lines in the file. Just change the columns. you now are well on youtr way to Importing a PST to another Users In-Place Archive.
Workload – this will always be “Exchange”
Name – this is where you list the exact name of the PST file. If you need to rename the downloaded .pst file(s) to make it simpler, do that.
Mailbox – I use the UPN of the user. You could probably also use the email address. Sometimes they are one in the same!
IsArchive – Set this to “TRUE”. If you don’t it will put the PST into their regular mail store increasing its size significantly. This will be a problem if you DO NOT have in-place Archive set up and it goes over the limit (Exchange Plan1 50GB, Exchange Plan 2 or E5 100 GB).
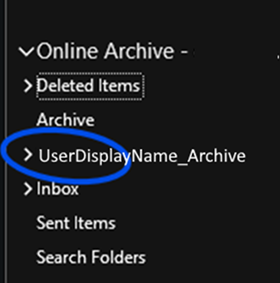
Target Root Folder – Ensure that you specify a folder name in “Target Root Folder” that is descriptive in the Drive mapping CSV i.e. (UserDisplayName_Archive). It will load the PST content into that Folder in the In-Place Archive. It makes it easier to distinguish between the users’ own in-place Archive and other users Archives if they have more than one etc.
- This step will require you to specify the user’s mailboxes and archive mailboxes that correspond to the PST files you’ve uploaded. You’ll be asked to input details like email addresses and the locations where the PST files should be imported.
- After creating the mapping file, download it and review it for accuracy. This file must be uploaded back to the portal during the import job setup. Here is what it looks like to add and validate the mapping file:
Step 5: Create a PST Import Job
With everything in place—your PST files uploaded and the import mapping file ready—it’s time to set up the actual import job.
- In the compliance portal, click new import job.
- Follow the prompts to upload your import mapping file and select the appropriate PST files.
- Review the settings, and once everything looks good, click Start import.
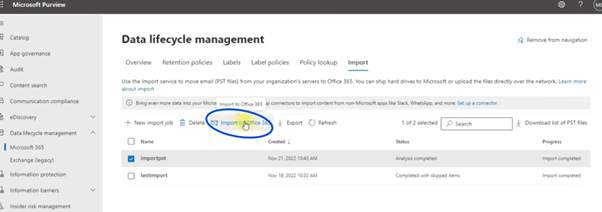
- After the PST file has been analyzed, the import will begin using the values from the mapping file when you click “Import to Office 365”. It will take several hours for larger PST files.
At this point, the PST import job will be queued, and Microsoft 365 will begin importing the data into the archive mailboxes as per your mapping file. You will be asked if you want to filter out some data before the import. I would touch base with the user to see how much data they want as it could significantly shorten the import process:
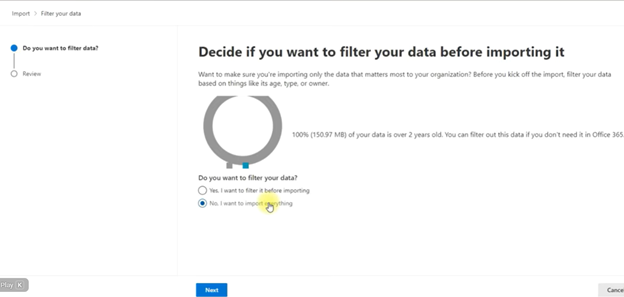
If you choose yes, you can specify how many years you would like to include in the import. If you say no, it will import everything. Choosing 3-5 years instead will significantly reduce the file size of the imports in most cases.
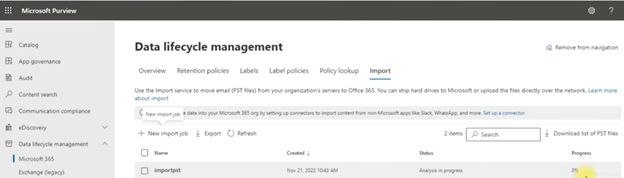
Step 6: Monitor the Import Job
Once the job starts, it’s important to monitor the import process to ensure everything goes smoothly. In the compliance portal, you can check the status of your job by clicking on the Import section. Here, you’ll see whether the job is running, completed, or if there are any issues during the process:
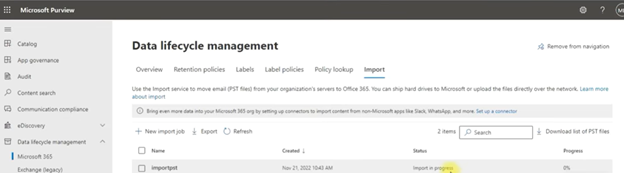
After the job finishes, the imported PST files will appear in the specified archive mailbox. You can review the results in the portal to ensure the imports are successful.
The user will see the following in their in-place archive:
Here is a link to a YouTube video that outlines the entire process: (https://www.youtube.com/watch?v=J60dhhWG3_c&t=334s)
You now have been able to get god at Importing a PST to another Users In-Place Archive. However, this article outlines it in more depth!
Using Your Samsung Galaxy Tablet as a Second Screen
So you are travelling with your laptop but your are accustom to using two screens (you do work in an office occasionally LOL). Lucky for you you have an accompanying tablet. You want to use your Galaxy Tablet as a Second Screen. With a few easy steps you can!
I originally started looking at his this issue with a slightly different view using a third party software package that look pretty straight forward to use (https://youtu.be/JLNw2Xg8T40?si=dExRSGO2G_jC2Tiw) but after viewing the video and setting it up, it looked a bit cumbersome for an everyday user. So I sought a better way. Well this articles lays it out for you.
How to use your Galaxy Tablet as a Second Screen
There is one caveat…..Both the Laptop and Tablet must be on the same Wi-Fi network for this to work.
- On your laptop, go to https://apps.microsoft.com/ and search for “Second Screen”

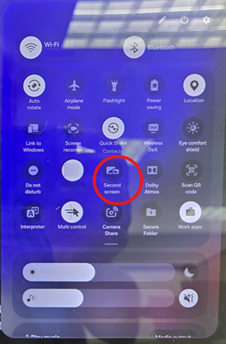
- Once the app is installed, go to your Samsung Galaxy tablet and swipe down from the top right of the tablet while in portrait mode and tap second screen mode. You may have to swipe down a second time from the middle right to expose the second screen icon:
- Go back to the laptop and launch the second screen app . You can type “second screen” from the search box and it will find it.
- With second screen mode already enabled on the tablet you should see it list in the app screen running on the laptop:
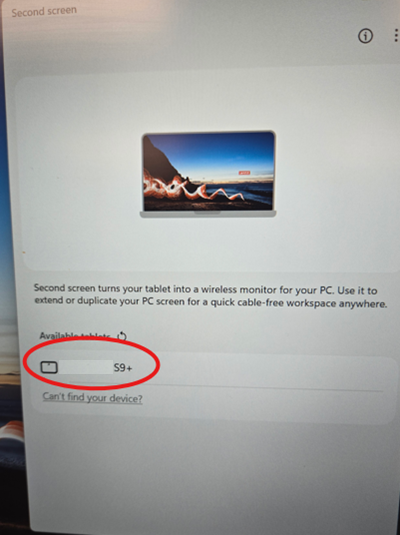
- Tap your listed tablet and it will connect as a second monitor to your laptop:
Display and use Tips for Galaxy Tablet as a Second Screen
To be able to use a second screen properly – your Galaxy Tablet as a Second Screen -(these are my suggestions):
Extend Display
- Right click on the laptop desktop and choose “Display Settings”:
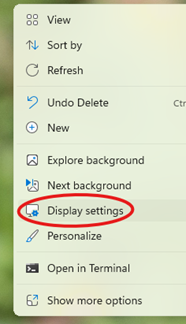
- In Display Settings, choose “Extend These Displays” from the dropdown menu:

- Select Keep Changes when it asks you.
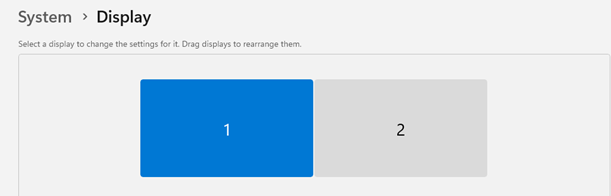
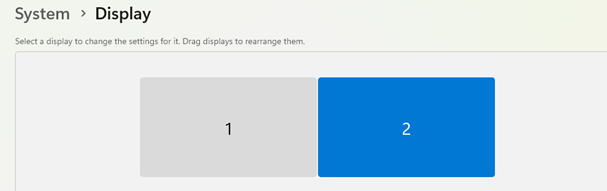
Making Sure Each Monitor has the Same Scale
- With the monitors now separate, click on each one and scroll down to the scale and input section and make sure they are set to the identical scale (start with 150% for both). Whatever you choose, the scale MUST BE THE SAME for each monitor:


You are all set up for your Galaxy Tablet as a Second Screen! This is better than troubleshooting a laptop dock!
Use MS Graph to Create a User Signature

You can use MS Graph to create a user signature. I had written an article about how to deal with signatures in various versions of Outlook . These are fine if you are a small organization. If you are a large organization, you can use Code Two or Exclaimer to do the job. But what if your are in between? This article will show you how to generate a signature using MSGraph and deploy it to a user with ease. Read on!
Steps in Using MS Graph to Create a User Signature
I had originally wrote an article on how to do this using VBSrcipt, however, this will be phased out with later versions of Windows and Windows server. It has served its purpose. Also, it is a little Phishy now (LOL).
Make sure you have permissions to have the scope “User.Read.All” is MS Graph and you can at least administer Entra and you are ready to start.
First, you will need to connect to Microsoft Graph:
Connect-MgGraph -Scopes "User.Read.All"Then, you need to load the data you get from Entra to create the signature into variables. I have included First Name, Last Name, Job Title, Business Phone, Mobile Phone and Email.
$user = Get-MgUser -UserId "user@company.com" -Property givenName,surname,JobTitle,BusinessPhones,MobilePhone
$firstName = $user.givenName
$lastName = $user.surname
$jobTitle = $user.JobTitle
$businessPhone = $user.BusinessPhones[0]
$mobilePhone = $user.MobilePhone
$email = $user.email
Additionally, you need to load an html document into a variable like this:
$htmlContent = @"
<html>
<body>
<p>$FirstName $LastName</p>
<p>$JobTitle</p>
<p>$BusinessPhone</p>
<p>$MobilePhone</p>
<p>$email</p>
</body>
</html>
"@
Lastly, You create an HTML file with the above information:
Set-Content -Path "C:\Your\Path\Here\Signature.html" -Value $htmlContentIt is easy to use MS Graph to Create User a Signature. The HTML format can be a simple or as complex as you like. I personally like to use an HTML file editing Program to crate the design of the HTML that I like and then put the variables above into it and then paste it into the $htmlcontent variable.
You then can forward this file to your user in question and have them copy and paste it into there Outlook Signature. I find this a good in between when you use MS Graph to Create a User Signature!
Get Chat Transcripts with Power Automate

We have all been there. You have told your users the best way to get support is to email the helpdesk, but they insist on sending a message directly to you on Microsoft Teams. This post shows you how to Get Chat Transcripts with Power Automate.
I showed you in an earlier post how to set up an auto-reply with power automate when a user sends a Microsoft Teams message to an unmonitored Help Desk client.
Why Use Get Chat Transcripts with Power Automate?
Without automation, you end up cutting and pasting an awkward trail of messages from your teams account to your Helpdesk software or an email. With the mismatched formatting between the two systems. You will be spending more time formatting the request than working on it.
How to Create the Power Automate Flow
- Go to https://make.powerautomate.com/ and sign in.
- On the left-hand side click “+Create”
- Choose Instant Cloud flow.
- Give your flow a name and select “Manually Trigger a flow”.
- Click Create.
- You will be presented flow design screen.
I prefer the classic design screen, but you are more than welcome to keep the new designer toggle on. For this post I will be using the classic designer.
I will show you the complete flow first and then I will break it down as best I can.
The Entire Flow
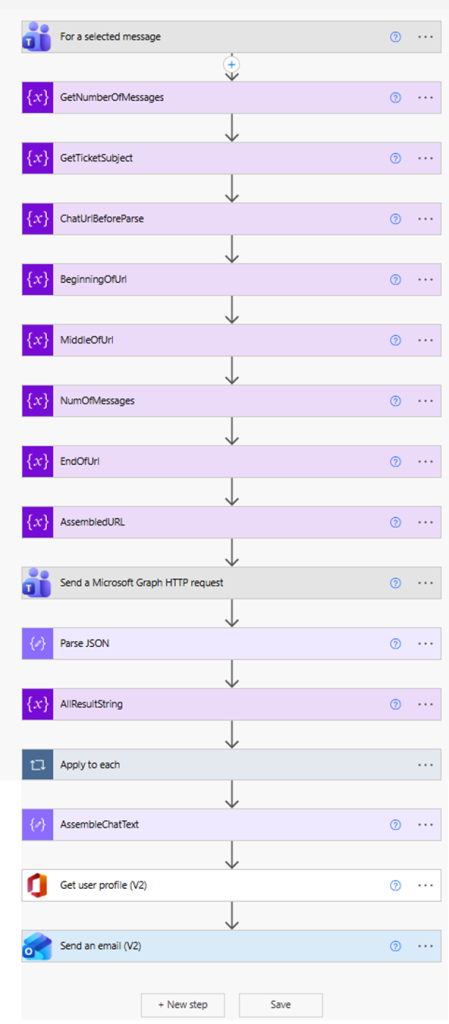
Yes, it seems like a long flow to do a simple task. Just because it seems simple doesn’t mean it is. It is just the way Power Automate rolls! Let me show you…..
Get Chat Transcripts with Power Automate Broken Down
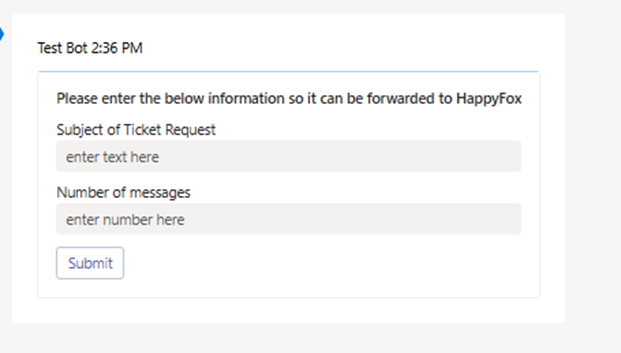
This very first step already does a lot. First, you add “for selected messages” and then edit its adaptive card:

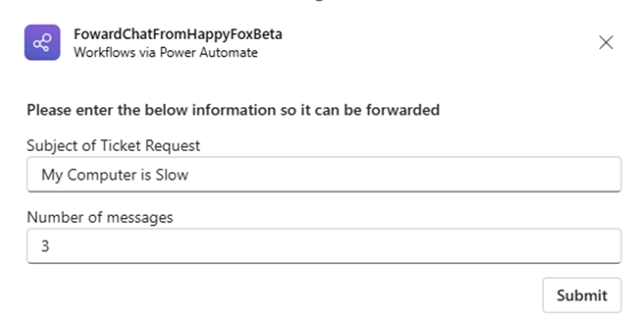
We are going to collect some input to help extract as much information as possible from the chat transcript. It is a very simple adaptive card. All we want to know is what subject we want to give to this chat transcript (usually a description of what the issue is) and how many chat messages you want to include total (including the selected chat message).
Now, you need to load the input collected into variables to be used by the flow:

The variables you created from the adaptive cards are now part of the flows dynamic content and can be loaded into other parts of the flow. Once the variables are loaded, the next step is to get the URL of 1:1 chat. This is where the fun begins. I will show the screen shot and then explain each step:
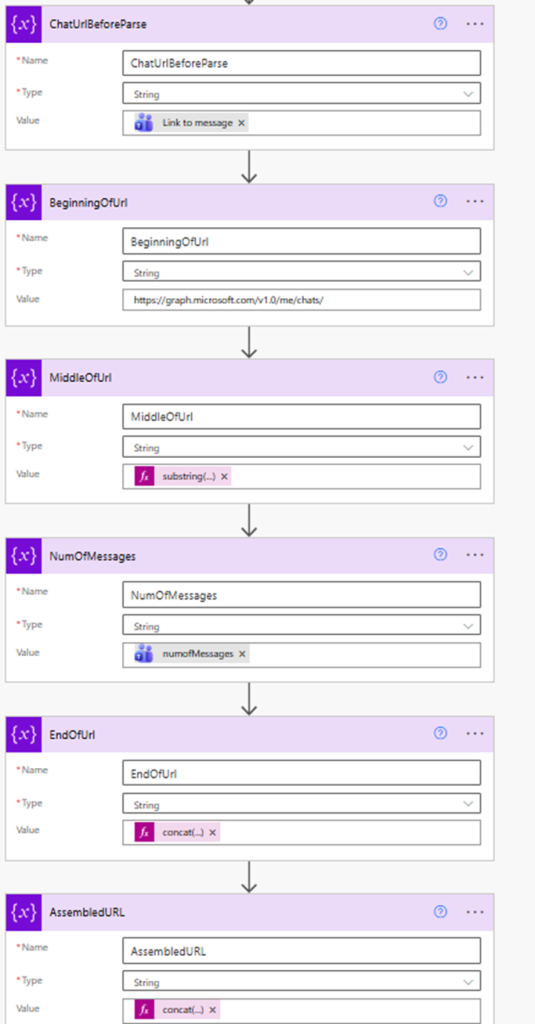
The following are all variables that use the “initialize variable” step.
ChatUrlBeforeParse – This the URL link of the team’s message. If you right-click on any message in your chats and choose “copy link”, you will get this link. The first step “for a selected message” has the dynamic content of “Message Link” which we will use to get the entire message link. We will parse it out to get the information we need to create the rest of the flow.
BeginningOfUrl – This is a static variable. All 1:1 chat links begin with https://graph.microsoft.com/v1.0/me/chats/
MiddleOfUrl – When we initialize this variable, we don’t use dynamic content but an expression (substring(variables(‘ChatUrlBeforeParse’),38,91)). This effectively gets the ChatID of the message we want get the transcript from. This is the part of the URL from “19:” to “@unq.gbl.spaces”
NumOfMessage – This is a variable that is needed to build the finished URL and it is the variable form the Adaptive card about loaded into a variable that can be used by final step “AssembeldUrl” which we will talk about soon.
EndOfUrl – When we initialize this variable, we don’t use dynamic content but an expression (concat(‘/messages?$top=’, variables(‘NumOfMessages’)), this finished the parts of the URL we need to extract the transcript.
AssembledUrl – When we initialize this variable, we don’t use dynamic content but an expression (concat(variables(‘BeginningOfUrl’), variables(‘MiddleOfUrl’), variables(‘EndOfUrl’)). The URL we need is finally put together and is ready for our next step.
Send a Microsoft Graph HTTP request
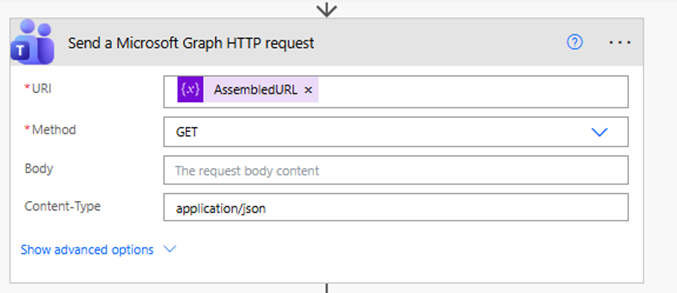
In this step, you add “send a Microsoft Graph HTTP request” as a step and us the variable “AssembledURL” as the value for you URI
Parse JSON to Get Chat Transcripts with Power Automate
Add the “Parse JSON” step next:
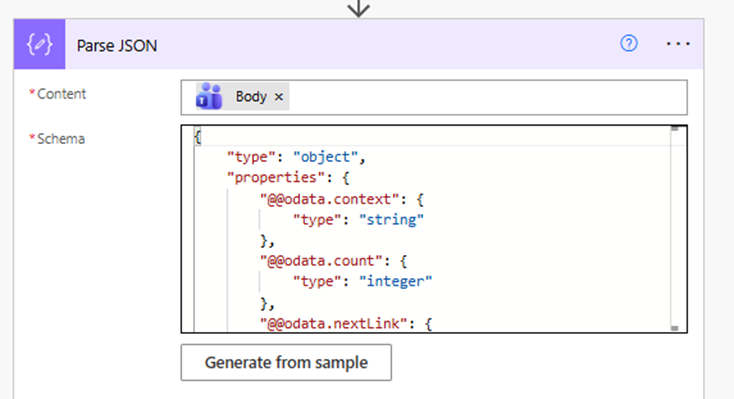
The dynamic content “Body” will be available for you to put into the content field. For the Schema click generate from sample and use this text as a sample schema:
{
    "type": "object",
    "properties": {
        "@@odata.context": {
            "type": "string"
        },
        "@@odata.count": {
            "type": "integer"
        },
        "@@odata.nextLink": {
            "type": "string"
        },
        "@@microsoft.graph.tips": {
            "type": "string"
        },
        "value": {
            "type": "array",
            "items": {
                "type": "object",
                "properties": {
                    "id": {
                        "type": "string"
                    },
                    "replyToId": {},
                    "etag": {
                        "type": "string"
                    },
                    "messageType": {
                        "type": "string"
                    },
                    "createdDateTime": {
                        "type": "string"
                    },
                    "lastModifiedDateTime": {
                        "type": "string"
                    },
                    "lastEditedDateTime": {},
                    "deletedDateTime": {},
                    "subject": {},
                    "summary": {},
                    "chatId": {
                        "type": "string"
                    },
                    "importance": {
                        "type": "string"
                    },
                    "locale": {
                        "type": "string"
                    },
                    "webUrl": {},
                    "channelIdentity": {},
                    "policyViolation": {},
                    "eventDetail": {},
                    "from": {
                        "type": "object",
                        "properties": {
                            "application": {},
                            "device": {},
                            "user": {
                                "type": "object",
                                "properties": {
                                    "@@odata.type": {
                                        "type": "string"
                                    },
                                    "id": {
                                        "type": "string"
                                    },
                                    "displayName": {
                                        "type": "string"
                                    },
                                    "userIdentityType": {
                                        "type": "string"
                                    },
                                    "tenantId": {
                                        "type": "string"
                                    }
                                }
                            }
                        }
                    },
                    "body": {
                        "type": "object",
                        "properties": {
                            "contentType": {
                                "type": "string"
                            },
                            "content": {
                                "type": "string"
                            }
                        }
                    },
                    "attachments": {
                        "type": "array"
                    },
                    "mentions": {
                        "type": "array"
                    },
                    "reactions": {
                        "type": "array"
                    }
                },
                "required": [
                    "id",
                    "replyToId",
                    "etag",
                    "messageType",
                    "createdDateTime",
                    "lastModifiedDateTime",
                    "lastEditedDateTime",
                    "deletedDateTime",
                    "subject",
                    "summary",
                    "chatId",
                    "importance",
                    "locale",
                    "webUrl",
                    "channelIdentity",
                    "policyViolation",
                    "eventDetail",
                    "from",
                    "body",
                    "attachments",
                    "mentions",
                    "reactions"
                ]
            }
        }
    }
}
Load Array into String
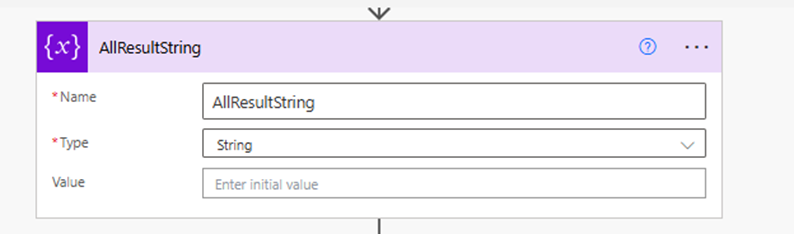
If you want to Get Chat Transcripts with Power Automate you will need to get the array data created by the parse JSON step and load it into a text variable that you can use to send as part of an email.
To do that we need to first initialize a variable outside of an “apply to each” step:
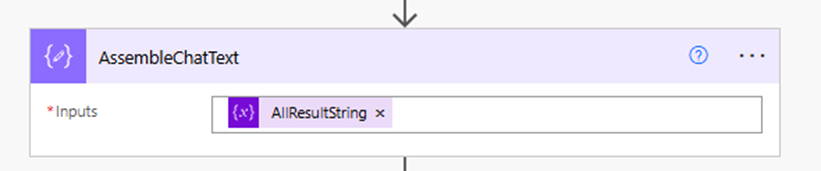
What the “Apply to each” step does is iterate through each item in the “value” of the JSON array (the entire JSON of the chat we specified from our Team Graph HTTP request) and grabs each “content” value and concatenates to our “AllResultString” variable. We are in the home stretch!
Preparing to Send the Email
On the other side of the “Apply to each step”, we have the completed variable load AllResultString in a Variable called AssembleChatText (We will need this to put in the email we are going to send:
The next steps get the users profile and mimic a forwarded email:
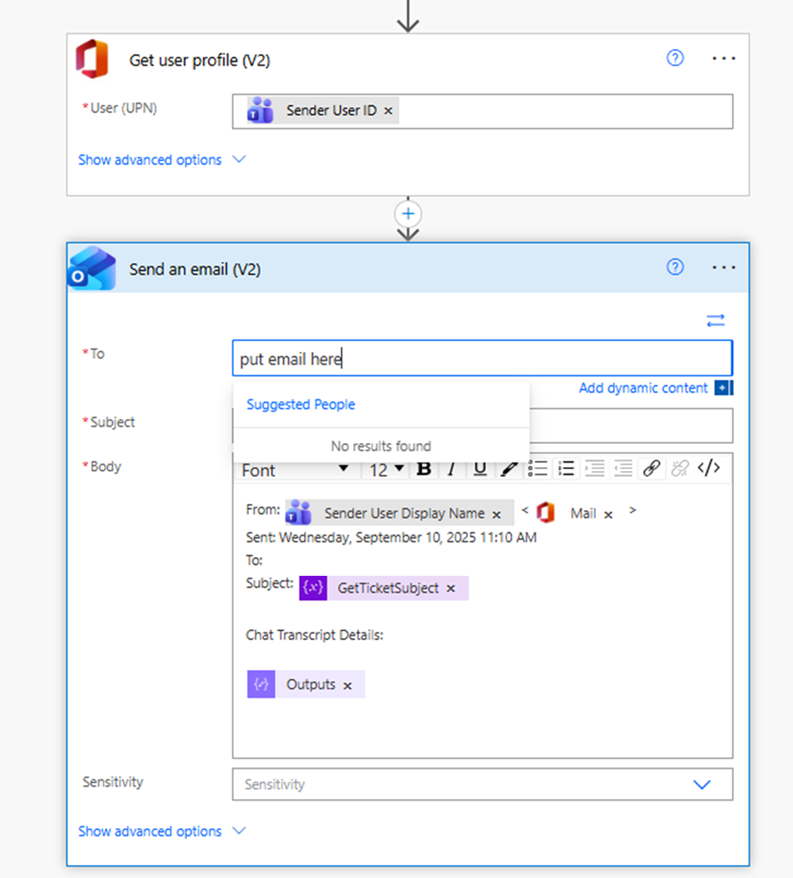
It uses the following:
To – email you specify (normally someone in your organization)
From – the user who’s chat selection you will choose).
Subject – The Subject you specified from the adaptive card at the beginning of the flow.
Chat Transcript Details – The outputs for the AssembledChatText variable
How it Works – Get Chat Transcripts with Power Automate
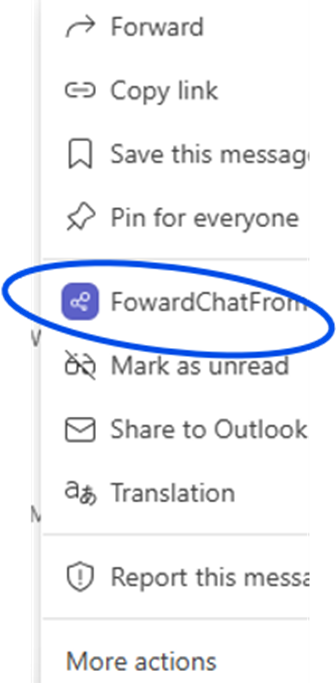
Now that you have the flow built, let’s see Get Chat Transcript with Power Automate in action. Go to the most recent chat exchange you have had with someone. Click the three dots (you might need to click “More actions) and choose your flow:
The adaptive card will show and gather the necessary information to build the graph command for the chat transcript and the subject you would like for the email forward.
An email will be sent to the address you specify in the flow with the number of chats you have specified.
How it Works
- You select first chat (from the user who initiated the request, NOT YOU) and then select “more actions” and launch the flow.
- The adaptive card shows.
- You enter the Subject for the request.
- You enter the number of messages you want. This includes the initial chat message you chose.
- Click submit.
- An email is sent to the email you specified in the flow with the chat transcript details.
Limitations of the Flow
You need to remember that Power Automate is a low code / no code solution to work process automation. Please do not expect it to be as robust as a custom coded solution using lower-level languages.
It only works if you send the most recent 1:1 chat exchange. It uses the MS Teams Graph query (?$top=X) to grab the number of chats you want from the most recent exchange. So, if you want to grab an exchange from before that it won’t work.
What will happen is if you pick a chat from say a day ago and want to extract the last three exchanges you will get the last three most recent exchanges from your 1:1 chat with this user. It won’t make sense.
This flow is for a specific use case. You have a recent chat exchange with a user and want to capture the transcript to email. That’s it.
Also, you can’t cherry pick messages in the chat. For example, you want to send a chat on email that has 7 messages in it, but you only want messages 1,3,5 and 7. It won’t do that. The best it could do is leave out X number of chats near the end of the exchange. So instead of specifying 7 messages in the adaptive card, you could specify 5, leaving out the last two if you did not want them in the email.
Conclusion of Get Chat Transcripts with Power Automate
So, you finally see how you can Get Chat Transcripts with Power Automate. Is it worth it? Of course it is. It always takes time to develop automation. Once it is in use you and your department will wonder how you got on without it! Power Automate is a Microsoft product that actually makes sense. Their ecosystem is getting very complicated and this helps out!
Can’t Login to Teams
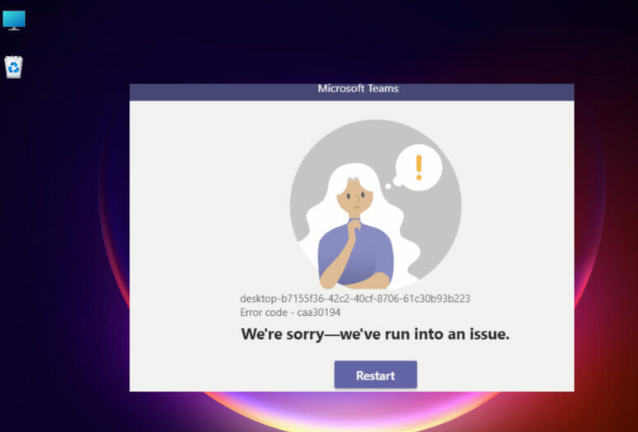
Thanks to botched Windows 11 updates you may find when starting work in the morning you can’t login to Teams.
A lot of times you encounter this error right before you need to get into a meeting. I would keep this article handy for just such an emergency. It will most definitely help you out ! At least you will not be late for your meeting!!
Windows 11 has changed many things. Eventually, you will get used to it but I am sorry, getting used to a heavy flawed update process is not one of them.
It could be a lot more than Microsoft teams but this article is only going to tackle one Windows 11 problem at a time…..
How to fix Can’t Login to Teams
- Try rebooting your computer.
- If that doesn’t work, search “Settings” in the search bar at the bottom of the screen then go to apps, search for “Teams” and then go to “Advanced Settings”:

3. Once in advanced settings for Teams, scroll down until you see “reset”.
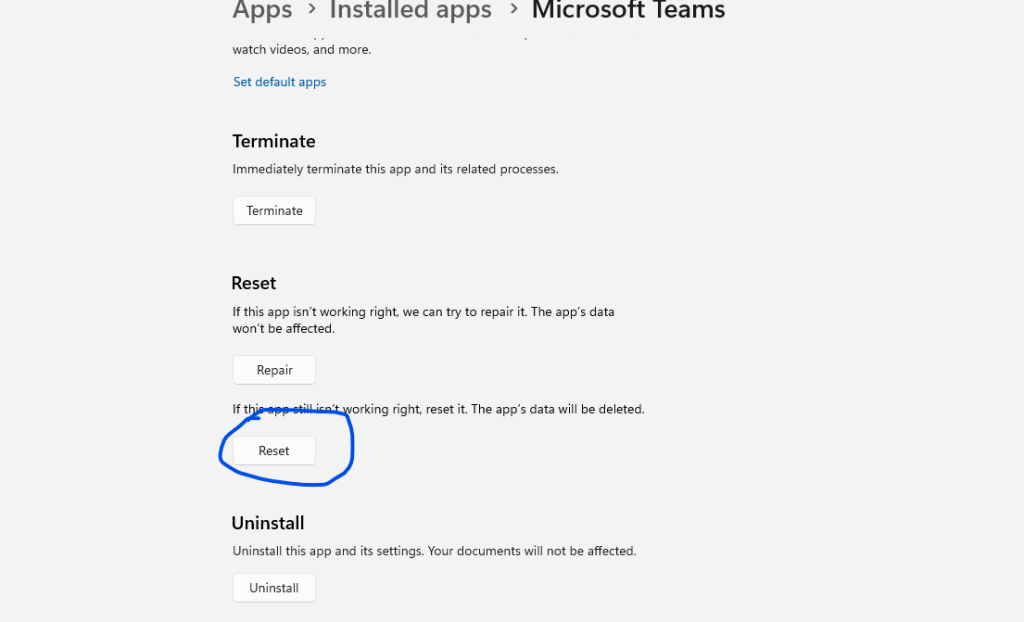
- Click that and it will reset your teams and get you to login again.
If Using the Desktop app Doesn’t Work
If you are still having, you can use the web version here: https://teams.microsoft.com or use Linux instead :p
Windows 11: Where Did Run as Go?

Well, Windows 11 has done it again. Where Did Run as go? Never mind the wonky AI or the complete invasion of privacy. They can’t even get the basics of day-to-day Desktop administration right.
Lets not even talk about what they are doing to some of their flagship software…
I will give you an anecdote. I received a request from a user to install a piece of software that required administration privileges. When the machine was Windows 10 it was as easy as right clicking on the EXE file, selecting “Run As” and go about my merry way installing the software. But the machine is now running Windows 11…..
Why Did Windows 11 Remove Run as
They claim, “Windows 11 did not remove “Run as”. Instead, recent updates changed how the “Run as” command is accessed, often by removing it from the default context menu and sometimes by hiding the “Run as different user” option. Microsoft’s focus on security, especially with the new Administrator protection feature and the introduction of the Sudo command, is likely the driving force behind these changes, as they aim to enforce least privilege and reduce attack vectors. “
If it is not removed, it is hidden. As if an IT professional doesn’t have enough work. We need to spend more time doing something that took no time at all before. That was sarcasm.
Where Did Run as Go and How to get it Back
So, I guess I should say Windows 11 has “hidden” the “Run as Command”. To get it back, you need to go to Settings / System /For Developers and turn Developer Mode on:

Then you must go to Settings / System /For Developers / File Explorer and turn on “Show Option to run as Different User in Start”:

Then, hold the shift key as you are right clicking on the EXE file you wish to run as a different user and the Run As option will reappear:
Run the program and voila! You got you functionality back.
Something that used to take 15 seconds now takes 5-10 minutes to complete. Way to go Windows…

Reset Outlook App Mobile

I am sure when you enroll a phone in InTune all the apps you deploy are functioning. Part of the process when you enroll a phone is to make sure all of the apps are working. Upon initial enrollment all apps should work out of the box. In time tough, some of the apps will start malfunctioning. One of them will be email or Outlook. You will probably have to Reset Outlook App Mobile. It is almost inevitable.
What Causes This?
This is a good question. I find that when users are travelling and come back home to their home network and occasionally things go awry. A reset actually works well. Other times, it is a corruption in the synchronization process that causes this. Either way, a reset usually does the trick.
Of course, if that doesn’t work you can always delete and re-add the account. More on that later.
How to Reset Outlook App Mobile
This is how you do it….
Open Outlook. Tap your account picture and then the settings gear.
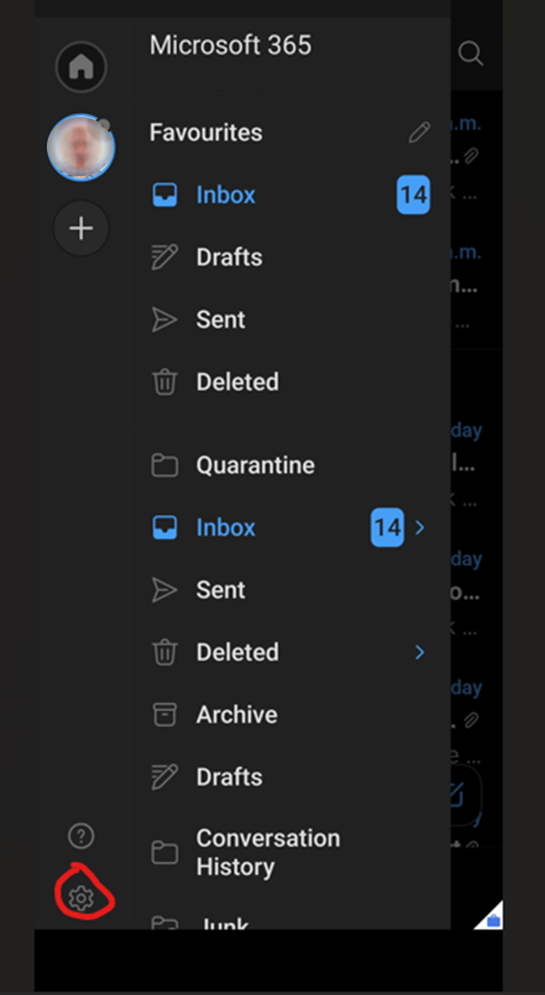
Tap Accounts.
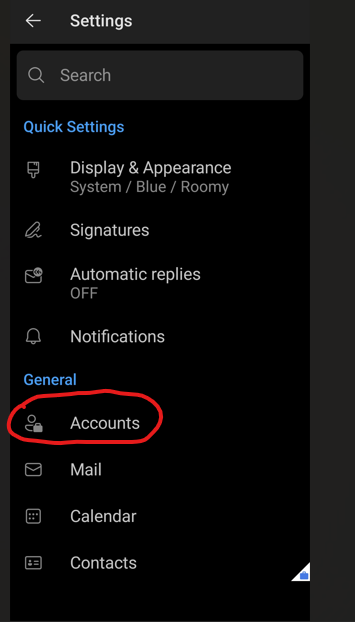
Tap Your Account listing.
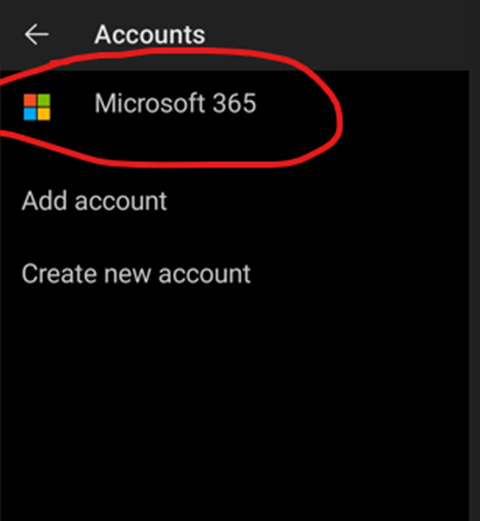
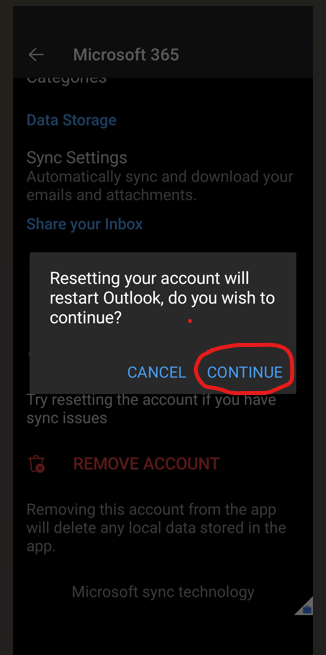
Scroll down until you see “Reset Account”. Tap it.
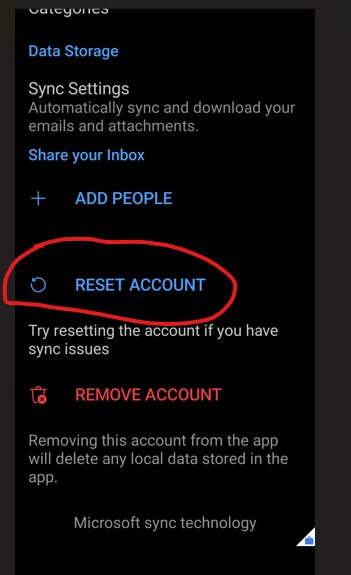
Tap continue to reset your Outlook account.
Reboot your phone and connect to Outlook. A Good practice is to re-boot the phone afterward and reload the Outlook app. It should start syncing again.
Doing this should clear out any corruption the the above cause may have had something to do with.
Users have come to rely on Outlook mobile on their phone and if it not working as expected, be sure to get a help desk call. It is very important to their workflow and the last thing they need is to be slowed down.
Using the steps above should resolve their problem and get them working as soon as possible. Worst case, if this doesn’t work, deleting and re-creating the account will get the synchronization for sure.