
Laptop Docking Station – 4 Ways To Troubleshoot

I have troubleshooted laptop docking stations for years and I have to tell you, they have gotten worse. The devices used to be a simple port replication unit. Now, there almost like their own computer with firmware updates and the like. The construction IMO has gotten worse too. Ok, rant over……
So without further ado, I will show you how to troubleshoot the most common problems with a docking station and laptop.
Laptop Docking Station Will Not Connect
The laptop has been docked yet it won’t connect to what’s hanging off it (i.e. Monitor, Mouse , Keyboard, Speakers, WebCam, etc…). this can be traced to a single point of failure. The actual connection from the dock to the laptop. You will need to reseat the laptop. The best way to do this is to undock and then re-dock the laptop. Depending on the manufacturer of your dock you may need to unlock with a slide lock (Lenovo) or a push lock (HP). Both manufacturers also have a new cube type USB-C dock that uses a simple power button.
I am sure there are other types out there but you get the picture. With the construction of some models you will have to hold the laptop firmly in place as you lock it.
Laptop Docking Station Partially Connects
This one is my favorite and a real pain in the ass. Some of the peripherals connect properly and some do not. I had a support experience where the user’s Monitors were working but their mouse and keyboard were not. The cause was a partially connected dock. Yes, that is possible. The fix was to make sure the laptop was completely perpendicular to the station while docking. Why? We have enough to think about! Using geometry while docking your laptop should not be one of those things….
Some Ports do not Connect
These can be isolated to a faulty cable or a cable that is not inserted fully. Reinsert the cable. Failing that, try a new cable.
A New Laptop Docking Station Breaks Things
You give a user a brand new dock and all of a sudden things that used to work with the old dock no longer work with the new dock. For example, dual monitors do not work anymore or a sound bar stops working. This requires an upgrade to the laptop drivers, dock drivers or both. Go to the manufacturers website and perform the updates. All manufactures automate this process with an update connect tool. Examples include, Lenovo, HP and Dell.
To narrow these things down have another dock handy. Unfortunately, this is not always the case so the above information is a great guide.
Here is a quick TikTok Video about it. If TikTok is not your thing, go to YouTube , watch a video on it and subscribe!
For more tips, sign up to my email list.
Happy IT’ing
Dan
Office 365 and Outlook: Install and Configure in 2 Steps
:max_bytes(150000):strip_icc():format(webp)/016_out-of-office-vacation-auto-reply-1173771-5c27fdeb46e0fb0001f2bbe8.jpg)
Congratulations you have an O365 subscription (I know you are jumping up and down…. this is sarcasm). Since 99.99999 % of people get Office 365 for Outlook look, here is a quick and dirty guide to get Office 365 and Office installed and Outlook configured in 2 Steps.
Install Office 365
- Uninstall and other Office version on your computer.
- If a click-to-run or any other version of Office 365 is installed on the laptop also uninstall it.
- Go to your control panel (i.e. Search for Control Panel, launch it and then go to Programs and Feature and uninstall any other version of office if it is there.
- Reboot you computer when asked.
- Log back in, go to Portal.office.com (log in if you need to.).
- Click the down arrow beside Install Office and chose Premium Office Apps:
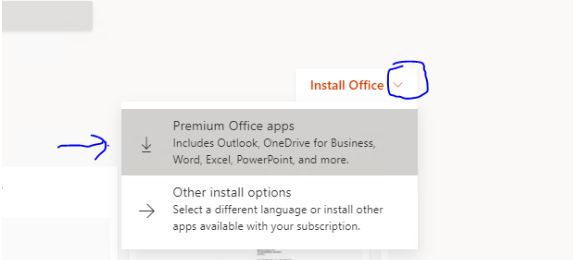
7. The download will show in your browser downloads:
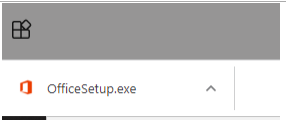
8. When it is done downloading, click on it and the install process will begin. You will see an Office splash screen like this:
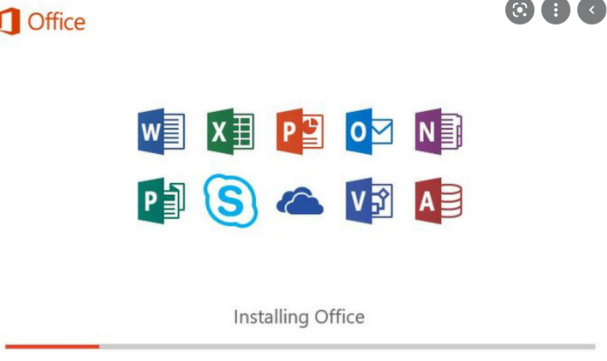
9. It will notify you when it is done installing.
Configure Outlook
- When it has installed you can launch outlook by searching for it by in the Windows 10 Search bar “Outlook” and clicking on it.
- It will start the sign process by setting up your email account. All you need to do is enter you email address if it hasn’t found it already and your Windows password when it asks for it.
- You may need to sign in again to activate your copy of Office. To do that you just enter your email address and windows password again.
- Once your email sign up is complete you will see your Outlook inbox.
- To launch any of the other office app just search for them by name in the Windows 10 search bar (i.e. Excel, Word”
- If you would like the office apps located pinned to your task bar you just search for the office app and then right click on the search result and choose pin to task bar:
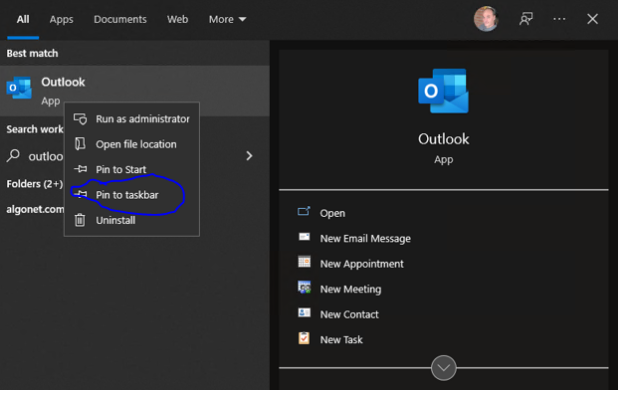
16. When starting Outlook for the first time it will ask you to log in. Please use your email address as the username and your password.
Voila you have Office installed and Outlook configured in 2 Steps! Add this knowledge to what you learned about using OneDrive a you will be an expert at office in no time!
For more tips, sign up to my email list.
Happy IT’ing
Dan
Two Really Cool Citrix Hacks

One of the biggest questions I get about Citrix is how to operate between the terminal server OS and the local OS. Usually there is the occasional need to work between the two. Here are two really cool Citrix Hacks. Once you learn them you will use the all the time!
Transfer Between Citrix and Windows and Vice Versa
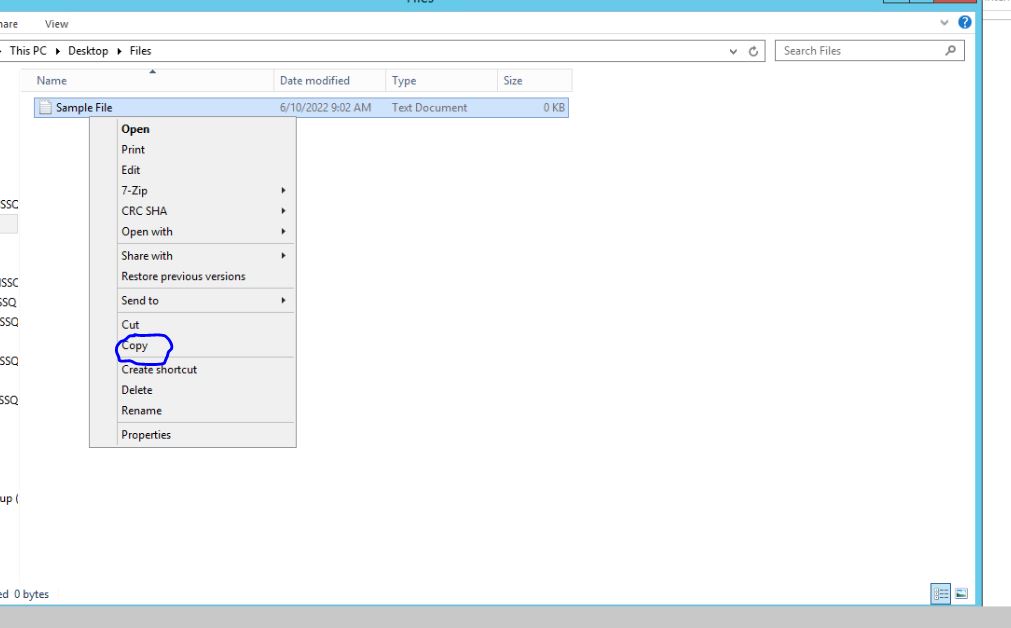
This one is easy. Just take the file you want to transfer from file explorer, right click and choose copy from the source system:
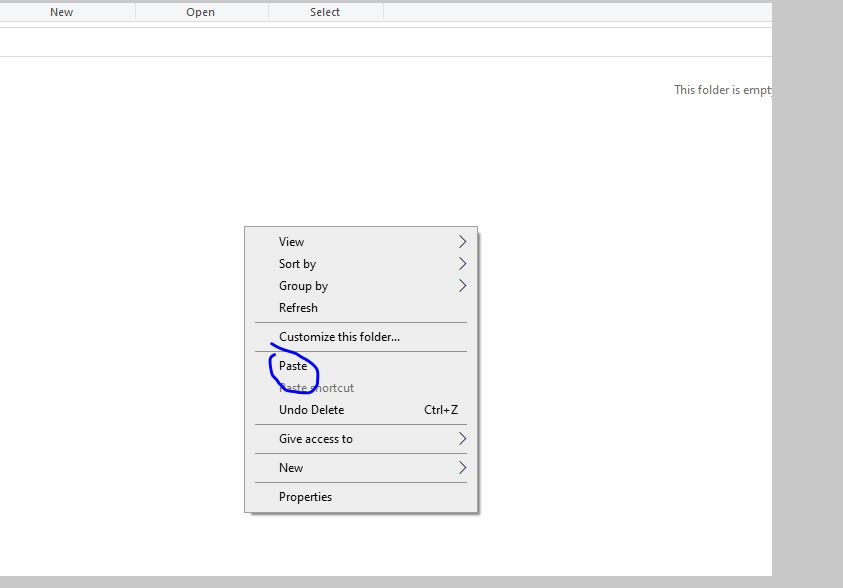
Then open file explorer in the target system, navigate to where you want the file to end up, right click and choose paste:
Pretty easy, right?
Adding a Printer in Citrix
This is little trickier but remember you are operating and system within an operating system (Windows within Windows). Things that you normally do locally can still be done in Citrix, just a bit differently.
For this example I will you use Microsoft Word as the “Hack App”. Open word in Citrix , create a blank document and then go to to print it:
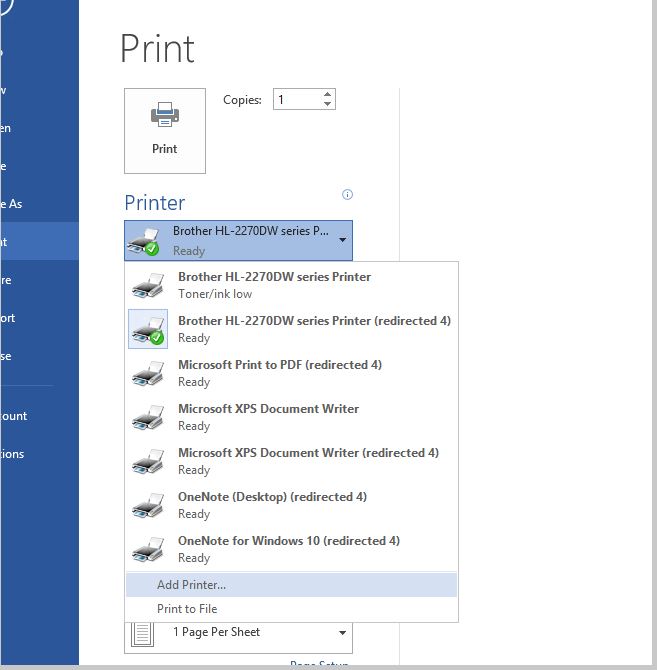
Choose “Add printer”. It will bring up the directory on your AD server:
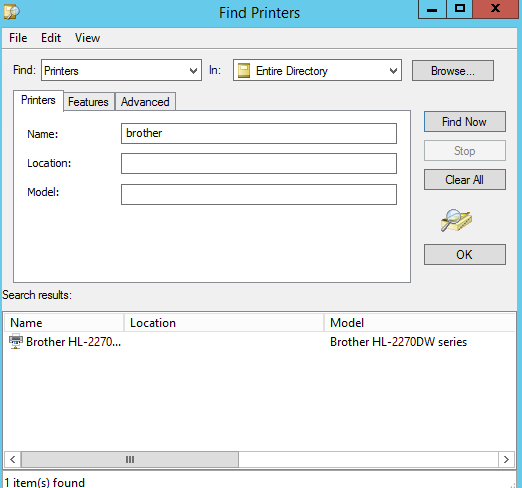
Type in the name of the printer you wish to use. This is where you can type roughly what the printer name is and it should find it. If you do not know what to search for you will need to get your IT support involved.
Double click the found printer and voila, you have it installed and available to all of you applications in Citrix. If you get an error chances are you do not have the necessary security permissions to access the resource. Once again contact your IT support in this situation.
If Citrix is new to you, read my article that gives the basics in a nutshell . Just so you know these hacks also work in Microsoft Remote Desktop Services
Happy It’ing
Back Up Your Whole System in Two Steps
This is a continuation from my previous article on how to make sure your files are backed up.
You either work from home or are a power user in an organization that might not give all the backup you need. Whatever the case, I will show you how to back up your entire machine using the built-in backup features in Windows.
Determine how much backup space you will need
You want to make sure you know your storage requirements before you start backing up your machine. It is quite easy to find out. On your Windows machine, open File Explorer and the find your system Drive. You may have more than one drive in the system but for the simplicity of this article we will work with a one drive system:
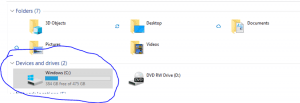
Looking at the Windows Drive it shows a total storage of 475GB. Not that you have determined your total storage space you need to get an external USB Hard Drive. I would recommend a WD USB Hard Drive. I would get one that is at least 512GB. The bigger the better.
Set up Windows Backup the Easy way
Backing up Files
Go to the Windows search:
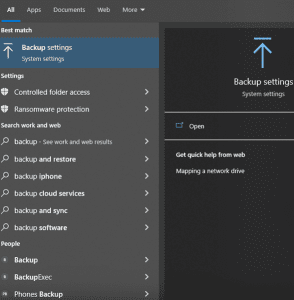
Search for Backup and Choose “Backup settings”. Have your USB Drive connected to your machine and click “Add Drive”:
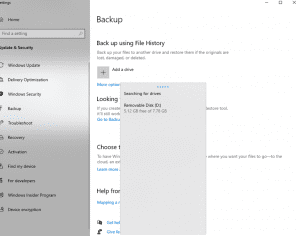
Choose it and now you have a drive where backups occur.
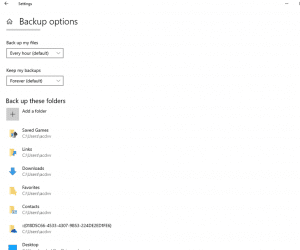
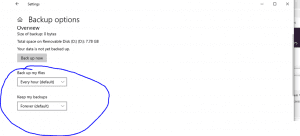
Accept the defaults if you want or choose different options. For example, you can change the frequency to once a day and the retention to one month.
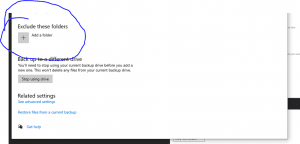
You can also exclude certain folders in your back up.
Click backup now or just wait for the schedule you picked to kick in.
Restoring
When you want to restore a file, you can either do it on of two ways.
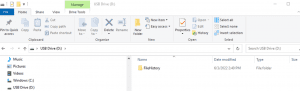
You can go directly to the USB Drive and drill down into the File History folder until you find the backup of the file or…..
Go to the Folder where the file was located, right click, and choose properties. Then click on the previous versions tab and click the down arrow button and choose “restore to” if you want choose an alternate location.
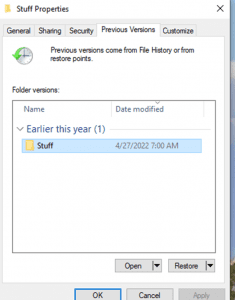
Once restored you can sort through the folder an get the file you lost. It will be as current as the last successful backup.
Backup System
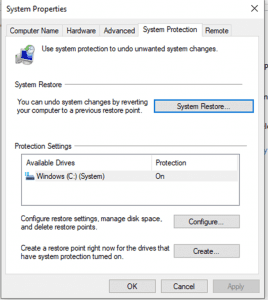
You will probably need to do this very infrequently if at all. See my tips on how to keep your system running clean (in a soon to be released post). All you must do is make sure system restore is turned on:
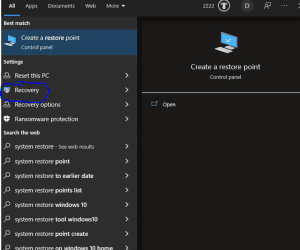
Search for system restore in the windows search bar in the lower left of your Desktop Screen.
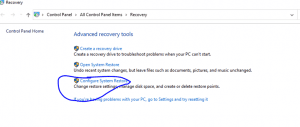
Click configure.
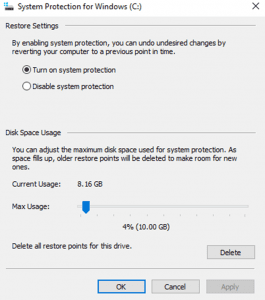
Turn system protection is on.
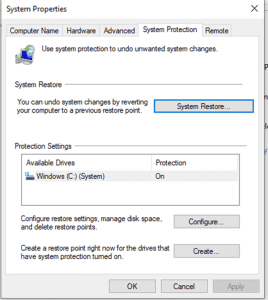
To run a system restore go to back to this screen and click system restore:
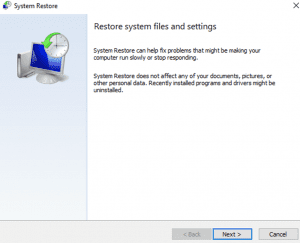
Click next to start the system restore.
Choose the restore point.
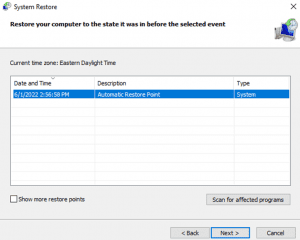
There is other options you can chose, like show more restore points if you want to restore your system further back. There is also scan for affected programs if you want to see what programs might not work after the restore. You will just have to reinstall them. I have found that the restore works well. In some case you might not get everything restored perfectly but no system at all is a lot worse. The restore will take some time and a reboot will need to be done. However, you will be working in no time! If you also follow my articles on keeping your other files and settings backed up you will have all the bases covered.
Here is a funny TikTok video I posted about it.
Files backed up? (4 Ways to be Sure)
You work for a company either with a dedicated IT Department or a Managed Service Provider who supplies your IT Services / Support. Backups are done regularly. You feel pretty safe but do you really know what information is backed up?
It is a good idea to ask. It might not be as much as you think.
What is Potentially Backed up
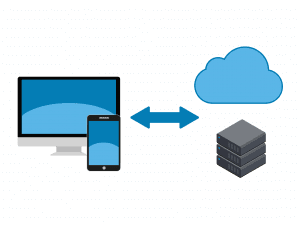
Your company, at the very least, backs up the file server. Most file servers today are actually virtual servers running on a host configuration in a data center (you know, in the cloud). For all intent and purposes, you just need to be aware that this type of file backup is a bare minimum.
If your machine is a mobile device or a special purpose device, it might be regularly backed up through a backup agent installed on the machine. If your machine is that special you probably already know this. Everyday use machines will not be backed up locally.
If your email is accessed centrally (O365, Hosted Exchange, IMAP, etc.), a copy of your email resides on the mail server so if your computer dies, don’t worry. I don’t think anybody uses POP3 mail anymore so I won’t discuss it.
What Might Not be Backed up
Items that may not be backed up are the following:
- Local files on your computer
- Browser history, cache, bookmarks and settings
- Email not centrally stored
- Computer settings (printers , power settings, views, etc.)
If you are not sure please check with your IT support. You should know what is backed up and what is NOT backed up. It could be just a matter of tweaking some settings on their end, you are covered. If not, make a business case for the items that your feel are important for backup. When all else fails, follow the Tips below to help you out.
What can you do if your IT Department is not Backing up as Much as you Like
Local files
You can use any of the cloud services like OneDrive, Drop Box or Google Drive. They can be configured to backup areas on a Windows computer where you would regularly store files (Desktop, Documents and Pictures). If you computer were to die you would have those files in Cloud that could be easily accessed from another machine.
I will give an example from OneDrive to get you started:
- Download and Install One Drive
- You will see the OneDrive icon by the system clock (
 )
) - Right Click on it and choose “settings”.
- Click the Backup tab and then the “Manage Backup” button.
- Make sure Desktop, Documents and Pictures are checked:
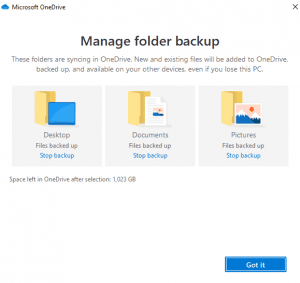
- Click “Got it”.
You’ve got some extra back up!
Browser Settings
This is fairly straight forward. Both Chrome and Edge allow you to login to your respective Google and Microsoft accounts and sync your browser data. I think it is great because not only does it back up your browser settings to the cloud, but it also allows you to access this data on multiple devices (smartphone, tablet, other computers). It makes for a seamless browser experience.
I will give a Google example this time:
- Open your Chrome Browser to https://www.google.com
- In the top right, click “Sign In”
- Use your Gmail account and password to sigh in. If you do not have one, it is easy to get one.
- One you are logged in all of your browser data will get synced.
Now you have more backed up! Also, the above two services can also be set up with MFA for added security!
System
This is really for a more advanced user. I have written an article about it so if you feel adventurous, go for it . The above tips will help most users get all of their data backed up in combination with what IT support backups up. It is really out of scope for this post but I will write a dedicated article in the future.
Long story short, you will definitely have some backup coverage through your IT Support. If you need more the above tips will help you!
If you want a good laugh, I have posted a Tik Tok video about it!
Before you call the Help Desk Try These Three Things

People’s natural instinct when facing a problem with a work computer or software system is to immediately contact the Help Desk. That’s what we are here for, right? I am not saying you shouldn’t contact the help desk. However, the problem you are experiencing might be very slight and can be easily resolved with some remedial steps before calling.
You see, by the time you contact the Help Desk and explain what the issue is and have us fix it; these steps could have already fixed it. If not, then at least you attempted some basic troubleshooting.
At this point, it is more than likely a larger problem that you will get assistance by reaching out. If it is a wide scale outage or problem, the IT staff probably already know about it.
So, before you call us…
Reboot your computer
Users don’t like restarting their computer. Waiting for the “endless seconds” for the machine to restart is too long! What you don’t realize is a PC left on for prolonged periods tends to slow down over time. The seconds you are saving by NOT rebooting is being lost due to slow performance.
Rebooting does wonders for a machine. Like, regularly clearing the RAM. If there are any memory leaks by programs that are not running, they will be gone with a reboot. Also, if there are any pending computer updates, they will get a chance to finish.
If your IT department or MSP automates the rebooting of your computer regularly through something like Group Policy or an automated script you don’t have to worry about this. If not, you can always set up a reminder in your email task list to reboot at a regular interval. If you really want to geek out about it, you could write a simple batch script and then call that script through a scheduled task. I will show you in another article how to do this.
Close and Reopen the Program that is Causing you Trouble
A lot of common programs (Office…I’m looking at you!) load some settings at startup. If things change in the Operating System, it might not be reflected in the program that is currently running. A good example is you load Word and THEN add a printer through Windows. Then you wonder why you can’t print to the new printer in Word. Close and reopen the program and voila! You can print to the new printer.
Computer Not Responding
I have got a great TikTok video that illustrates this. You are working on your machine and it locks up. It may appear that the whole machine is not responding but it may be only one program. Hit the Alt-Tab keys and cycle through your programs. Look at the title bar of each window. There might be only one program that says “Not responding” (I am now looking at you Chrome!). Note that program. Right click on the task bar and chose “task manager”. Highlight the offending program in the task list and click “end task”. Restart the program. If your machine doesn’t lock up again, great. If it does, it might be time to try Rebooting as mentioned in step 1. If all else fails, call us.
If you follow these three basic steps you should at least divert some calls away from the Help Desk and actually get on with your work day a bit quicker! It may not be as easy as this all the time but at least you tried and believe me, Help Desk with thank you!
Explaining Citrix to a 6-year-old

Citrix is complicated. There is a lot going on with all its moving parts. The title is a bit of a misnomer. You truly can’t explain it fully to a 6 year old, but you can give it a well-deserved introduction!
Citrix at 50,000 feet – For Adults
For those who can remember the days of the dumb terminal (is it even PC to use that terminology now?), your computer is a terminal to a remote desktop(s) that runs all the necessary software for you do your job. The good news is if your terminal dies or malfunctions, you can be up and running very quickly.
In most setups it is like this:
- You login to your computer and / or Citrix Session.
- One or more delivery controllers decide which is the best server in the pool of Citrix Application Servers you should connect to to load your apps.
- You connect to the prescribed server and start running your applications.
It looks quite seamless, like it is running locally on your machine, but it is not. There can be interoperability between your local machine and your Citrix session (sometimes it is required) To keep things simple, most administrators tell users to run everything in the session. It makes for more efficient trouble shooting and support.
One very attractive feature is you can login to another device and poof, all your programs are there! If you must run a meeting and all your prep work was done at your desk, it is quite helpful that all you must do is login to the boardroom computer and you are ready to go!
Citrix at 50,000 feet – For Kids
Imagine you would like to watch your favorite streaming show. To get to those shows, you would need to get permission from at least one of you parents (delivery controllers), who would then let you watch it on a TV in the living room (Application Server). You get bored watching it in the living room, so you go to your bedroom and start watching your favorite show on your tablet(Session Transition). You pick up right where you left off in from the living room.
Isn’t Citrix Fun!
That is in a nutshell what it takes to operate with Citrix. Apart from having a strong password as well using MFA to make your environment even more secure, using Citrix is an ideal solution for large enterprises. If a six year can understand how Citrix works, imagine what they will be like when they join the work force!
You can use whatever explanation that makes it easier for you to understand. So next time you are working with Citrix you can say “hey… I know how this stuff works! And all it took was a 6 year to explain it to me…. LOL
As always for Quick IT Tips, please reach out to me either through this site, or by one of my other channels.
Happy IT’ing
Dan
Your Email has Been Hacked! Do these 5 things

I have seen it all too often.
A user goes to work and either comes in to the office to check their email or looks at their phone beforehand and oh no….they see a bunch of emails from their contacts all asking the same thing. “Why are you sending this to me? Dude you have been hacked!”
It is more than likely your account has been compromised by a bad actor who is using your account to send out dozens if not hundreds of phishing emails out to all of your contacts hoping to get a bite (click) on a malicious attachment.
If you are part of a large organization, IT probably has been notified and are already taking steps to mitigate the damage. But what if you are a small company or an individual? If you use Office 365 as your email platform you can do these 5 things.
Disable the Account From Sending mail
If you are an individual you really can’t do this so quickly move to the next step. If you run your own O365 tenant please do this (https://docs.microsoft.com/en-us/microsoft-365/security/office-365-security/responding-to-a-compromised-email-account?view=o365-worldwide).
Change the Password Right Away to Something More Secure
To do this please follow one of my older blog articles (https://quickm365tips.com/how-to-create-a-strong-password-in-5-steps-especially-when-you-are-lazy/)
Enable MFA on the Account
Also, please visit one of my other blog articles (https://quickm365tips.com/using-mfa-why-should-you-care/)
Check If There are any odd Mail Rules for the Account
You need to make sure the hackers haven’t set up any forwarding rules that sends email to them (Instructions Here)
Disable Email forwarding for the whole Organization
This is a good security measure for many reasons. To add to the reason above it is good to disable it. That way, it can’t be used. You don’t want a disgruntled user to be forwarding email to another account that they could be using for malicious reasons against their soon to be ex-employer (https://docs.microsoft.com/en-us/microsoft-365/security/office-365-security/external-email-forwarding?view=o365-worldwide).
Following these steps will mitigate the damage and help you keep safe.