
Automatically Carbon Copy in EAC

I am sure your organization has a lot of automated process in place for its workflow. Most organizations have this set up to get things done more efficiently. However, some parts of this flow are still somewhat manual. For example, remembering to send an email after a process is completed. If it is not built in to the process, why not Automatically Carbon Copy in EAC?
A good option for an individual is to use Microsoft Flow for automation. But what if this process needs to be done by a department or the entire organization? If it is simple enough, it can be set at the server level using Exchange Online Mail Flow Rules. I will show you how…..
What Mail Flow Do You Need To Automate?
What process are you trying to automate? I will give an example. You have a department that either manually or through a system sends an email notification to email@companyA.com. They have been instructed to CC (Carbon Copy) email@companyB.com every time they do so. That’s fine but what if they forget? What if the system cannot accommodate this request. You can set up a Mail Flow Rule.
How to Set Up Automatically Carbon Copy in EAC
- First, go to your EAC (https://admin.exchange.microsoft.com/#/transportrules) and click add a rule / create a new rule.
- The Rule should look like the following:
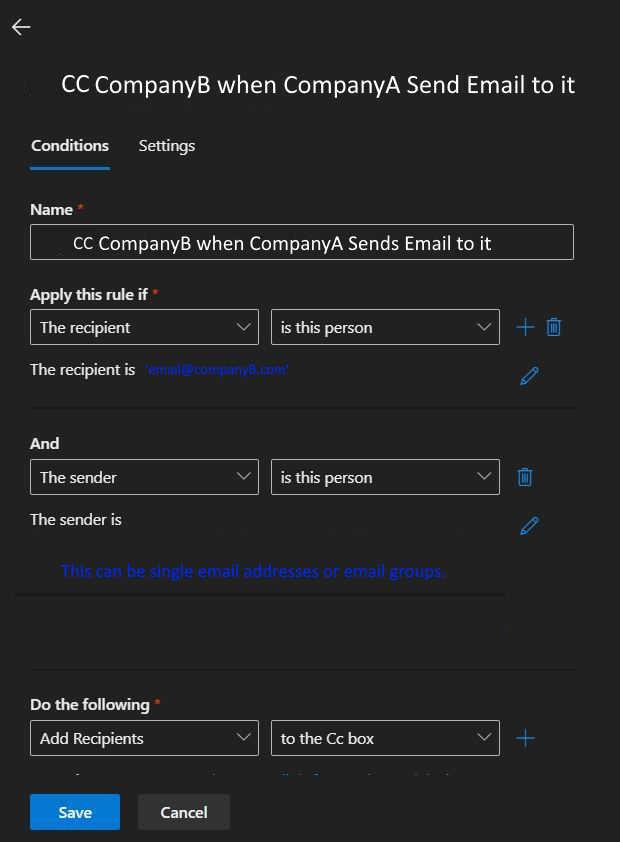
When this rule is Saved and then Enabled (Don’t forget to enabled the rule after you have created it). Any email send to Company A will have Company B CC’ed on it. This is great for email addresses that serve one purpose like receiving reports. Maybe another company you work with closely with needs these reports too and you do not have to remember to CC them anymore. It is all done automatically!
Happy IT’ing
Dan
Trapping Errors in MS Graph

I was tasked with automating how Outlook contacts are written to a users profile using Microsoft Graph. I wrote about how to do it in my situation here. However, my last task was to accomplish this but with a much larger contact list. This required trapping errors in MS Graph. I will show you the behavior of the MS Graph Rest API when it writes many records.
Possible Errors You Will Get
Microsoft clearly outlines what errors you could get while writing / reading data. In my case the ones I came across were the following: 400, 401,503 and 429
400 – Bad Request – This will happen when the command your are sending or the data you are trying to write are malformed.
A “reading “example is when you have constructed a command in PowerShell that using the $ and ? characters together. It works find in Graph explorer but errors in PowerShell. Using an escape character between the two symbols remedies this ($`?).
A “writing example” is when you have data in a format (a cell in a CSV) that can not be read by the command so it errors out with a 400. When you are writing thousands of records it might be hard to check for format beforehand.
401 – Unauthorized – You would think a token for a session would last for the entire time your are issueing commands in a PowerShell session but it doesn’t. I have learned it lasts about 1 hour.
429 – Too Many Requests – if you issue too many reads or writes in an allotted period of time, Microsoft will throttle you. It is best to wait before you write again. If you keep trying , you will keep getting throttled. Even though I was issuing several writes in a 10 minute period, it wasn’t enough to trigger this error but it is still a consideration.
503 – Service Unavailable – This is mostly to do with network traffic. I am sure the service actually is not down. MS has built enough redundancy in their infrastructure to take care of this. It is like being in a very bad rain storm. Just pull over and wait a few minutes. Then you can start up again.
Trapping these errors will allow you to start up again. I will show you how.
Trapping the Errors
For this section it is good to download the sample script I provided in a previous article and tweak it as necessary.
How to you trap the errors? The part of your script that writes the records needs two things. One, a while loop that counts the records that goes through each record and knows exactly what record number it is (sorry, a for each x in x’s loop won’t do the trick here) and a try / catch block to handle the error.
$Results = “”
$Script:StatusCode = “”
While ($script:x-lt $tot) {
try {
$NewContact = ImportContact -Mailbox $mailbox -token $token -contact $contacts
$Script:StatusCode = $Results.StatusCode
} catch {
$Script:StatusCode = $_.Exception.Response.StatusCode.value__
$script:x = $script:x – 1
Write-Host Error processing contact. Backing up and trying again in 30 seconds…
Start-Sleep -seconds 30
#Login again
#Get Graph Token
Try {
$Token = GetGraphToken -ClientSecret $ClientSecret -ClientID $ClientID -TenantID $TenantID
}
catch {
throw “Error obtaining Token”
break
}
}
$script:x++
}
You can get a little more granular by specifying what to do with each exact error I mentioned about with an if statement inside the catch block but since I know exactly what errors I am going to get I left it general.
What this code accomplishes is it goes through each record and writes it to the users contact folder. If it encounters an error a long the way, it waits 30 seconds, tries the record that failed again and if successful, keeps writing records until it encounters an error again (hopefully not) and starts the process over again.
I have tested this several times with a contact list of thousands of records. and it works like a charm. One test showed three errors but every single record was written.
Happy IT’ing
Dan
2 Ways to Revoke a M365 Users Sign-in

Why Revoke a Sign-in?
Need to revoke a M365 Users Sign-in? Maybe it is for one one user or many users. A good example is for a security breach. Another example is when a user leaves the company and you want to make sure their are no cached logins for any device they might be signed into as you disable their account. Maybe you are changing something on the network and maybe you want to get a baseline of the change. There could be a lot of reasons.
Another good reason is to re-enforce MFA on your users when they sign-in. Either way, I can show you two very good ways how to make sure your users can have their M365 sign in revoked. It will log them out every single service they have a connection to.
It can be a lot more than you think. For example, when I tested it on myself, it took a good two days for me to get through all the devices I was signed into to get re-signed in! There was Outlook, Teams, the admin portal, and a reMarkable tablet I was testing, to name a few.
I will show you two ways on how to do this. The first way will be through the admin portal and the second way will be using PowerShell. Using PowerShell is a great way to revoke a M365 Users Sign-in for many users through the use of a script.
Revoke a M365 Users Sign-in Using the M365 Admin Portal
In this case all you have to do is login to you Microsoft admin portal and go to active Users in the left hand pane of the page. Click on the user you want to revoke all sign-ins for other right side and click on “Sign-Out of all sessions”.
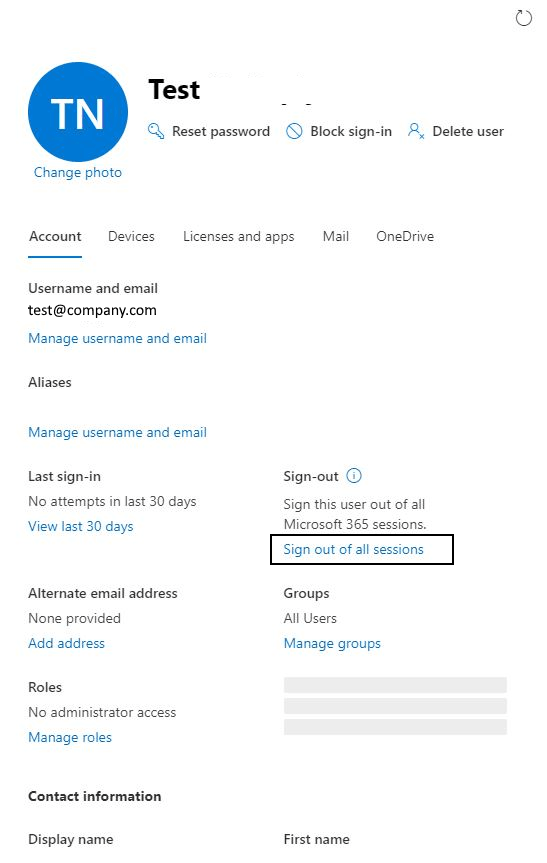
If you need to do this for only a few users, this is a good way to go. If you have many more to sign out, this is not a very efficient way. Thank goodness there is PowerShell…..
Revoke a M365 Users Sign-in Using PowerShell
The best feature of using PowerShell is its ability to automate pretty much any task you need to accomplish in M365. I have written several articles about it. In this case, you would need to run the Get-AzureADUser command with the revoke-azureaduserallrefreshtoken. As mentioned in the previous section if you need to do this for a few users you can also use this PowerShell command. However, if you need to run it for many users or your whole organization, you would need a CSV list of your users and a script that can loop through the list running the Get-AzureADUser command.
An example of the command is as follows:
Make sure you are connected to the Azure AD module the run the command
Get-AzureADUser -SearchString <M365username or email> | revoke-azureaduserallrefreshtoken
If you need to run this command for many users, this example script will help:
#Declare Variables
$CSVPathUPN = “C:\Files\Users.csv”
Connect-AzureAD
#Run Script
Write-Host Signing out all users….
#Try import UPN CSV file
try {
$UPNUsers = import-csv $CSVPathUPN -ErrorAction stop
}
catch {
throw “Error importing CSV: $($_.Exception.Message)”
break
}
foreach ($UPNUser in $UPNUsers) {
$Uname = $UPNUser.UPName
$Dname = $UPNUser.displayName
Get-AzureADUser -SearchString $Uname | revoke-azureaduserallrefreshtoken
Write-Host Signing Out $Dname ….
}
Write-Host Done Signing Out All Users…
The above script takes a CSV file with field headings UPName and displayName, loads them into variables $Uname and $Dname and runs the the “for each” loop and runs the revoke command for each user in the list.
Easy Peesie.
So now you have 2 ways to revoke a M365 users sign-in depending on your situation.
Happy IT’ing
Dan
Enrolling an Android Device in Endpoint MDM Part 2
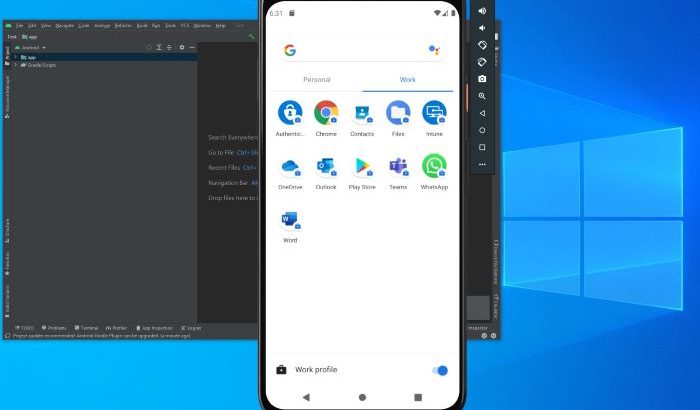
This is how you can be enrolling an android device in Endpoint with corporate-owned, fully managed user device. These are the following steps to get an Android device enrolled with screenshots. If you need a refresher on how do enroll a device with a personal device with a work profile, please check out Part 1.
Prerequisites to Enrolling an Android Device in Endpoint
Like mentioned above, the proper profile must be set-up.
Getting the QR code
A profile has been set up to enroll devices (Android only now) with a QR code. The code is located here:
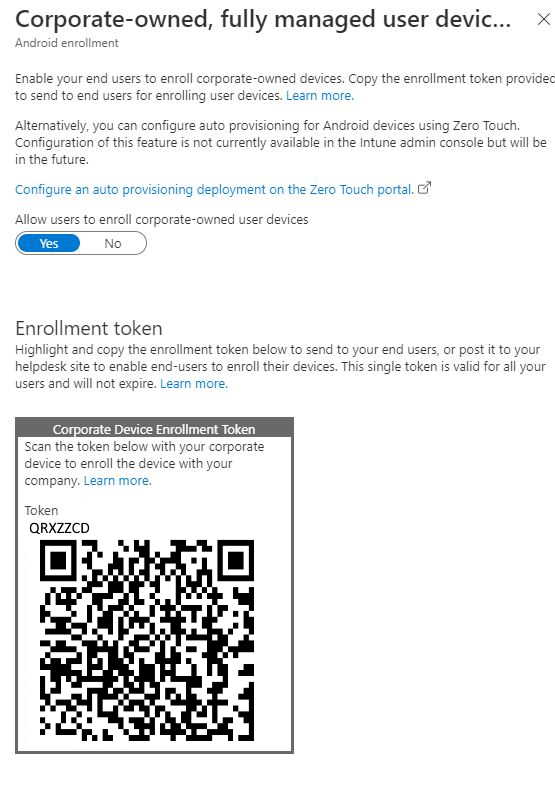
Since this profile is different then the others it shows up different. One the setting is toggled on you will see a QR code similar to what you see above.
Here is the QR Code:

You can print this code out and have it ready when you need to enroll a mobile device.
Enrolling a Mobile Device
The mobile device you are enrolling must be set to factory defaults. If it is a brand-new phone this has been done already. If it is a phone that has never been enrolled in Endpoint Manager, it needs to be factory reset. If the phone is already enrolled in Endpoint Manager and you need to redeploy it to another user, also need to wipe the phone and re-enroll. The Device Name and Management Name field in the portal need to be changed to reflect the new user (See Renaming the Device and Description in Endpoint Manager)
- To begin enrolling, at the first screen you see when the phone is turned on, tap continuously in the center of the screen until you see the QR code scanner. Samsung S10 and above the QR code scanner is built in. If the phone is lower than an S10 you will have to install QR Code scanning software first. Scan the QR code mentioned above. The process will begin.

- Next you will be asked to connect to Wi-Fi. Connect
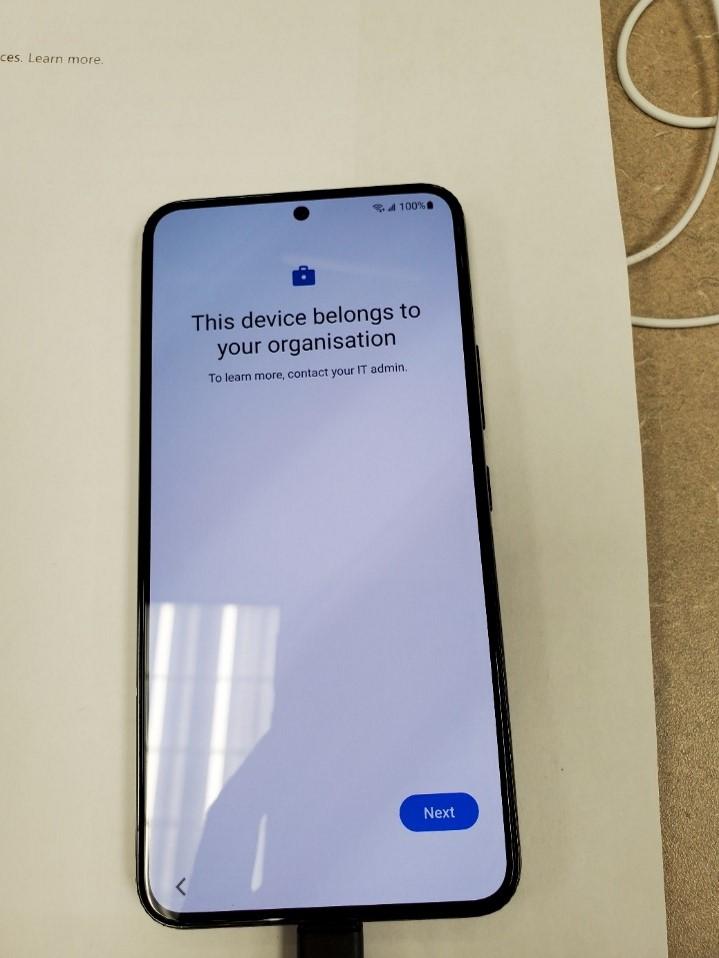
- Tap Next
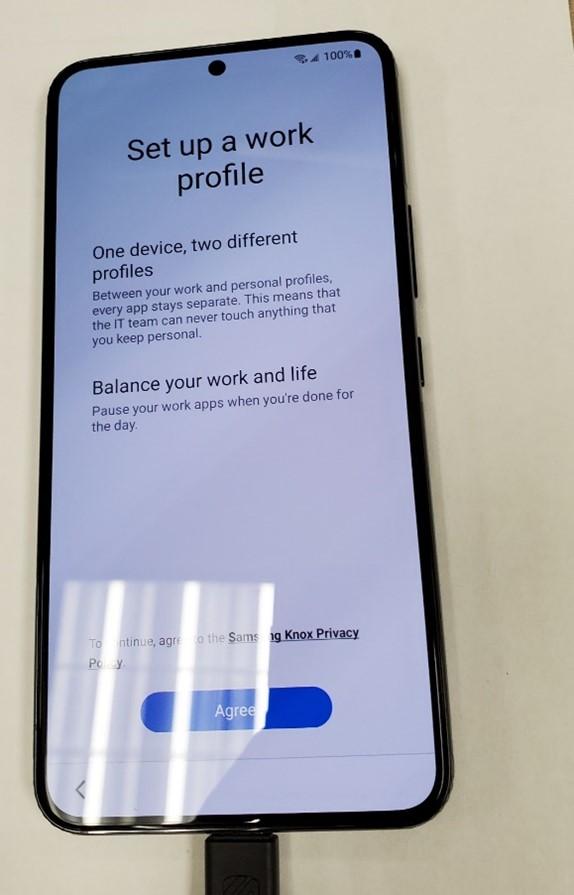
- Tap agree,
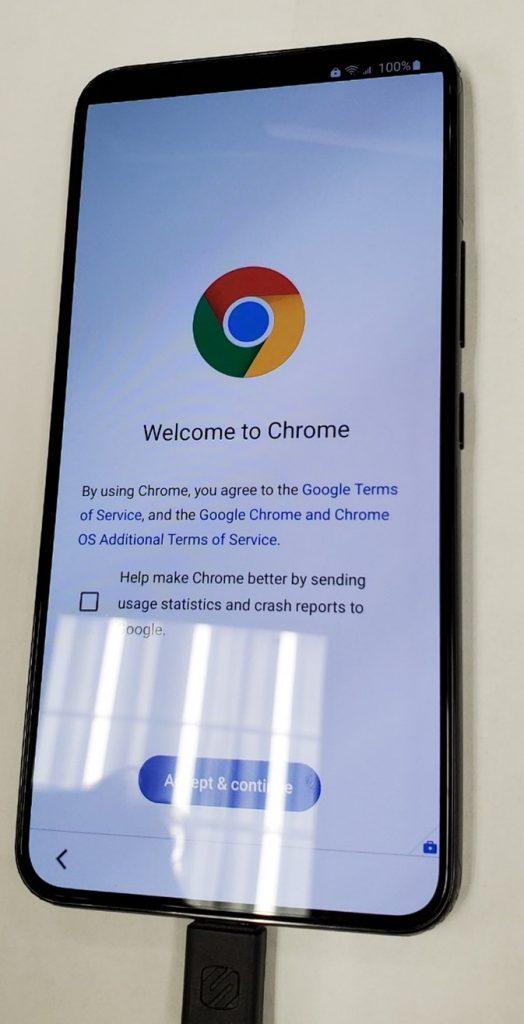
- Uncheck the check box and Tap “Agree and Continue”.
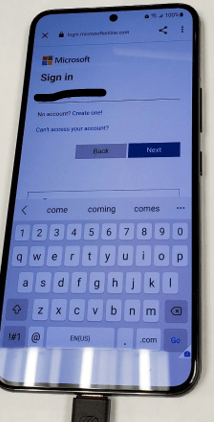
- Sign the user in.
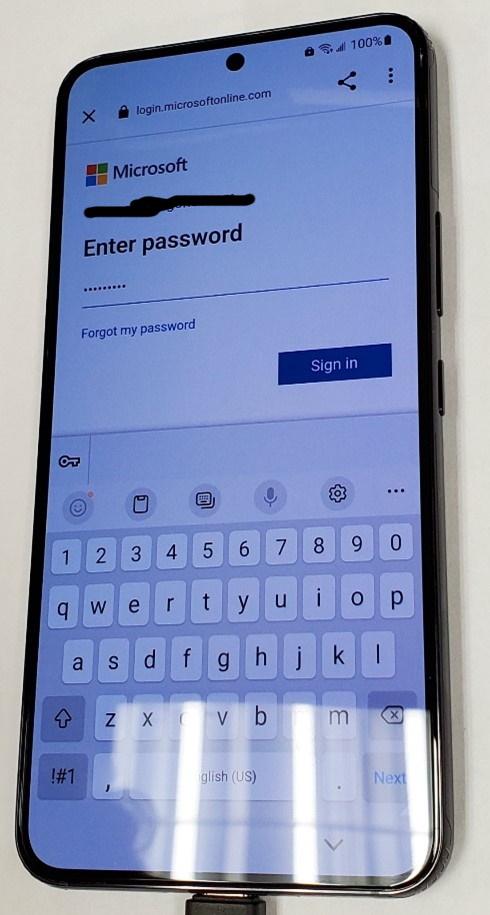
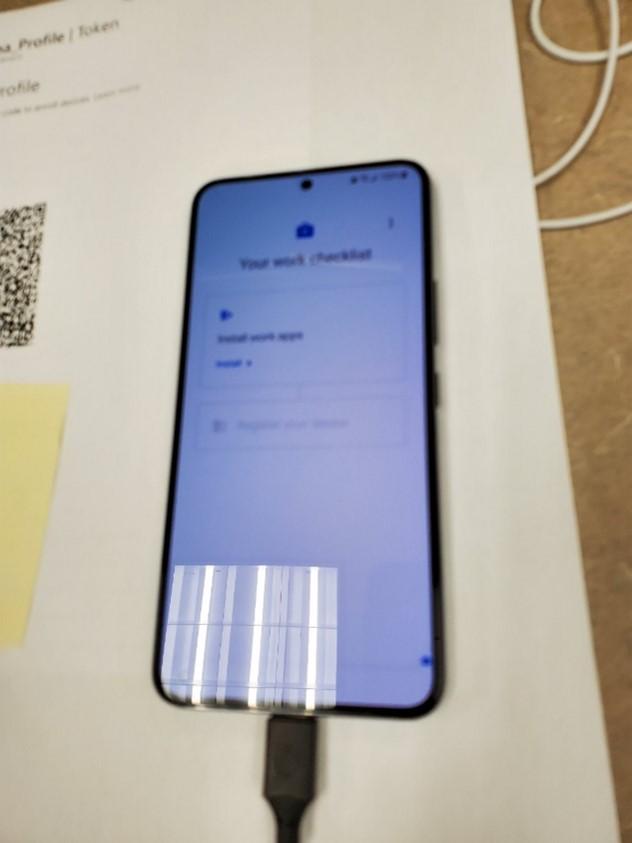
- Once you have signed in the user, tap “Install Apps”
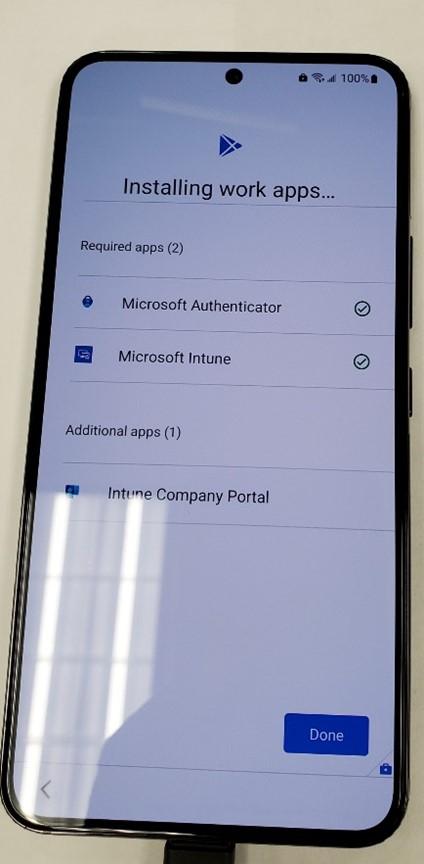
- The following Apps are installed. Outlook for mobile and Teams will be installed after due to a configured and applied App Configuration Policy. Tap done.
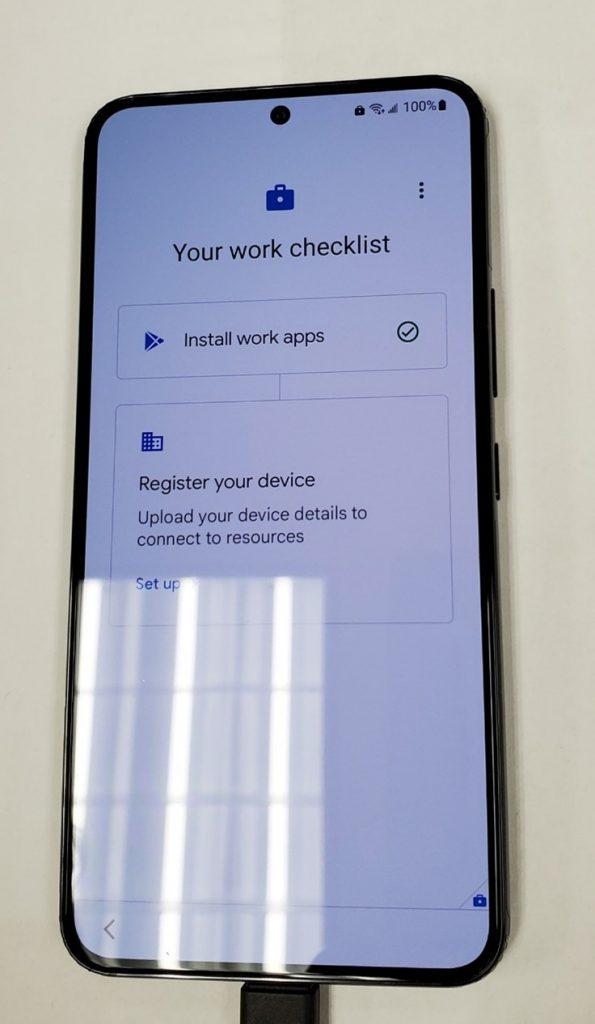
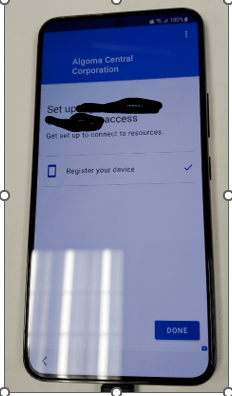
- Tap “setup” to register the device.
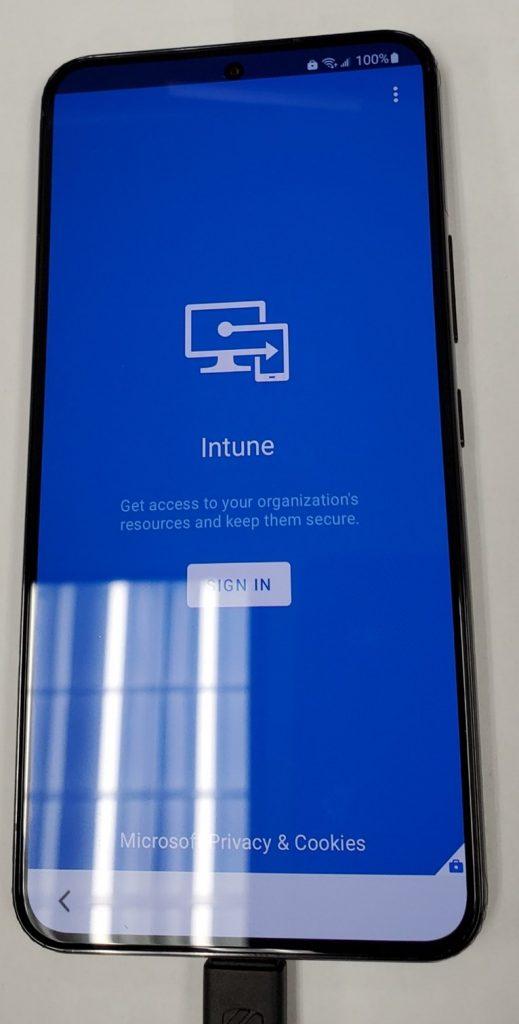
- Tap “sign in” to for Intune.
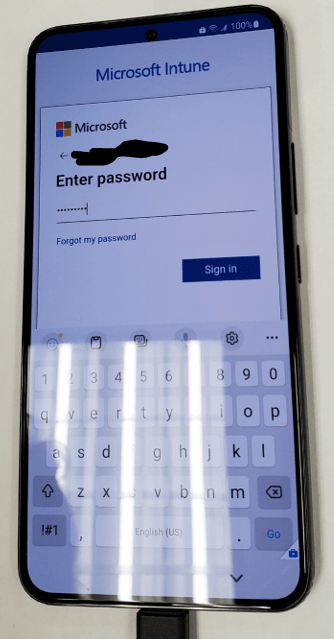
- Sign in with the users’ credentials again.
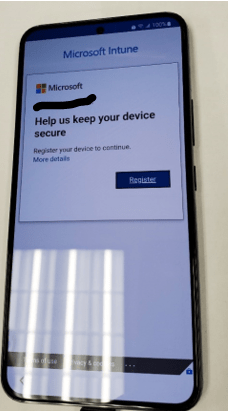
- Tap “Register”.
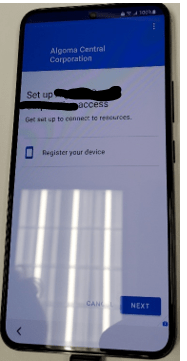
- Tap “Next”
- Tap “Done”.
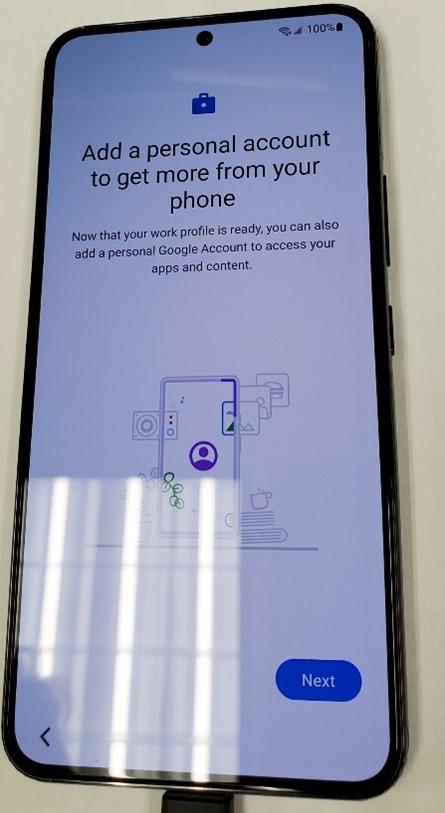
- Tap “Next”.
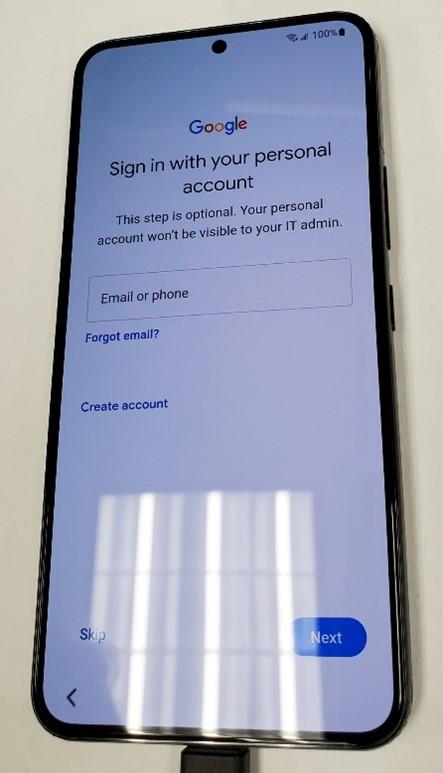
- If you want to add the users Google Account, you can do it here. If not, Tap “Skip”.
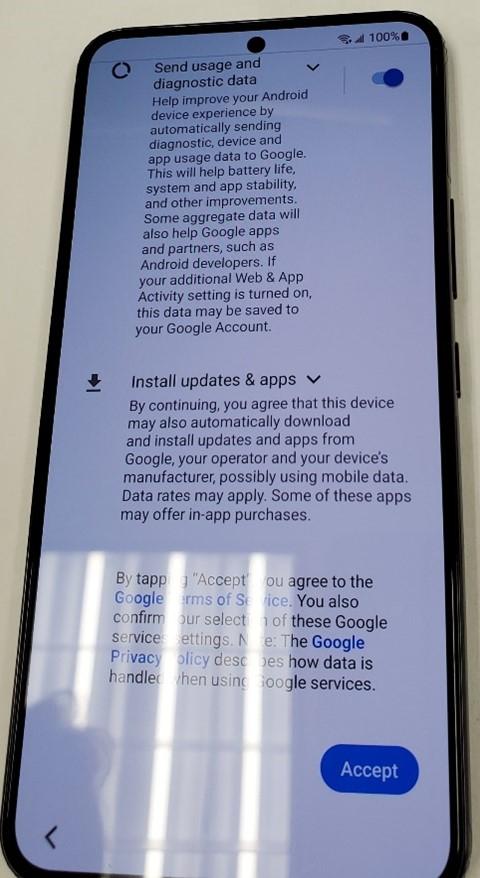
- Swipe up and tap “Accept”.
- Give the phone a passcode. I would use password as it is more secure.
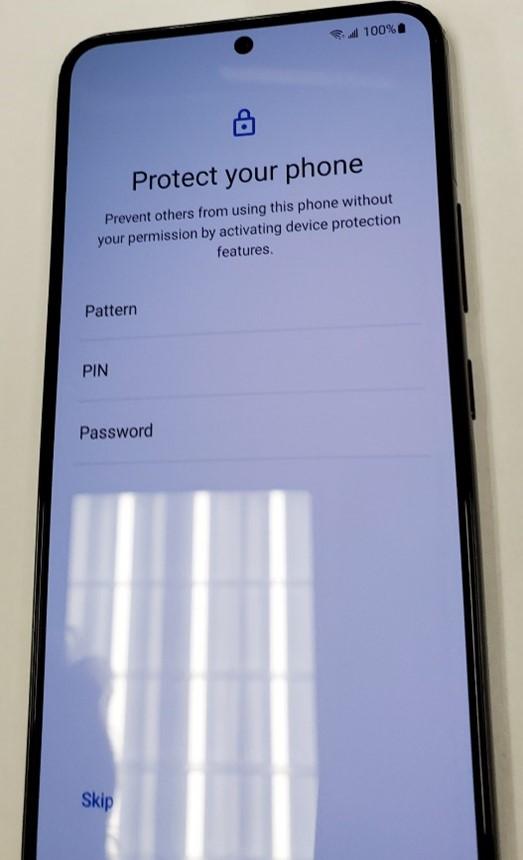
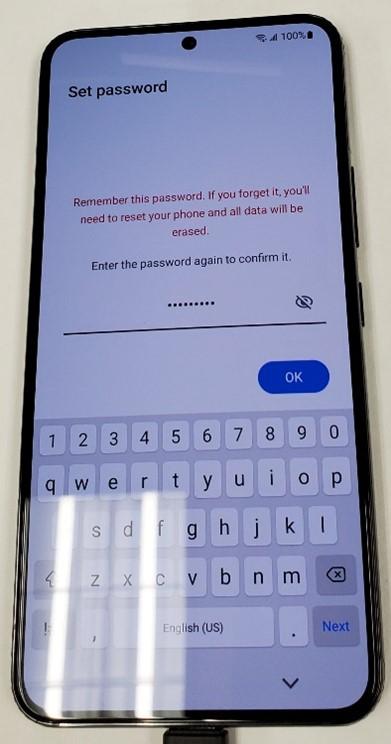
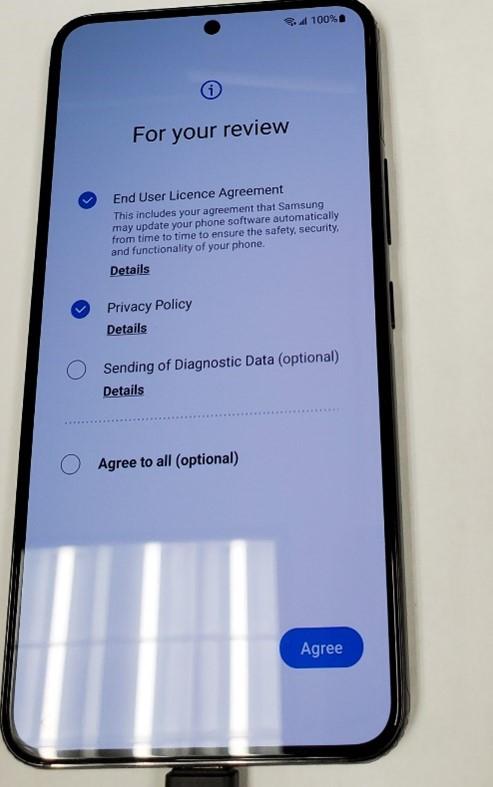
- Check the first two radio buttons and tap “Agree”.
The phone is now set up in endpoint manager.
Renaming the Device and Description in Endpoint Manager
The device is now in endpoint manager. To view the Android devices that are enrolled go here in Endpoint Manager:
It looks like this:
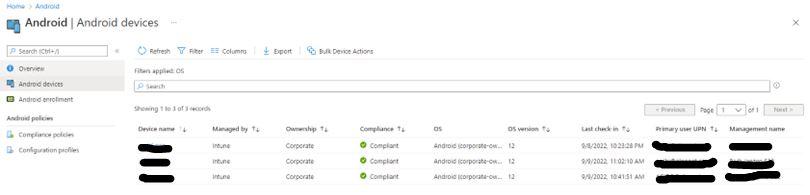
The two fields you need to change are the Device name and Management name. When the device is first registered the fields are auto generated. Change them so it is easier to read and distinguish who the device belongs to. I changed the Device Name to <userId>_model_number (i.e., abc123_S22). Change the Management Name to <User_Full_Name> <Model Number> (i.e., John Doe S22)
Common Tasks Performed in Endpoint Manager
With the Corporate Owner with Work profile enable you can perform the following tasks:

Retire – Good for when person leaves company but wants to take the phone. It removes all company data and email profiles assigned through Intune but leaves personal data.
Wipe – For Mobile devices it resets the phone back to factory defaults. Good for a lost or stolen devices
Delete – Removes the device from Endpoint but does not remove company data
Remote Lock – Locks the phone. Good for when phone is lost but the user may know where it is.
Reset Work Profile Passcode – Locks the Work Profile on the phone. A temp password is generated in Endpoint manager that allows for the workspace to be unlocked. DOES NOT reset the passcode of the device. You still need to let the user know to NOT change the assigned device passcode.
Play Lost Device Sound – Good for when user misplaces phone but is sure it is nearby. The lost alert sound can be played from one to 5 minutes on the phone while the user looks for it.
I will be writing an article on how to deploy apps to the device very soon. Stay tuned for that!!
Happy IT’ing
Dan
Prepopulating Outlook Contacts with the Graph API…Another Way

I had a project at work where I needed to streamline uploading contacts from a public folder to a user’s personal contacts. I was able to find this article to get me started. It really helped figuring out how to take a CSV file and use the MS Graph API to import the data into a user profile.
I was coming from an environment where we used to have an On Prem / Hosted Exchange so the information I needed was already there, but it was in a format that was incompatible to the new M365 environment. There were some differences to account for.
The Differences in My Situation
My requirements were a bit different:
- While the article shows you how to upload the CSV into the root of contacts, I needed to upload the data into a specific folder in contacts. The way we use contacts is the root is used for personal contacts and a folder below is used for staff contacts. It easily syncs to our Android phones. Sometimes we need to do a mass delete of staff contacts and this will not interfere with personal contacts.
- The Sample contact list in the article is a very small sample. I needed to figure out all the contact fields MS Graph / M365 uses.
- There was another contact list I needed to automate as well but it used a lot of fields that are only available in Office and not Microsoft 365. Office contact fields and M365 Contact fields don’t really link up. If you are NOT creating a contact list CSV from scratch (which most of you probably are doing), you must look at the field mappings that I will provide later in the article.
- I also needed to upload staff photos. Unfortunately using “For Each” does not work (I will show you later) and went with the old standard “while” loop!
So now that I have told you what difference I was up against. I will show you how I made things work.
Create a Registered App in Azure AD
Before you can use MS Graph to automate a lot of the functionality in Outlook you need to create an app in Azure AD. I like to think of it as login credentials that your MS Graph / PowerShell uses to get access to the M365 environment.
By default, only Global Administrator, Cloud Application Administrator and Application Administrator roles have access. You will need to give permission for the app to do the following:
- Contacts.ReadWrite application permission.
- Also, make sure to grant admin consent for the permission to allow the script to access the contacts for all users.
- You will need the following information for your script, the Application (client) ID and Directory (tenant) ID from the Overview page:

- Lastly, open the Certificates & Secrets page and create a new client secret. Note the value of the secret. This combination of the App Identifier, Tenant identifier, and App secret will allow our script to authenticate and use the assigned permission to interact with user mailboxes.
Creating the CSV File
This where I had mentioned Earlier if you were taking an older Office Contact CSV and need to get it to work with M365 you will have problems. I will give you a list of the older Office fields and what they map to in M365. If they don’t, I will note it as such. You will have to use another field in M365 (if you can) to map to (This list is not exhaustive):
| Office Contact Field | M365 Equivalent |
| File As | not manditory but is involved with title of contact in business card view (fileAS) |
| Display Name | must create or MS Graph will not create contact record(displayName) |
| Assistant’s Name | assistantName |
| Business Country/Region | countryOrRegion |
| Business Fax | No Equivalent |
| Web Page Address | businessHomePage |
| Business City | city |
| Business Fax | fax |
| Business Phone | businessPhone |
| Business Phone 2 | businessPhone2 |
| Business State | state |
| Business Street | street |
| Company | companyName |
| Department | department |
| E-mail Address | emailaddress |
| E-mail Display Name | emailname |
| E-mail 2 Address | emailaddress2 |
| E-mail 2 Display Name | emailname2 |
| E-mail 3 Address | emailaddress3 |
| E-mail 3 Display Name | emailname3 |
| First Name | givenName |
| Home Phone | homePhone |
| Home Phone 2 | homePhone2 |
| Initials | initials |
| Job Title | jobTitle |
| Last Name | surName |
| Manager’s Name | manager |
| Middle Name | middleName |
| Mobile Phone | mobilePhone |
| Notes | personalNotes |
| Other Fax | No Equivalent |
| Other Phone | No Equivalent |
| Radio Phone | No Equivalent |
| Title | No Equivalent that I know of |
| Zip / Postal code | postalCode |
When you export your old contact file into a CSV, now you know what you will have to change the field names so the data will import properly using MS Graph. As mentioned above DisplayName must be populated, or the import won’t work.
One more VERY IMOPRTANT ITEM:
If using email addresses, the record can only have one or three email addresses in it. When you try to use only two or one in any other spot than the first field, the creation of the record will fail. Please ask Microsoft about this (LOL)?
Now that you have the format in which to create your CSV, let’s go on to the next step.
Creating the Scripts
To upload to the user’s contacts (in this case a contact folder), you need to create 3 scripts. One calls the other when it is done:
- A script that declares the App Registration parameters and passes them to the subsequent scripts.
- Another script that imports the contact info from a CSV file you specify.
- Lastly, a Script that uploads contact photos from a folder you specify.
Declare App Registration Parameters
All this script is doing is taking the parameters you set in your Azure AD App registration (Client Secret, Client ID, and Tenant ID) and loading them into variables. It also loads the mailbox you wish to upload the contacts to and the path to the CSV file for good measure. Lastly, it calls the import contact PowerShell script.
Import the Contact Info From CSV
This is where the fun begins! This script has several functions which it calls in order
- It imports the CSV file.
- Checks to see if the contact folder already exists.
- If it does it deletes it and recreates for import. If not, it creates for import.
- For each contact record in the CSV file, it creates a contact record in the users Outlook Contacts
- To end this script, it calls the upload photo script.
Upload Photos from a Folder
This script uses the same CSV file, and it matches each First and Last name with the naming convention of contact photos you have stored somewhere (Firstname Lastname.jpg) and uploads them to the user’s corresponding contact record.
The key takeaway here is to make sure all contact photos are named exactly as the first and last name of the person they belong to.
Another feature of the script is scrubs names with apostrophes. If single quotes are misinterpreted in PowerShell, things break. Make sure the corresponding photo is also named without the apostrophe.
I mentioned earlier in the article that “for each” method does not work when going through each record and uploading a photo. That is OK though. A while loop does the trick. After you get a count of the records in the CSV, it is a matter of going though each record an uploading the photo.
Advice on Troubleshooting
As with all scripting, you need to test, test and test some more before it ends up in production. Start with one record and get it to work. If the record doesn’t work, you may need to go field by field to narrow it down.
As an example, the personal notes field is a text field but cannot start with a “+” sign. It breaks the import somehow (I found this out the hard way).
Another piece of advice is to make sure you DO NOT name your field headings the same as the contact fields you are importing. For example, the contact field name for a person’s email display name is “emailname”. In your CSV, do not call it that. Call it something different like “emaildisplay”.
As well, if you are unsure on syntax and field format, you can always connect with Graph Explorer. You can easily connect to you own Outlook and run commands manually to see how they are supposed to look like or to test your syntax before you put it in the script.
I found it quite helpful.
Download the Example Files
But before yo do consider tipping me. It was some work to generate this script and it would help a long wat to keeping the site going….
I have the files located here: (Download Sample Script). You can download them and customize for your environment.
Final Thoughts
There are probably a lot of organizations that have been using Outlook for several years. More than likely, you are coming from either an On Prem or Hosted Exchange environment. Trying to get your contact information into M365 takes a little bit of work, but it can be done. It is automation at its finest!
I hope this information will help you on your journey.
If you find this post useful please consider buying me a coffee. It will keep me caffeinated so I can provide more Quick IT Tips!
How to create a No-Reply Email Address in Microsoft 365
You have been tasked to create a no-reply email address in Microsoft 365. It sounds easy but it is a daunting task. You could use third party tools like Code Two, but…… Some examples also show you using a shared mailbox.
In some instances, it isn’t good idea to use either. One example come to mind if you need to send the initial response sent to the no-reply email to a distribution list. It is a lot easier than to set up dozens if not hundreds of shared email boxes in users Outlook profiles. Granted a shared mailbox does not use a license but in some cases it is not practical.
Now get your cup of coffee, I will now show how to create a no-reply address in Microsoft 365….
The Process for No-Reply Email Address
A user (either internal or external) sends an email to the no reply address:
- The user gets an auto reply stating that the email address they just sent to is not monitored but it has been forwarded to the appropriate group Distribution List(DL) – The Auto reply is set up by setting up a Workflow in Power Automate on the no-reply mailbox.
- Any replies to this address are marked read and deleted in the No Reply inbox. – This is accomplished by a Client Side In Box Rule in the inbox.
- The request gets forwarded to a DL of users you specify. They can reply to the request, but it will be coming from their email address and not the no reply address.
What You Need for No-Reply Email Address in Microsoft 365
- The name of the email address (@domainname.com)
- The members of each DL for each email address.
- The verbiage of each Auto Reply.
It is a good idea to regularly keep the member list up to date. Sorry, Dynamic Distribution Lists do not work for this.
Setup for No-Reply Email Address
- I created a mailbox (testnoreply@domainname.com).
- License with Exchange Plan 1 and Power Automate
- I created a DL with Members) (testdl@domainname.com) – Hide from GAL – Delivery Management only. People internally can send to it – it is hidden so none knows about it!
- An Auto Reply was set up with testnoreply@domainname.com – In Power Automate

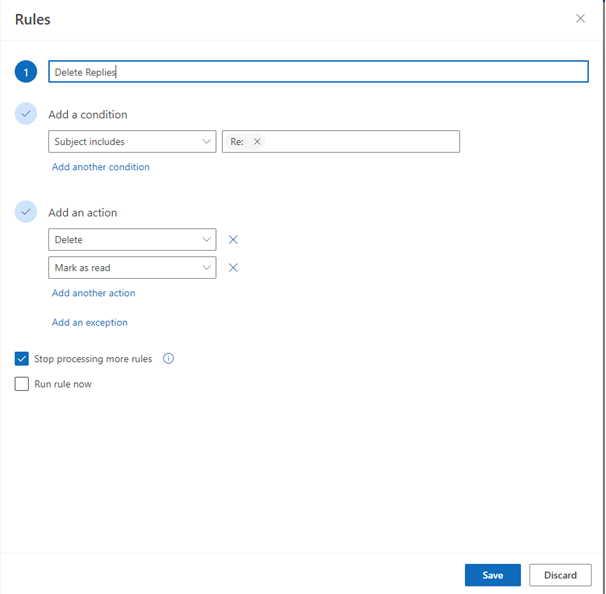
- 2 Rules in OWA – 1) redirect Rule to All messages to DL – 2) messages with Re: in Subject – those would be replies are marked as read and deleted.
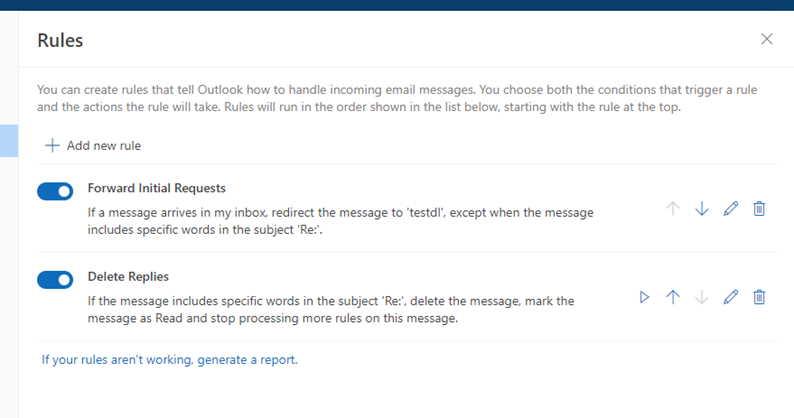
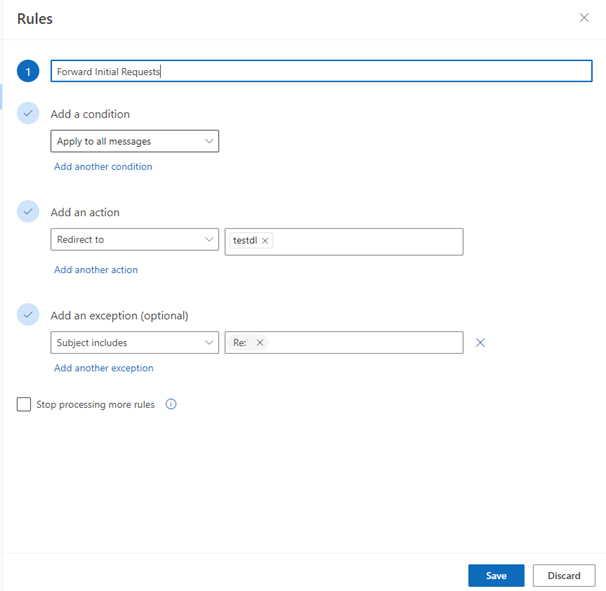
- An Anti-Spam Policy was created to allow forwarding to be set up on testreply@domainname.com so we won’t get O365 alerts each time the email request is forwarded to the DL:
https://security.microsoft.com/antispam?tid=99024eb3-7026-40fe-a9d2-89553fd405b7
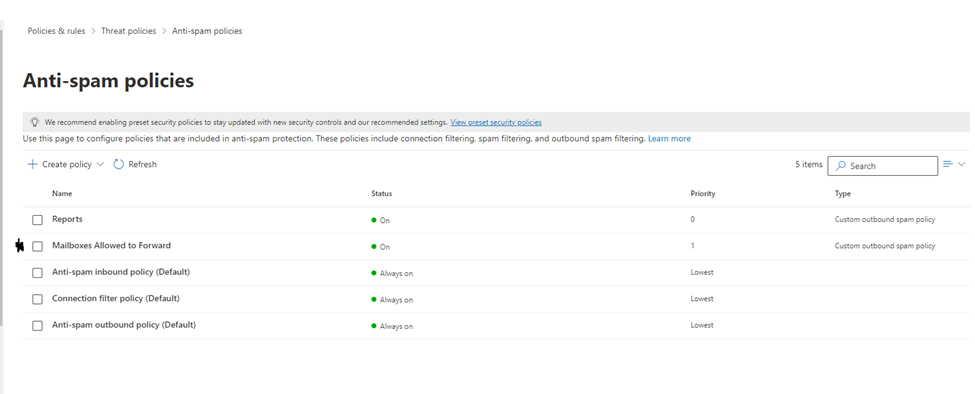
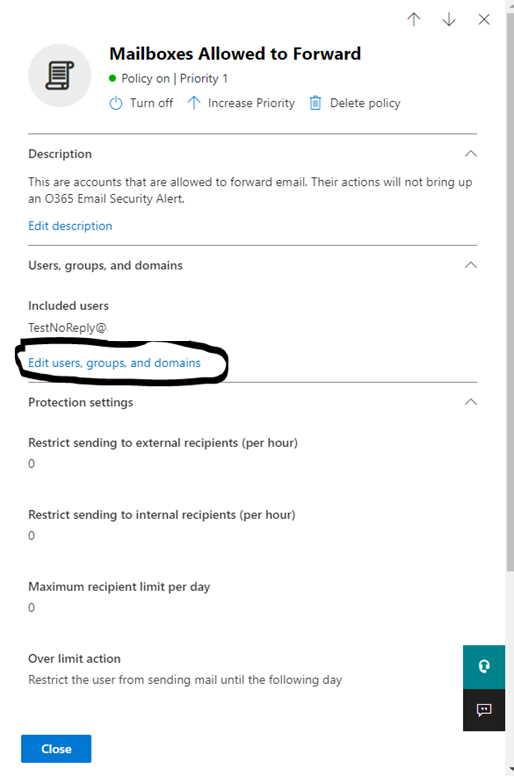
By doing the following you have setup a no-reply in M365 without the use of any third-party tools and without the need to use a shared mailbox. It is another tip for M365 you can add to your toolbox!
Happy IT’ing
Dan
If you find this article useful tip me! Thank you!
Two Ways to Guard Against MFA Fatigue Attack

Let’s face it, Cyber-attacks are on the rise. It seems like that every time we read the news some organization somewhere in the world has had their system compromised in some way. A good example is what happened to Uber the other week. They were a victim of an MFA Fatigue attack that allowed the attacker to eventually access to several systems deemed important and confidential to the organization. You need to guard against an MFA fatigue attack. I will show you two ways. One as a user and the other as an administrator.
What is an MFA Fatigue Attack
It is quite simple really. Most users have MFA set up to gain access to their system (i.e., O365). If their credentials get compromised the bad actor will login into the system and realize MFA is enabled when the logon screen tells them a “push” has been sent to the authenticator app.
The suspecting user receives the push and ignores it. The attacker knows this and logs in again. The user receives another push. It will not stop. The user gets annoyed and either out frustration or by accident they approve the push. Bingo, the attacker is in. This exactly what happened to an Uber user.
Guard Against MFA Fatigue Attacks as a User
It is quite simple. Change your password. Constant pushes to your Authenticator App is NOT normal behavior. This is a hint that your account has been compromised. Once the password has been changed the attacker can no longer login and the MFA prompts will stop. For good measure, you should contact your helpdesk to let them know.
Guard Against MFA Fatigue Attacks as an Administrator
The best way as an admin is to set up Phishing Resistant MFA but the quickest way (especially if you are using O365) is to set up MFA with number matching. It adds an element to the process the attacker will not have access to even through they have compromised your user credentials.
As an Admin, you will need to go into set up a group of users (M365 Dynamic Group is good) and add the users who will use MFA with Number matching. Then you go into the Azure AD portal and under Security / Authentication Methods / Microsoft Authenticator Settings.
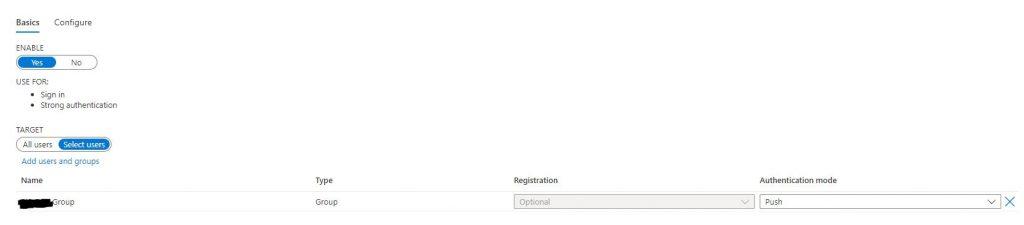
Toggle the switch to enable.
Go to the Target section and toggle selected user and choose the group you created in the previous step and set the Authentication Tab to “Push”.
Click the “Configure” Tab:
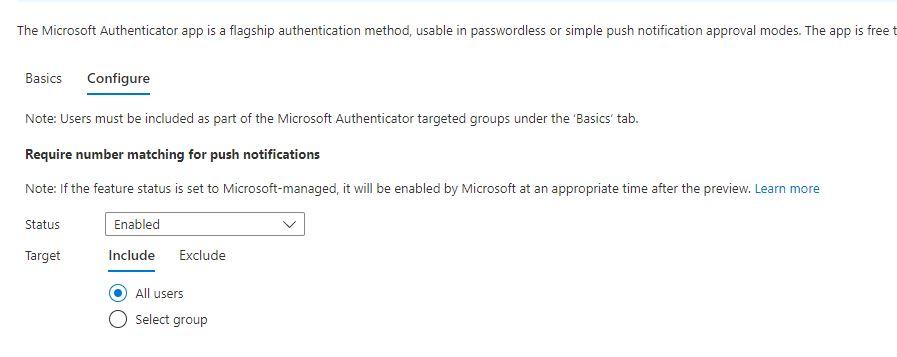
Change the status to “Enabled” and select the target to All “Users. All Users refer to all users in the target group. Click save. When the target users initiate a new logon that prompts an MFA it will include a number match:
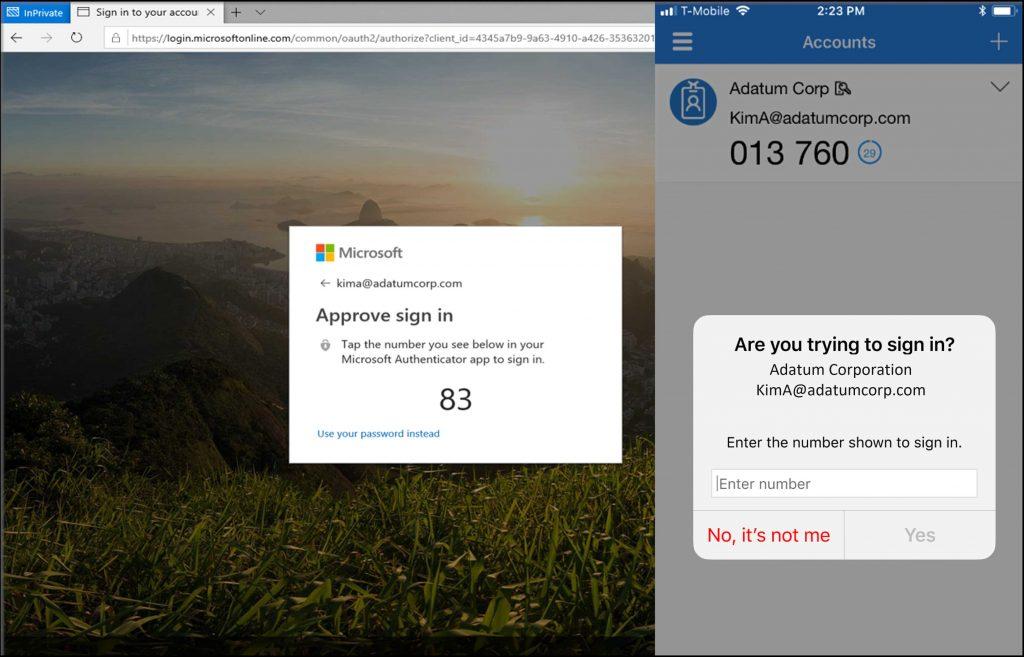
Using these two steps to Guard Against MFA Fatigue Attacks will ensure you do not fall victim. It will enhance security and keep you and your environment safe1
Happy IT’ing
Dan
5 Things You Should Not Do With M365 Admin
As an O365/M365 Administrator you can occasionally make a mistake. It may not seem apparent but later down the line it can cause you problems. Or maybe there is a setting within the Microsoft environment that is enabled / disabled by default that should be changed, you just need to know about it. Whether it is either of these situations knowing the 5 Things you should not do with M365 Admin will help you out in the long run.
Do Not Use the Global Admin Account
Don’t make every user who performs some form of Admin in your tenant a Global Administrator. There are several types of Admins and using the principle of least privilege you only need to give enough access required for the user to perform their job.
Not Having a Backup Admin Account With no MFA
In the unfortunate incident of your Global Administrator account being compromised it is good to have a backup Administrator account. If you do not it will take Microsoft a long time to get your access to your Tenant again. This way you can get back in and disable the Global Admin account and mitigate any damaged that might have been caused. Do this by creating another Global Administrator Account. Do not call it Admin!! Call it something else. Make the password long and complicated and DO NOT enable MFA. Doing so would just complicate things. Store the information for this account offline (like in a safe). The technical term for this type of an account is a “break glass account”.
Having a Second Domain With no DNS TXT Record
So, you decide to add a second domain to your tenant. Great. To do so you need to add a DNS TXT record to your Domain registration records to prove you own this domain through the add domain wizard in the Admin portal. You are successful. You may be tempted to delete the domain TXT record afterwards but DON’T. If you do you have set your self up for a possible DNS Poisoning attack. Leave it.
Not Understanding Shared Mailbox Behavior
This falls under a mistake that is not apparent until later. Creating a shared mailbox is easy. You go under the shared mail tab in O365 Admin and create a shared mailbox. Then you add users to the mailbox. If you want to be more granular you can also administer it through the Exchange Admin Center in your portal. The problem exists when you take a standard mailbox (single user) and convert it to shared. This is usually done when a user leaves the organization and other users need to access their mail. You may be doing a user audit some months later and decide that this user can be deleted.
If you forget that this user is a shared mailbox, and the delegates still need access to it they will lose the mailbox!! A better way to do this is block the defunct user account sign in. You can also report on blocked users and see which ones have a shared mailbox. Find out who the delegates are and see if the still need access. If they don’t, you can at least delete the account safe in the knowledge you won’t be cutting of anyone’s mailbox access.
Not Understanding Guest User Access
Giving users guest access to your organization I fine but O365 has guest access setup by default:
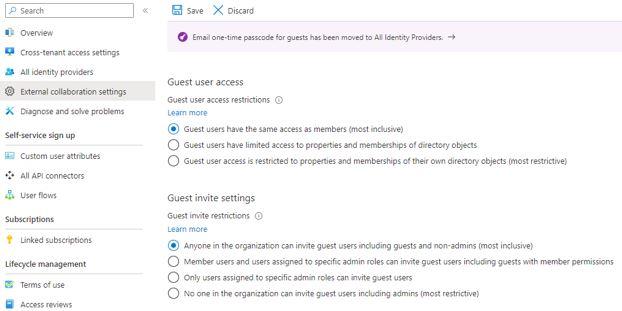
This is a most inclusive / least restrictive access for guest in your tenant. You may not want this type of access granted to your guests. Adjust to whatever makes yur organization compfortable.
Making sure the 5 Things you should not do with M365 Admin are addressed will ensure that your have not only security hardened your environment, you will have spared yourself some unexpected surprises along the way!
Happy IT’ing
Dan