
Try Windows 11 in 5 Steps

So you would like to try Windows 11? Well it is pretty easy. We are starting to see more of these installations and it is important that your currently running software works with it. It is better to test before upgrading so you know what works and what doesn’t before a full scale upgrade. I strongly suggest rolling it out in phases and per Microsoft’s Recommendations. All you have to is initiate the following five steps.
- Have at least Windows 10 Professional
- Install Microsoft Hypervisor Manager
- Download the Windows 11 ISO
- Create Your Virtual Machine
- Configure Your Newly Installed Virtual Machine
I will show you how to do this in the next Sections:
Have at least Windows 10 Professional
Unfortunately you can’t just have “Widows 10” you also need to meet the following requirements:
- Windows 10 Enterprise, Pro, or Education
- 64-bit Processor with Second Level Address Translation (SLAT).
- CPU support for VM Monitor Mode Extension (VT-c on Intel CPUs).
- Minimum of 4 GB memory You will need at least 8 GB if you are going to use Microsoft Hypervisor Manager
The Hyper-V role cannot be installed on Windows 10 Home.
Install Microsoft Hypervisor Manager
To install the Hypervisor Manager, you need to go into settings or the control panel and add Windows Featires:
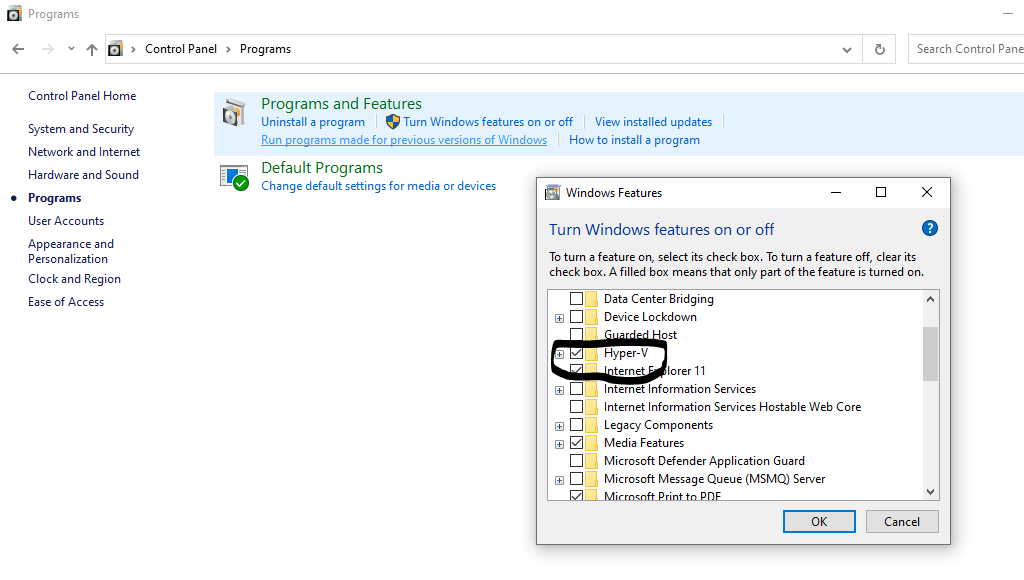
All that is left is a reboot and then you can proceed to the next step.
Download the Windows 11 ISO
Please go to Microsoft’s Windows 11 Site and Download the ISO file for your region. I would recommend the Multi-Edition ISO so you can decide what version is best for you. You can leave it in your download folder of your favorite browser or you can move it to a location you would like, Just remember where you saved it. You will need it for the next step.
Create Your Virtual Machine
First Verify that your computer can support Virtualization in the BIOS / UEFI. Start the Microsoft Hypervisor Manager and click New / Virtual Machine.
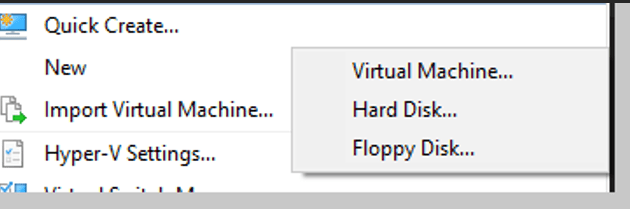
This will start the Virtual Machine Wizard.
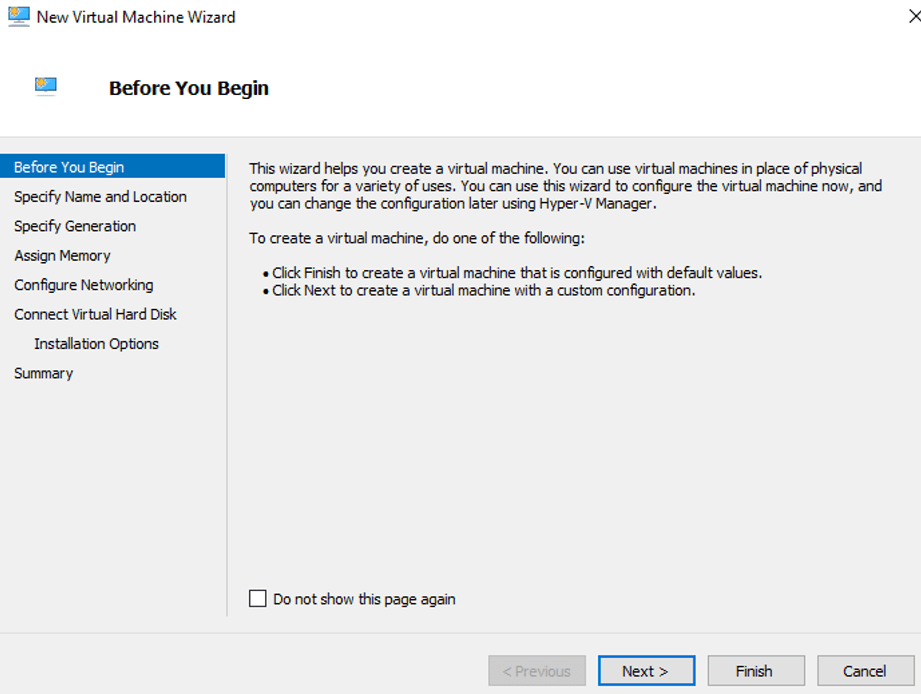
Click Next.
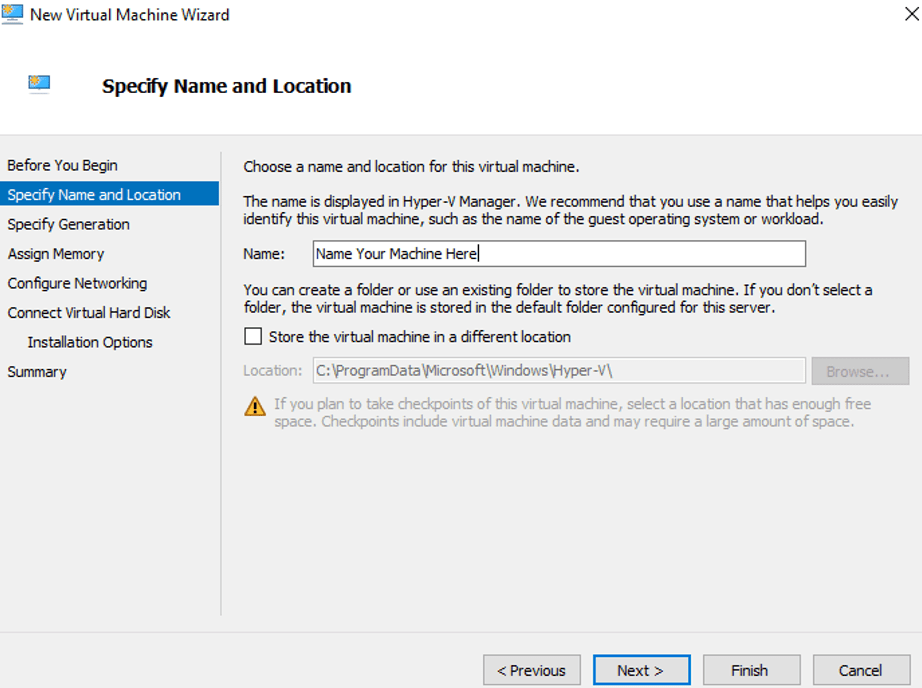
Name Your Machine and Click Next.
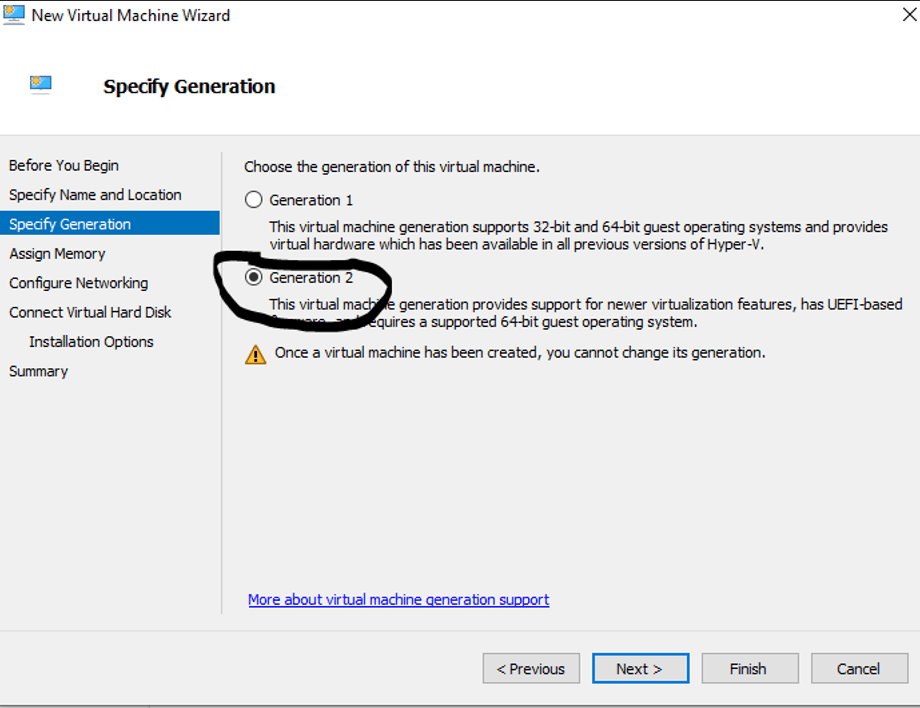
You need to choose Generation 2 as Windows 11 uses these features in order to run. You will have to come back after configuration to set the number of processors you want your virtual machine to use.
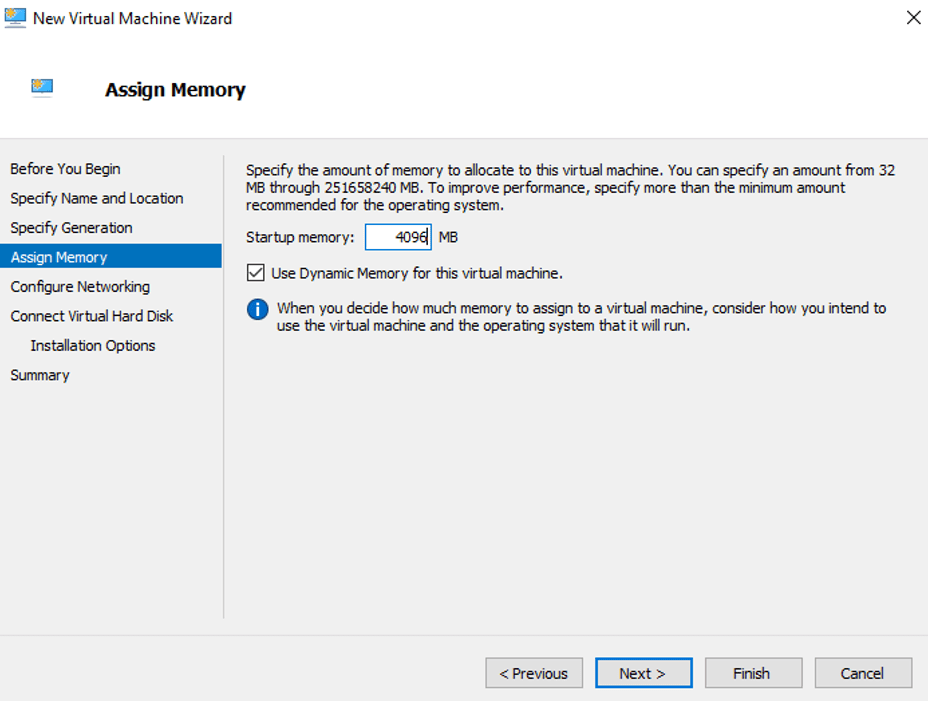
Assign at least 4 GB of memory. This is a minimum requirement for Windows 11. Having said that you will need at least 8GB of RAM on your host machine to be able to run the virtual machine. I have 16 GB of RAM on my machine. It was really helpful.
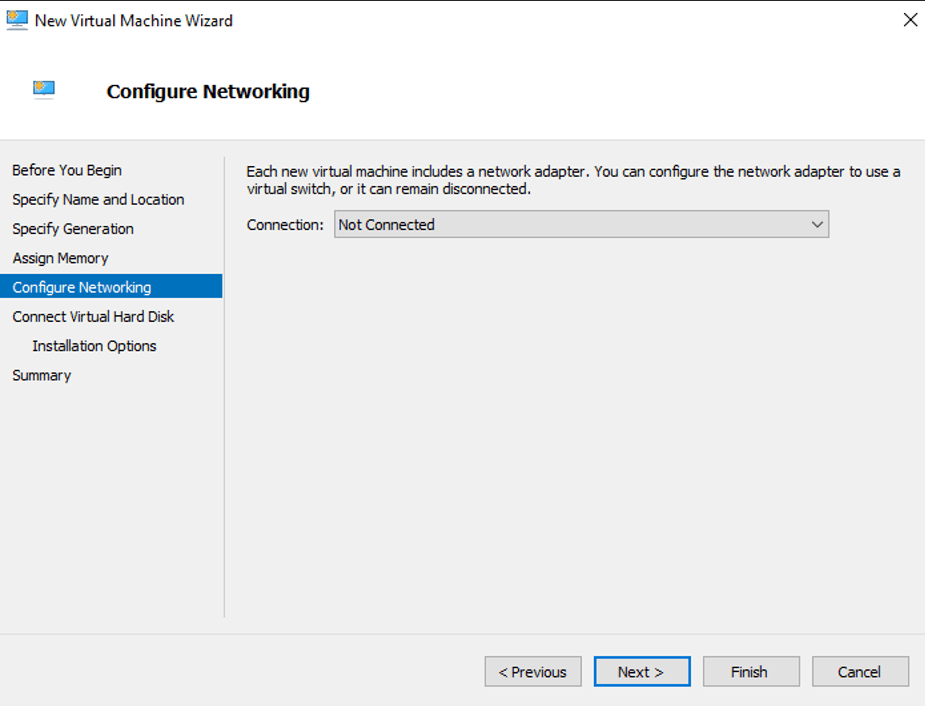
For the Networking section. Choose “not connected” for now. We will set it up after the Virtual Machine is created. For now, just click Next.
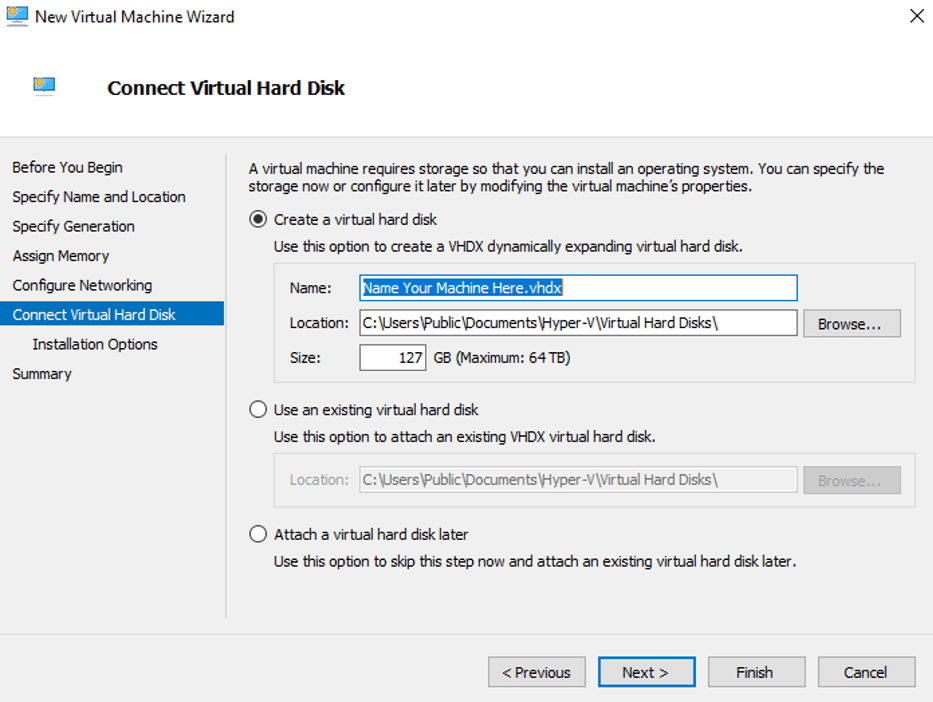
For the Virtual Hard Disk, just accept the defaults and Click Next.
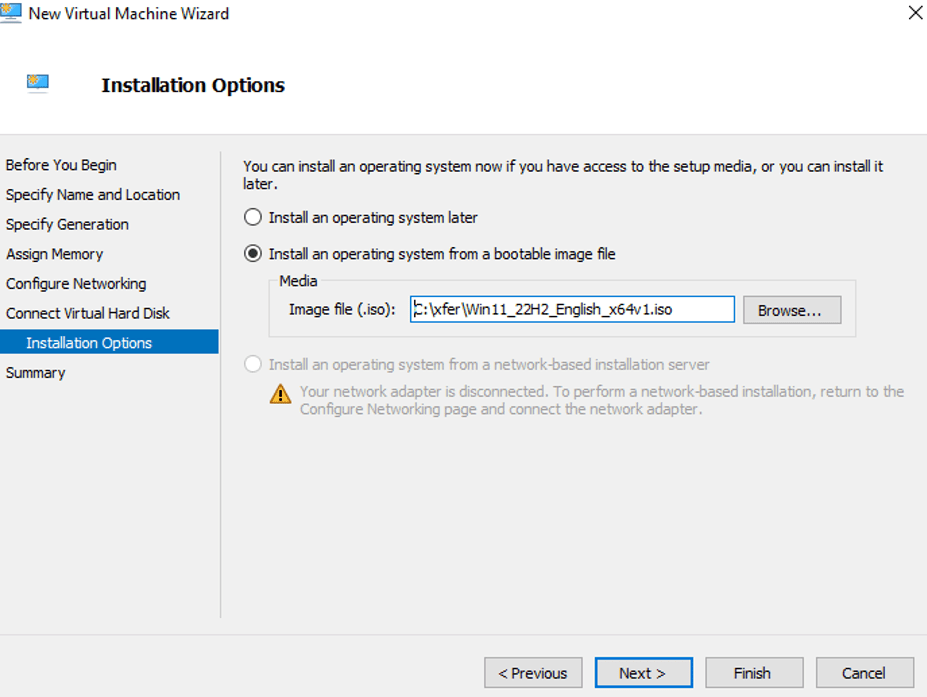
In this section, please choose “Install an operating system from a bootable image file” and browse to where you saved the Windows 11 installation ISO. Click Next.
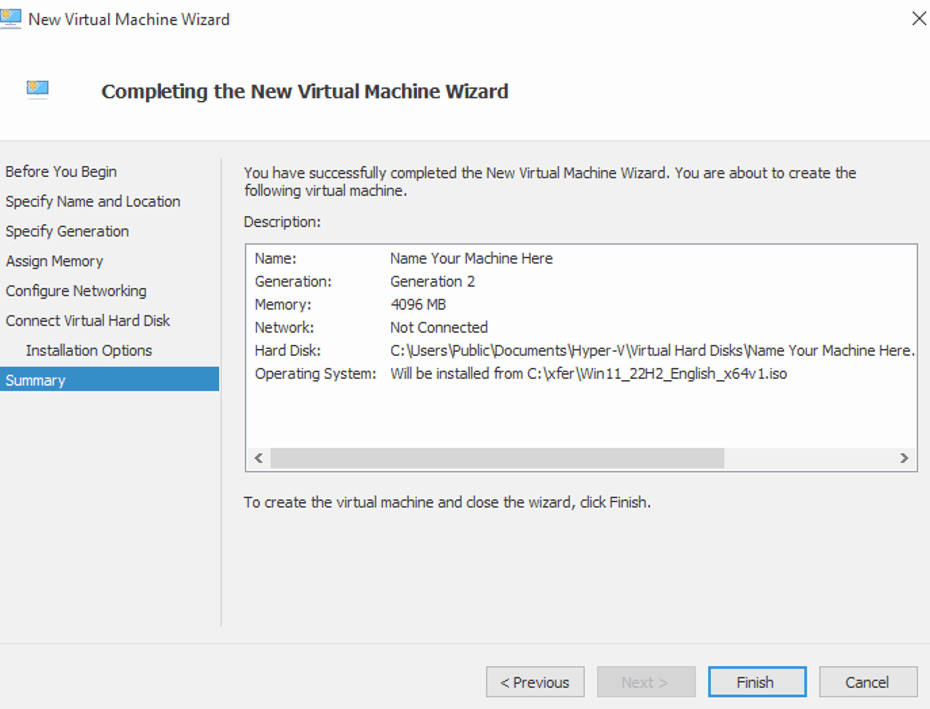
Click Finish and your Virtual Machine has been created. Now lets configure it…..
Configure Your Newly Installed Virtual Machine
Go to the main window of the hypervisor manager and right click on the virtual machine you just created and choose “Settings”. We need to configure the processors so Windows 11 can run and the networking so it can access the internet / intranet through the host machine.
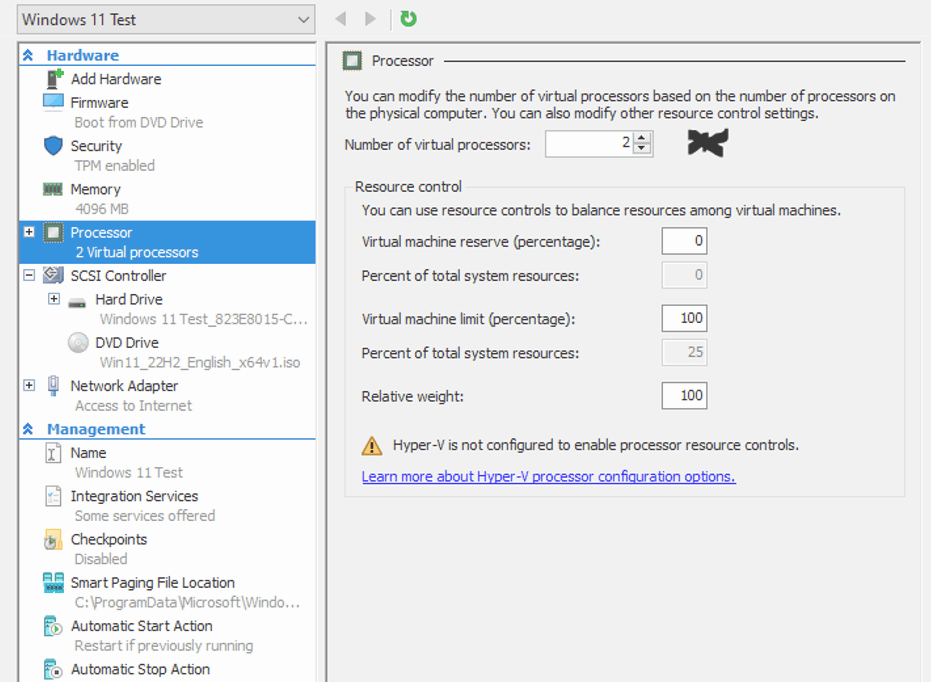
Adjust the processors by clicking the item on the left pane. On the right choose 2 processors to start. That should be enough for testing purposes.
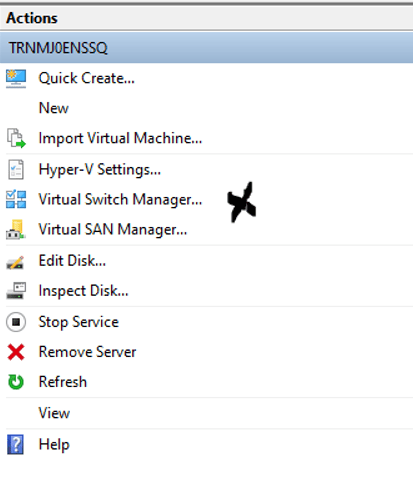
Go back to the Main window and in the right pane you will see the Virtual Switch Manager. Double click that and you will be able to create a virtual switch so the VM can get networking:
Select External and Click Create Switch:
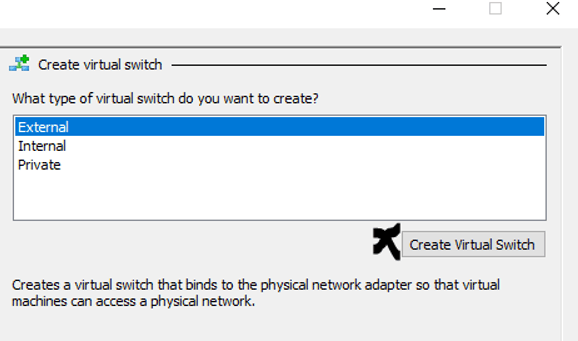
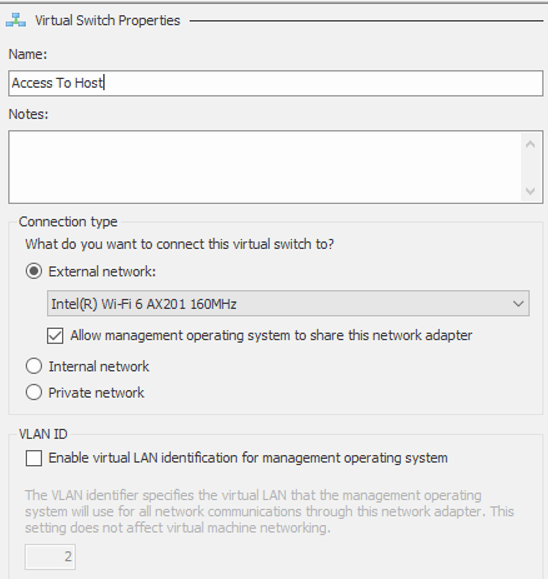
Name the Switch and click OK.
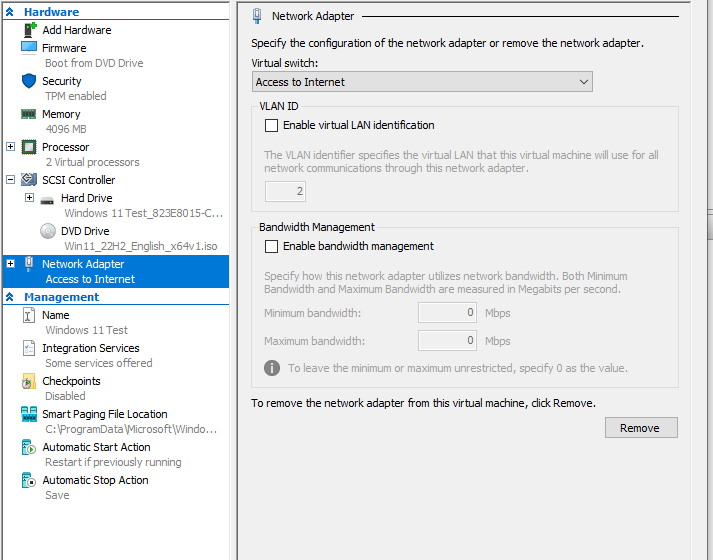
Go back to the settings of your VM and choose Network Adapter from the left pane. In the right pane choose the virtual switch you created from the drop down and click OK.
Conclusion
You are now ready to Try windows 11. Just double click the machine you created in the main window of the Hypervisor Manager and it will begin the installation process of Windows 11 like you you were running it on Bare Metal Hardware. It’s like Hardware Troubleshooting. You need to make sure your systems will work reliably and predictably with the new OS.
Happy IT’ing
Dan
Set up Working Hours in O365 Calendar (Two Ways)
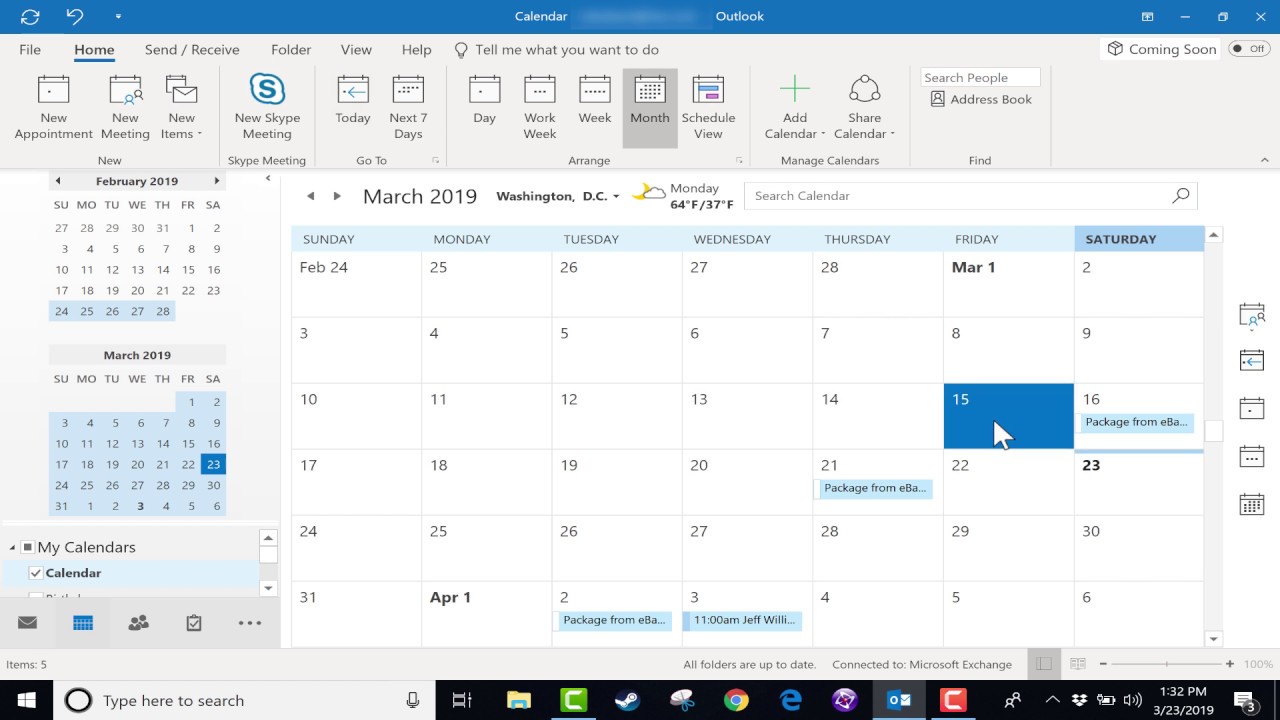
You might think you have working hours in O365 Calendar are set up properly, but something is not right. Users are noticing that when they book appointments in a shared calendar or their own, the working hours for the organization do not match what is in the calendar. There are two places to check for this depending on which type of calendar you are booking in. Let’s go through the ways.
Set Working Hours in Your Own Calendar
This is set locally in your Outlook client and can be accessed by going to File / Options / Calendar and changing the Working Hours to your Organizations start and end time:
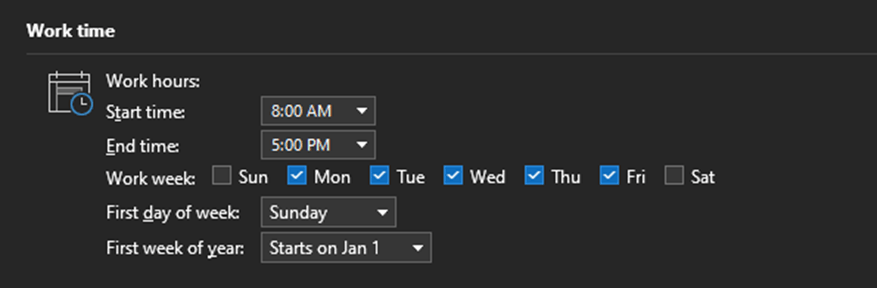
It is a good idea to make sure you have the proper time zone chosen as well:
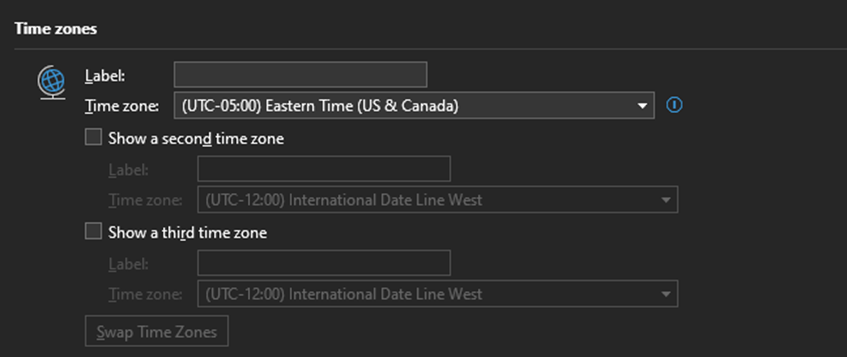
If you are using the webmail version of Outlook, go to Settings (Gear Icon) and then view all settings at the bottom and change the working hours and time zone here:
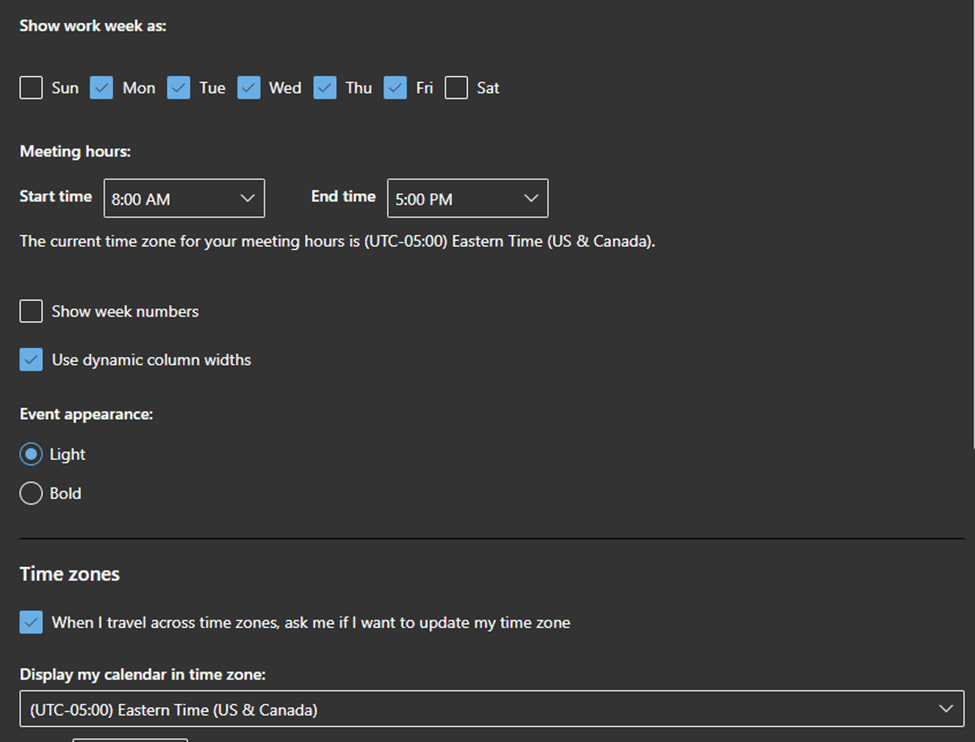
Set Working Hours in a Shared Calendar
To accomplish this, you need to be an admin in O365. It requires some PowerShell commands. If you have a lot of shared calendars you need to change, you will want to use a for each loop to cycle through them all.
Use this command to ensure your calendars have the right working hours and are operating in the correct time zone:
Example:
Set-MailboxCalendarConfiguration -Identity <UPN> -WorkingHoursTimeZone "Eastern Standard Time" -WorkingHoursStartTime 08:00:00 -WorkingHoursEndTime 17:00:00If you need configure many calendars, use a PowerShell Script:
## Declare Variables

$CSVPath = "FilePathHere\SharedCal.csv"

##Try import UPN CSV file

try {
    $SharedCals = import-csv $CSVPath -ErrorAction stop
}
catch {
    throw "Error importing CSV: $($_.Exception.Message)"
    break
}

foreach ($SharedCal in $SharedCals) {

Set-MailboxCalendarConfiguration -Identity $SharedCal.calname -WorkingHoursTimeZone "Eastern Standard Time" -WorkingHoursStartTime 08:00:00 -WorkingHoursEndTime 17:00:00

}
In this case, when a user wants to book into a shared calendar, they will only see the work hours as free (white space). They can book outside of the available working hours they just can’t see it until after they book.
If you follow these two ways to adjust Working Hours in O365 calendar, you will have absolutely no problem scheduling meetings!
Happy IT’ing
Dan
Allow Specific Users to Auto-Forward

You would like to allow auto-forwarding to specific domains. Great! What if you want to allow specific users to Auto-Forward? Back in the day you could probably only allow / disable domains from auto-forwarding. However, with the ever changing landscape that is M365 you now can get more granular with the process. Now you can specify exactly what users are allowed to do this.
It is a bit of a trick. If you know a bit about Exchange Online Admin and the Security Portal, you will have no problem, especially if your users aren’t using Microsoft Flow. I can show you in two steps.
Allow Specific Domains to Auto-Forward in Exchange Online Admin
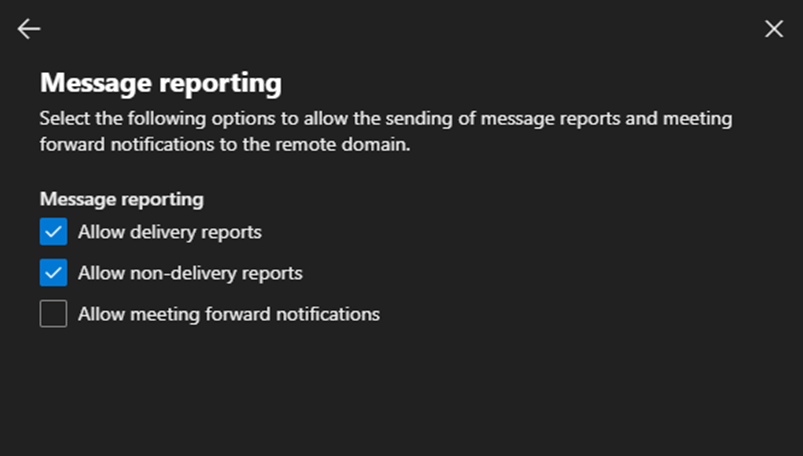
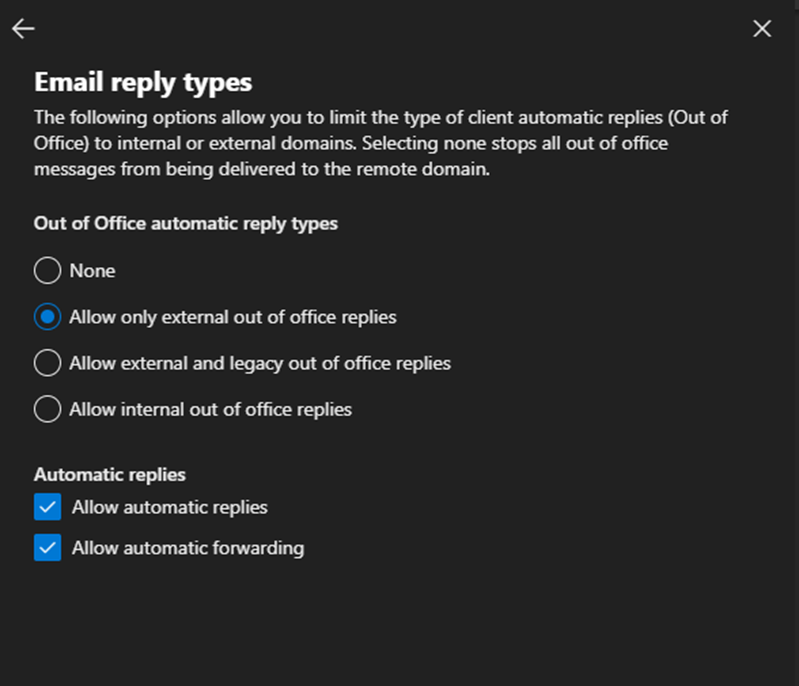
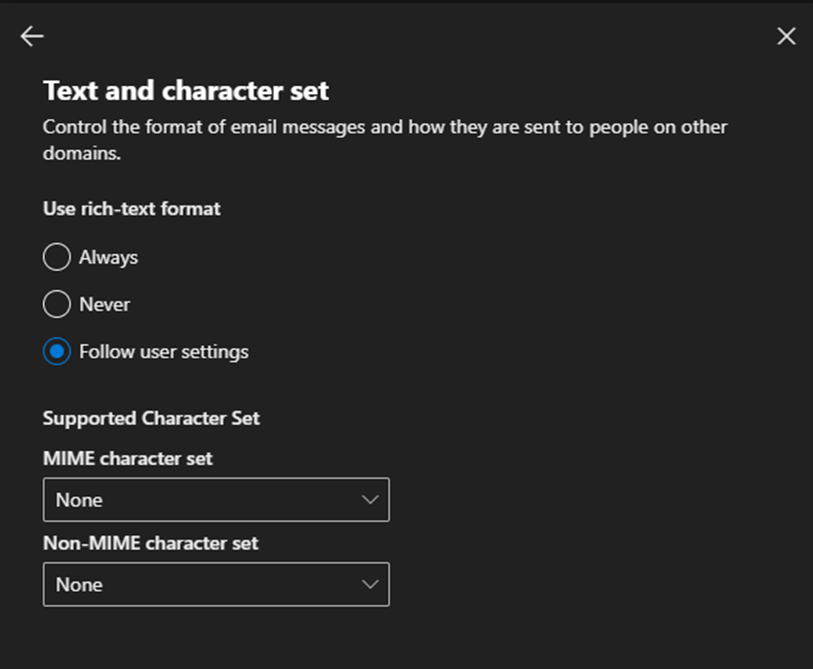
It is extremely important that you set this up correctly or the next step won’t work. Basically, you need to disable all domains (* – default domain) from auto-forwarding and then specify exceptions. When done like this, the exceptions are processed first. Go to Remote Domains in Exchange Admin:
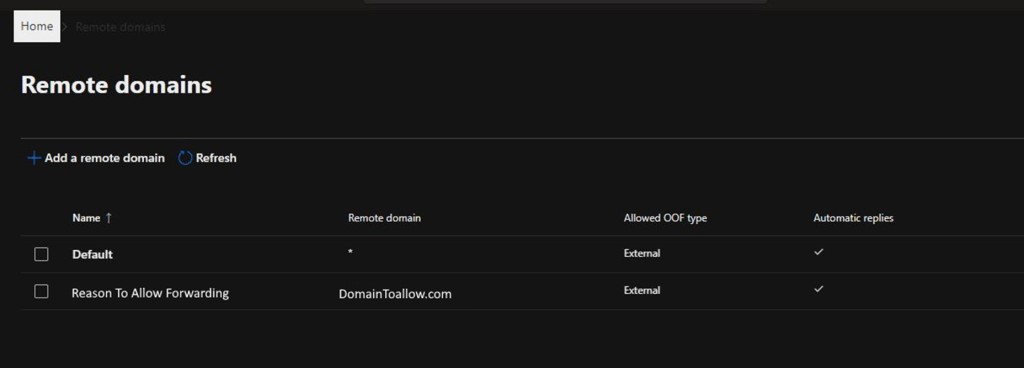
These are the settings you need to have for the default domain:
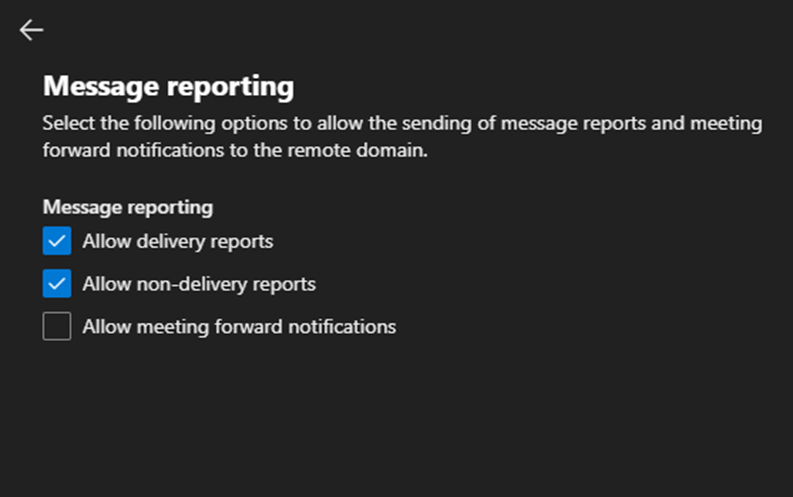
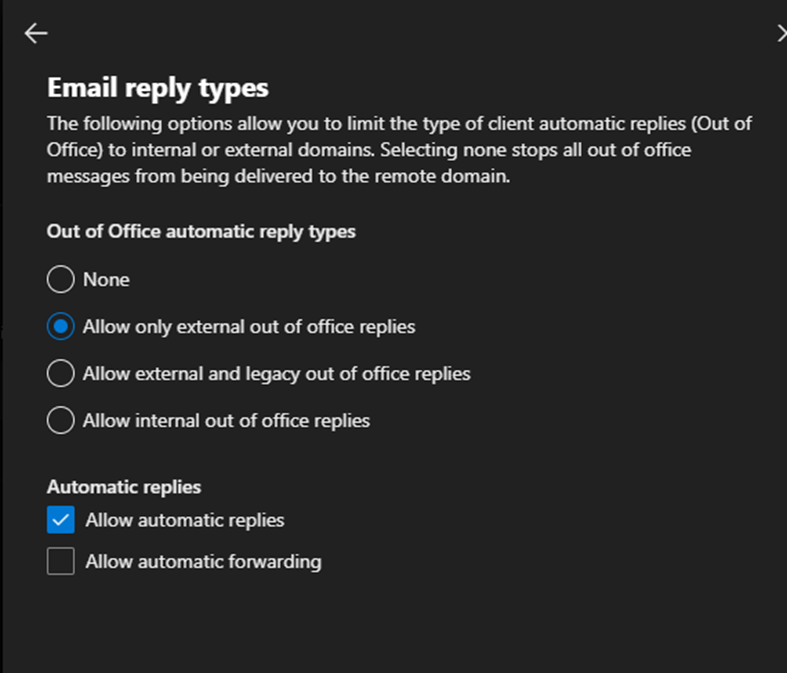
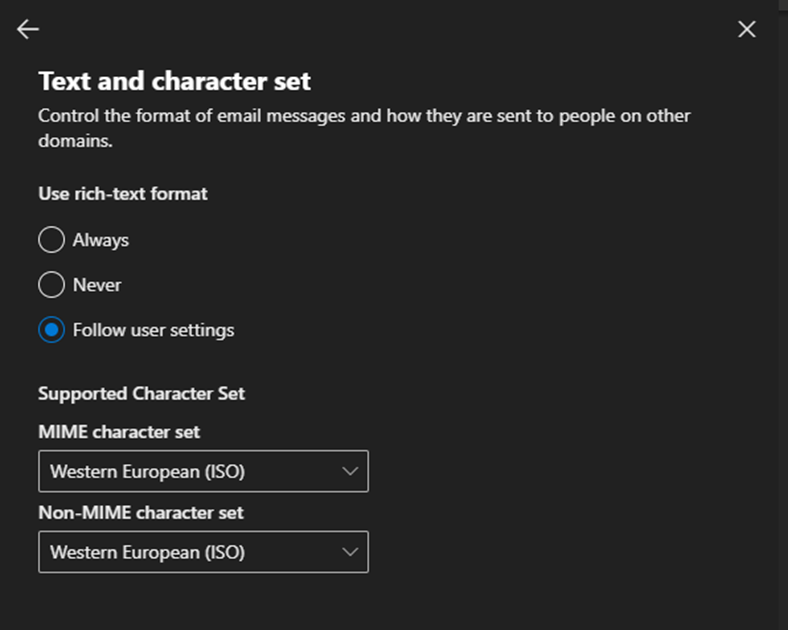
Next, in the list of remote domains you want to allow forwarding for are set up like this:
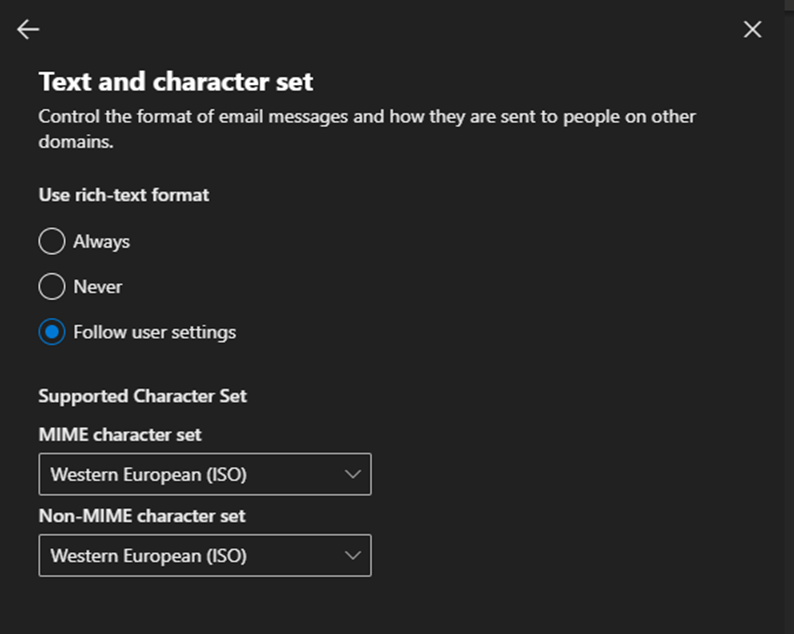
Allow Specific Users to Auto-Forward in Exchange Online Admin
Now that you are done step one, navigate to the Microsoft Security Portal Under Email and Collaboration / Policies and Rules / Anti-Spam. Here you will see your Anti-Spam Policies:
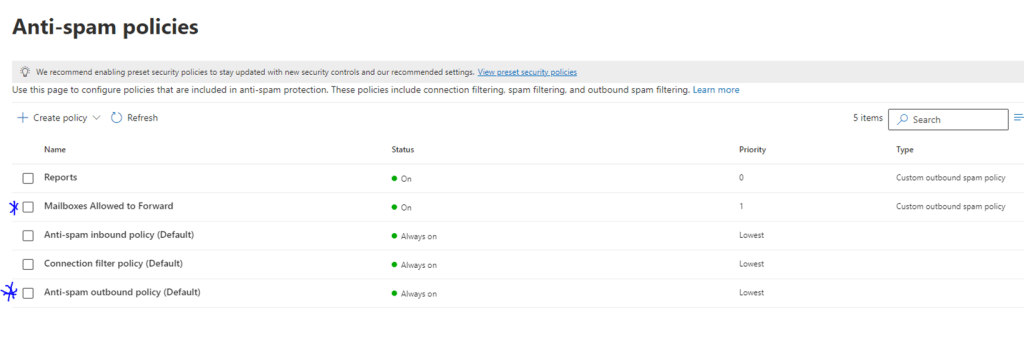
The Anti-Spam Outbound Policy (Default) should already be there. You just need to add your own Custom Outbound Anti-Spam Policy. Below is what the Default Anti-Spam policy should look like:
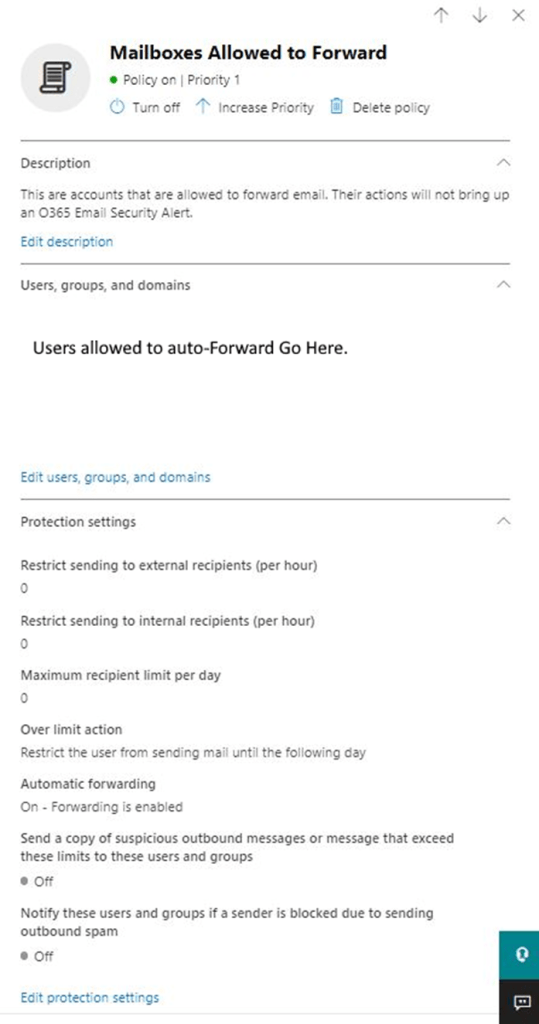
Unfortunately specifying groups does not work. I have tried several ways and even reached out to Microsoft about this. They tried their best to help but, in the end, I was told it is a limitation of the software. They encouraged me to go to Microsoft’s Feedback Portal and put a request in. If it gets enough votes, it might make it into a future release.
Happy IT’ing
Dan
Use Power Automate (Microsoft Flow) to Send Emails

Your organization has turned off Automatic forwards for security reasons. It helps protect emails from being forwarded to a hacker’s email address if your account became compromised. It also stops a disgruntled employee from sending information to the wrong place. If you use Power Automate (Microsoft Flow) it is more secure.
So, what if you have an email that you always like to send to a coworker(s) and you do not want to use a DL? You can use Power Automate (which is included in Office 365) to do this for you.
Power Automate is different than using Inbox rules to forward email. It executes actions as you do instead of completing the action without a record (like auto-forwarding did). You can see what you have done, and it satisfies basic security that blocks forwarding of messages to external recipients.
If you use MFA to login to Office 365, it is pretty much a bullet proof way of forwarding mail. If an Admin has disabled Auto-forwarding across the organization, it is practically impossible to be compromised.
Steps To Use Power Automate (Microsoft Flow)
To set up an email re-direct to an external user, follow the steps below.
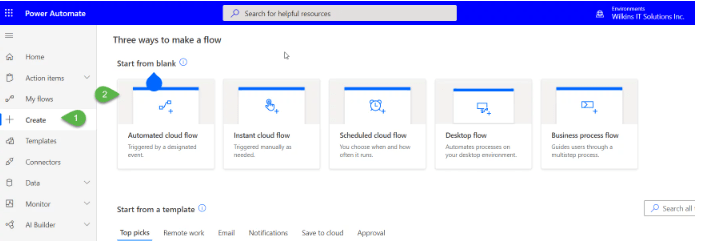
Step 1: Go to flow.microsoft.com and sign-in with your Office 365 account. Then click “Create”. We are going to create one from scratch.
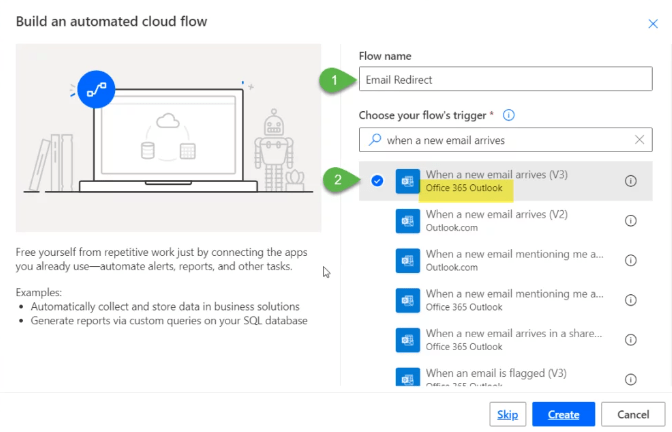
Step 2: Name your flow and choose the trigger. The trigger you want is “When an email arrives.” Power Automate maintains its own API-Level access, like Microsoft Graph, to connect to services so no password is needed.
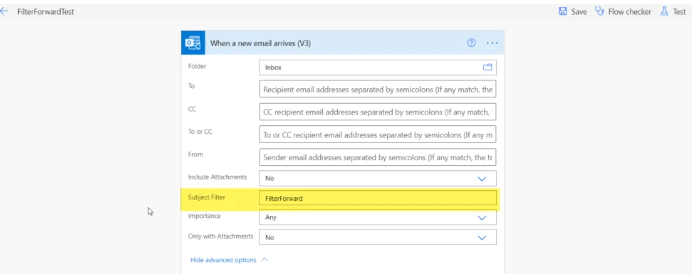
Step 3: Edit in your email “rule” We want to use the subject filter, so we choose “Show advanced options” and then type what we want in the Subject Filter. You will see there are many options, and other advanced conditions to filter email.
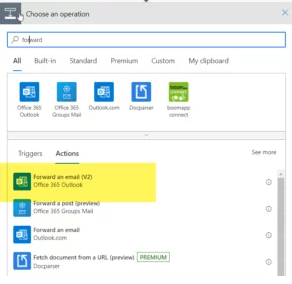
Step 4: Now tell Power Automate “What to do next”. In this example, Power Automate is looking for emails with what you are looking for in the subject line, but you need to tell it what to do next. You want to choose “New Step” and then choose “Forward an Email” for Office 365 Outlook
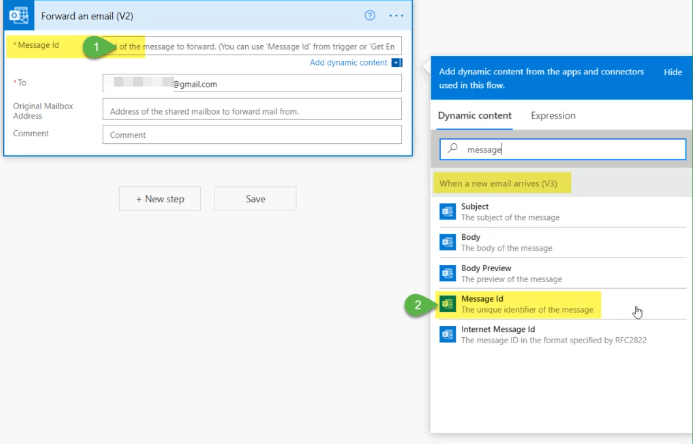
Step 5: Program your Forward Rule This is imperative. You must ensure that you choose the “Message ID” of your email from step 1. Use the search in the “Message ID” box you will get a list of options, choose Message ID.
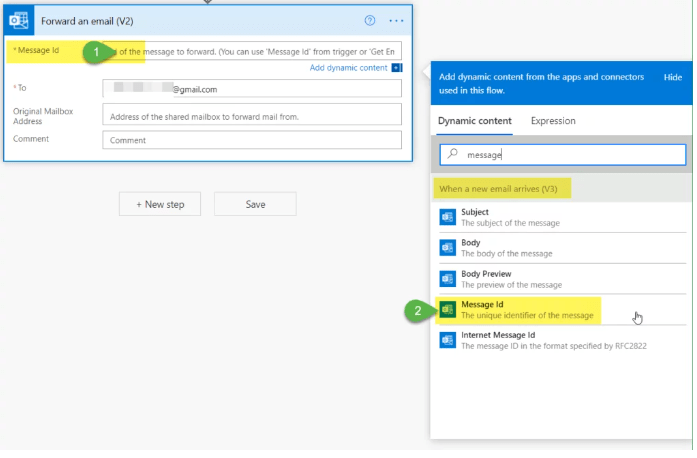
Step 6: Program your rule continued – Finally, enter the email you want to send the email to and then hit Save. If you followed all the steps above, you should get a “Saved Successfully” message. If you get an error, you can use the flow checker to see what is broken.
Step 7: Run the rule – You may need to modify the rule. In the example, any email that is received with the subject line you specify will be forwarded externally. You test the flow prior to running the rule. Give it a few minutes so the cloud can do its thing and sync but you should be good to go!
Happy IT’ing
Dan
How to Send HTML Mail In PowerShell

To Send HTML Mail email in PowerShell requires you to use Microsoft Graph. Send Mail is now depreciated and you shouldn’t be using it anyway. It is nice to add email automation to your scripts but wouldn’t it be better if you could send an nicely formatted email through HTML? Well you can.
It does require some set up. If you look at my previous article on the correct way to send email through PowerShell you can see how to get the App registration set up. Once you are done that, You can use the following script.
Send HTML Mail In PowerShell
Here is an example script that sends an HTML formatted message with a simple table. It also uses CSS formatting:
#Declare Parameters

$clientID = “your ID from App Registration”
$clientSecret = “your client secret from App Registration”
$tenantID = “your tenant ID”

##Run Script##

#Connect to GRAPH API

$MailSender = "who email will be from"

#Connect to GRAPH API
$tokenBody = @{
    Grant_Type    = "client_credentials"
    Scope         = "https://graph.microsoft.com/.default"
    Client_Id     = $clientId
    Client_Secret = $clientSecret
}
$tokenResponse = Invoke-RestMethod -Uri "https://login.microsoftonline.com/$tenantID/oauth2/v2.0/token" -Method POST -Body $tokenBody
$headers = @{
    "Authorization" = "Bearer $($tokenResponse.access_token)"
    "Content-type"  = "application/json"
}


$HTMLBody = @"
<!DOCTYPE html>
<html>
<head>
<style>
* {
'box-sizing: border-box;
}
.row {
margin-left:-5px;
margin-right:-5px;
}
.column {
'float: left;
'width: 20%;
padding: 5px;
}
/* Clearfix (clear floats) */
.row::after {
content: \"\";
clear: both;
display: table;
}
table {
font-family: verdana;
font-size: 10pt;
border-collapse: collapse;
border-spacing: 0;
height: 100px;
width: 315px;
border-right:1px solid black;
padding: 0px;
}
th, td {
text-align: left;
padding: 0px;
}
p {
 margin-top: 2;
 margin-bottom: 2;
}
</style>
<html>
<body>
<p>Here is the Contact Information that you require.</p>
<br>
<table style=\"width:100%\">
  <tr>
    <th>Company Name</th>
    <th>Contact Name</th>
    <th>Email Address</th>
  </tr>
  <tr>
    <td>John Doe</td>
    <td>Acme Co.</td>
    <td>jdoe@acme.com</td>
  </tr>
  <tr>
    <td>Eve Jackson</td>
    <td>Jackson Inc.</td>
    <td>ej@jakson.com</td>
  </tr>
  <tr>
    <td>Bruce Wayne</td>
    <td>Wayne Enterprises</td>
    <td>batman@wayne.com</td>
  </tr>
</table>
<br>
<p>Sincerely,</P>
<p>Sales</p>
</body>
</html>
"@

$msg = $HTMLBody

#Send Mail
$URLsend = "https://graph.microsoft.com/v1.0/users/$MailSender/sendMail"
$BodyJsonsend = @"
                    {
                        "message": {
                          "subject": "Customer Information",
                          "body": {
                            "contentType": "HTML",
                            "content": "$msg"

                          },
                          "toRecipients": [
                            {
                              "emailAddress": {
                                "address": "email address to"
                              }
                            }
                          ]
                        },
                        "saveToSentItems": "false"
                      }
"@

Invoke-RestMethod -Method POST -Uri $URLsend -Headers $headers -Body $BodyJsonsend
Escape the Quote Character When You Need To Send HTML Mail
It is very important to note that the script needs to escape an quote (“) symbol it sees. That character is the back slash (\). You will need it before every quotation mark in the script.
You will get a 400 Error (Bad Request) if you don’t. I was working on a heavily formatted email to send in PowerShell and I had to go through a lot of lines of code to ensure all of the quotation marks were escaped.
Now that you have a good base, whenever you need to send a mail for whatever reason in PowerShell you have an excellent “go to” HTML template for whatever reason you need.
If you find this post useful please consider buying me a coffee. It will keep me caffeinated so I can provide more Quick IT Tips!
Happy IT’ing
Dan
Upgrade Breaks Logitech Tap Scheduler

I was going about my normal duties and decided to upgrade a Logitech Tap Scheduler (we have many) to firmware 1.8.557. Well it broke it. It was throwing a weird error too:
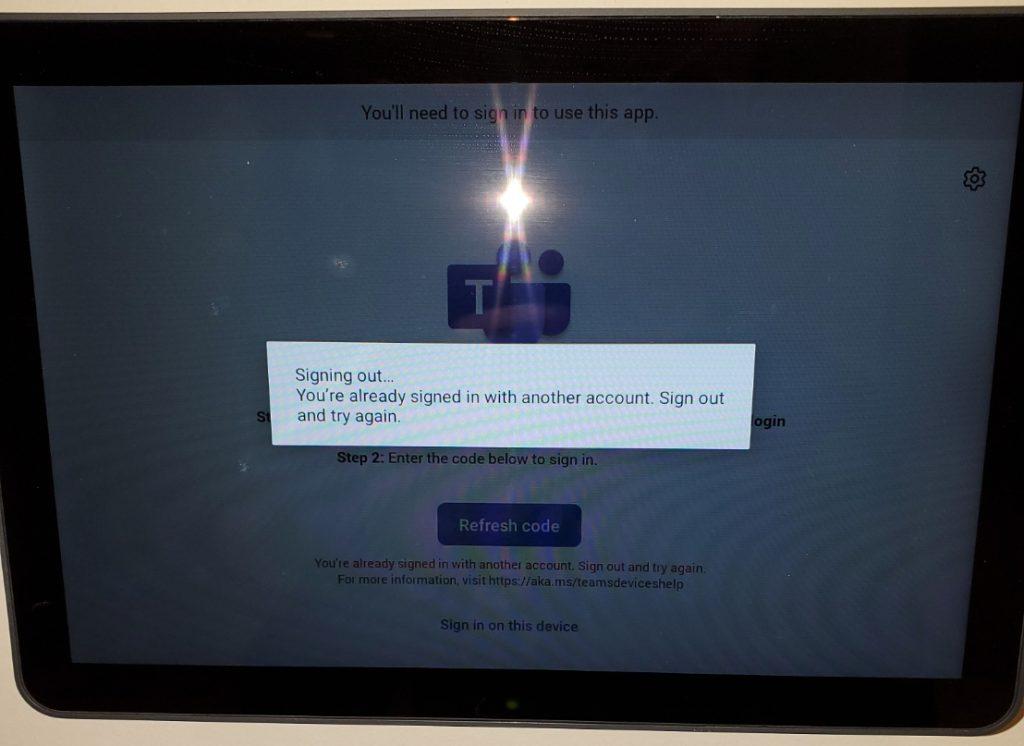
This particular account only signs in to this device. To be sure, I revoked all sign-ins for this account and tried again. No luck.
Contacting Logitech Tap Scheduler Support
Logitech support is always very helpful. I rarely have problems with these devices. I was told that this device is considered a “panel device” and needs a Microsoft Teams Pro license. It started running with a Teams Standard license and when Microsoft changed the licensing scheme we switched it to Microsoft Teams Basic.
I had been running for a few months like this without any issue. We switched to this license because it is free up to 25 devices. It suits us because all this device does is broadcast what is going on inside a meeting room or if it is free to use. The pro license is a lot of money per month. Very steep for what little the device does…
Fixing the Logitech Tap Scheduler
I contacted Microsoft support abut this and explained that it only happened since the firmware upgrade and that a Pro license is way to expensive for what it does. We have several of these devices and an expenditure like that is unnecessary.
The fix was quite easy:
- Sign in to endpoint.microsoft.com with your admin credentials.
- Go into Devices>Android>Android enrollment>
- Scroll to the bottom and in the section that says “Android Device Administrator”
- Click the “Personal and Corporate Owned Devices”
- Tick the box in here to “Use Device Administrator to manage Devices”.
After that, the device logged in normally, even with the updated firmware. Apparently other devices have had the same problem (Having issues signing into a yealink teams room panel – Microsoft Community Hub) I was a little worried. I have devices in various states of firmware and I did not want to upgrade any of them while they were still working.
I will take one broken tap scheduler over a dozen anytime!
Happy IT’ing
Dan
Disable Microsoft Teams Phone When User Leaves
Trying to Disable Microsoft Teams Phone for a user who has left the organization can be puzzling, especially if you haven’t done it before. It is quite integrated with M365 and there is a process to it. You are probably doing it this way….
Back in the day when a user left your organization, it used to be quite easy. It was done this way:
- You would disable the account in AD
- Forward their email to someone else in the organization
- Perform any modifications necessary in your VOIP phone system
- Change the VM greeting to let users know the user was no longer with the company
- Reroute their calls for awhile.
You can still do that in M365 but if you disable the account first, the user disappears in Teams Admin and you can’t do any further modifications!! If done right, it is as easy as adding a number in Teams. Here are the steps to the proper process.
How To Disable Microsoft Teams Phone
Note: Make sure you do this before you disable the account in AD. When it syncs to the Cloud the users Team’s account will disappear!!!
- Keep the users licensing active in the M365 portal.
- Start by forwarding all calls to voicemail:

- Then, establish a VM that notifies people – the user must have a default greeting set to “<user> is no longer with <Company Name> effective <Date>. Please contact <Manager> at <Teams Phone Number>.”.

- Hide the user from the GAL. You can do this in the portal but if you operate in a hybrid environment, go to the user account in AD and set the attribute MSExcHideFromAddressLists to TRUE
- Disable the account in AD or block sign-in in the portal.
- Have your IT Ticketing system remind you to remove the licensing after a certain period in O365 portal, so you don’t needless pay for a license you are not using.
The important thing to remember is NOT disable the user M365 account until after the Teams configuration is done. Wen done right, even tough the user has disappeared from teams, people will be properly notified when they call.
Happy IT’ing
Dan
Use Conditional Access When MFA Not Possible

You have a group of users that you want to only login into to certain devices in your organization. A good example is a general use account that you only use in one place (like a kiosk or a dedicated work area) but MFA is not feasible. You can use Conditional Access to help with this.
What is Conditional Access?
Conditional Access is a part of Azure AD that helps organizations improve security and compliance. By creating Conditional Access policies, you can tweak your authentication process.
Think about the old way of authentication: You require user to supply a username and password. Most of the time, it’s the legitimate account owner typing them in, the user can go on to access all the data, applications and other resources they’ve been granted permissions for. But consider this, an attacker has stolen or guessed a user’s credentials. Now they are accessing your network, and could have a breach on your hands
To mitigate these risks, organizations can put additional authentication in place. MFA is a good example.
The thing is, MFA is a broad approach. In the example I am about to show you what to do if the user is unable to use MFA.
You can use Azure AD Conditional to strengthen the authentication process. For example, you can create a policy to require users in a certain group to only login on devices that are recognized by the organization (At least Azure AD registered) and block all others. This will also help you pinpoint a breach a lot quicker. I will show you how in the next section.
Limit A Users Login With Conditional Access
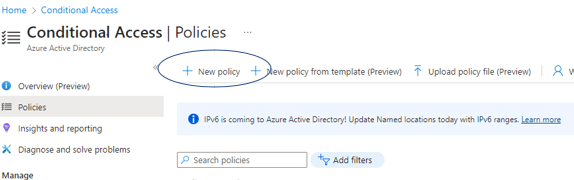
Login to your Azure Active Directory (AD) portal and go to Conditional Access and add a new policy:
Give your Policy a name and then add users or groups that you want to include in this policy ( In my example I added a group):
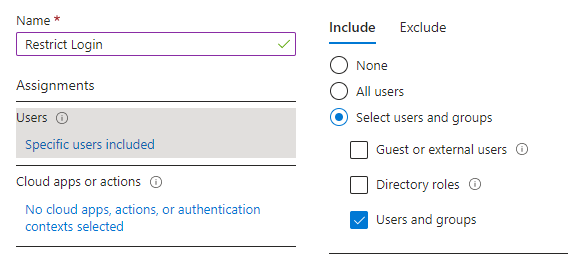
Next, you can move to the next step, which is what applications you want to restrict login to. In this example, I have chosen Office 365:

This is the most important part the Conditional Access Policy:

In the Filter for Devices Section, you exclude devices from the policy by “Trust type”. If a user account from the group specified above is NOT one or more of the trust types you specify, they ARE included. I kept it simple and chose Azure AD registered. I am in a Hybrid environment and our devices are not joined to the cloud, only registered.
The last section is to block all access to the aforementioned apps:
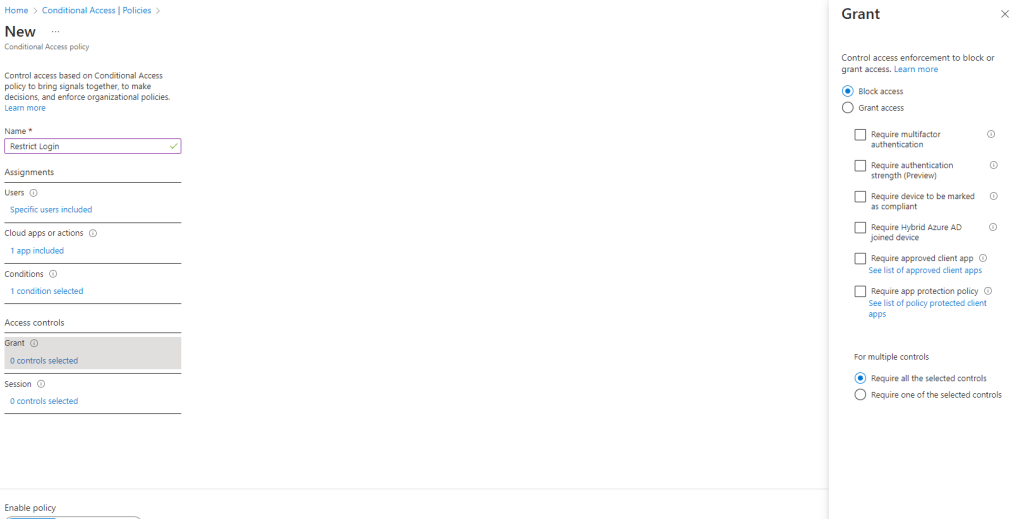
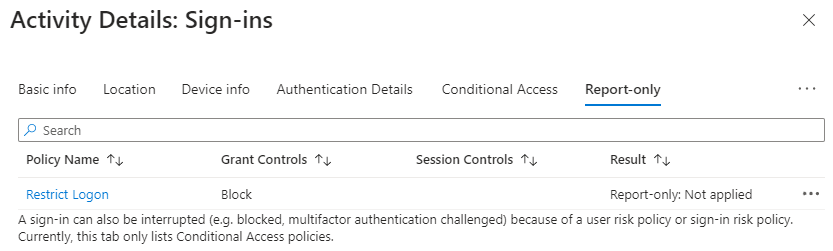
You could save the policy and start using it right away but that would not be a good idea. Save it as “Report-Only” and then check you Azure AD sign in logs to make sure it it working. Look at the logs by going to Azure AD / Users / Sign-in Logs. You will see a list of your users sign-ins. Filter for a time period where you have the Report-Only Conditional Access Policy in place.
Pick a user account that you know in included in the policy, if you see this then the policy would not block them if it were on:
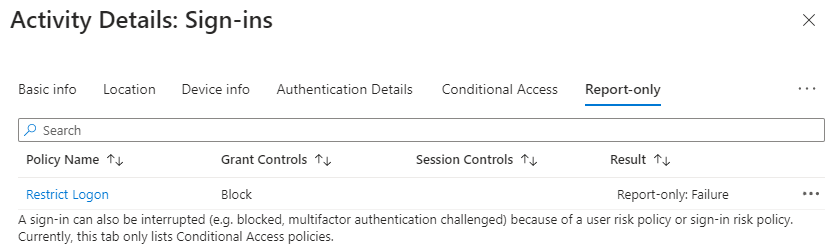
If you see the following you the device would be blocked from signing in if it were on:
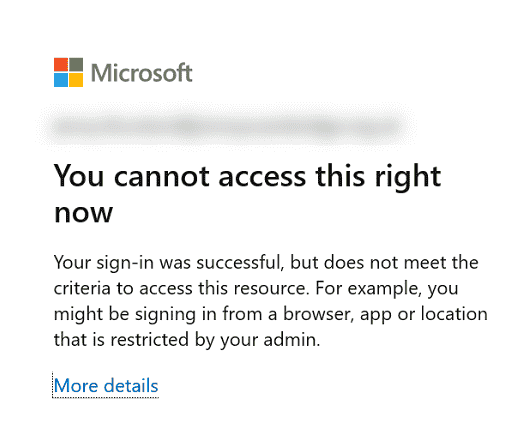
Users would expect to get this screen when they try to login:
You can investigate the sign-in to make sure it is not a false positive. Let the policy run in “Report-Only” Mode for awhile until you are sure it is running as it should and then turn it on. You have found a way to limit logging in for a certain group of users where MFA is not feasible.
Happy IT’ing
Dan