
The Correct Way To Send Mail In PowerShell

Are you still using Send-MailMessage to Send Mail In PowerShell? You need to stop. The command needs SMTPAuth enabled for your organization. If you are looking for ways to security harden you M365 tenant, disabling this feature is a good way to go. But you still need to send email in PowerShell, right? I will show you in three steps.
Step One – Send Mail In PowerShell (Set up an App is Azure)
The first step involves setting up an App registration that will let you send mail. Create an App Registration in Azure Ad by going to Azure AD / Application / App Registrations and creating one:
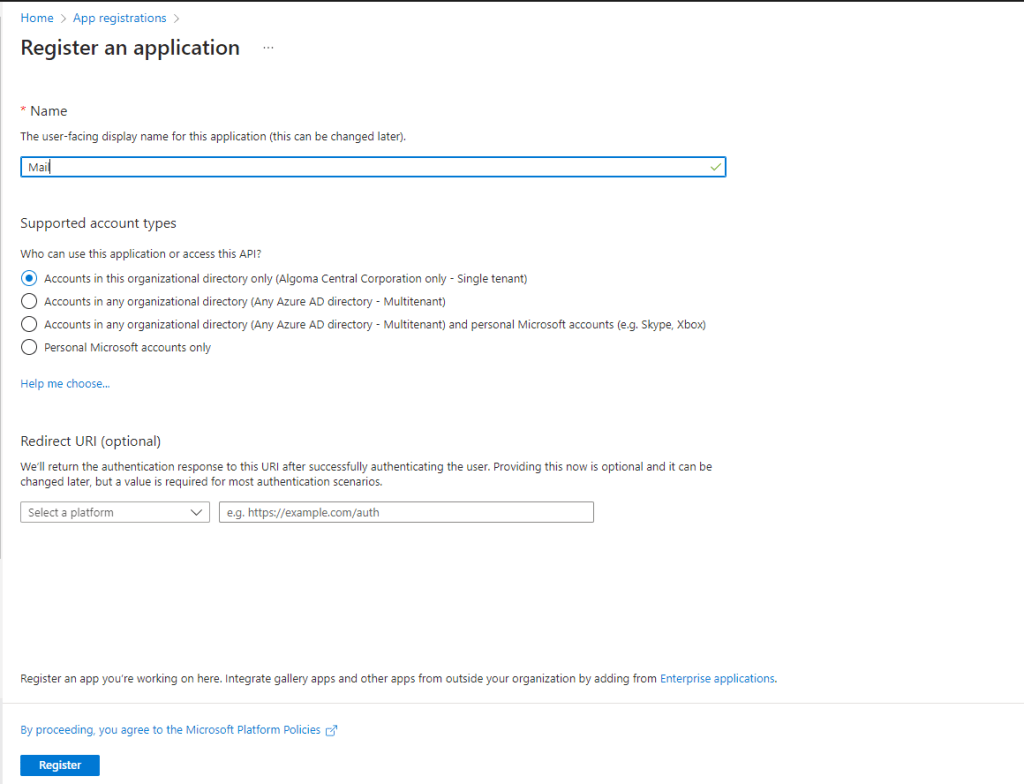
Click register. Now that you have you App for sending mail registered, go to API Permission and give the App permissions to Send mail as any user.
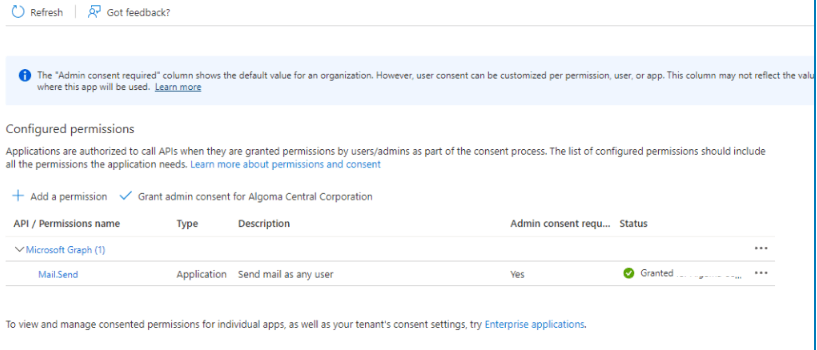
Please don’t forget to click on “Grant admin consent for” on the app.
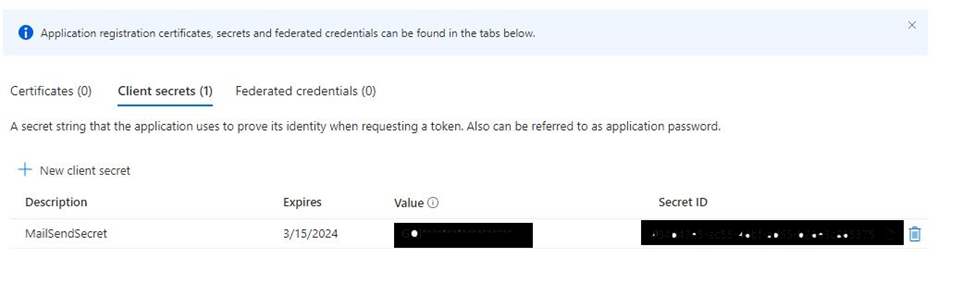
To finish our Azure App, we need to configure the Authentication Method to use as a Client Secret. Navigate to “Certificates & secrets” and select “New client secret.”
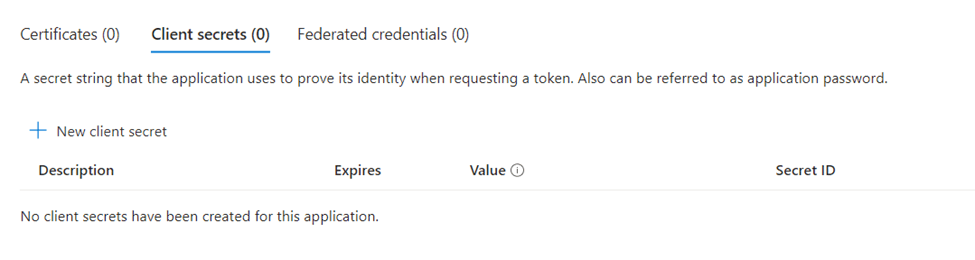
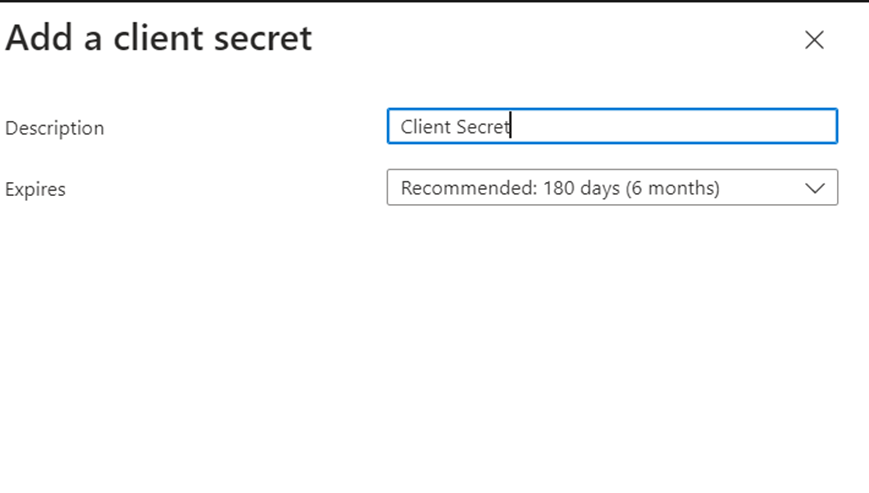
Enter a Name and Expire Date. Not this date because when it expires, your scripts that use this app will stop working and you will have to renew it.
NOTE:
When you click “Add”, the Secret is created and you have a unique chance to get the Client Secret. This is a one-time shot, so copy the Secret, before refreshing the Page or navigating to a different Section.
Now on to step two.
Step Two – Send Mail In PowerShell (Set Security Group in Exchange Online)
Once you are done creating an App, you need to set and application policy that will only let you use only the email address you specify in your organization to send mail as:
Connect to Exchange-Online and then run the following command in PowerShell:
- Connect to Exchange Online with the ExchangeOnlineManagement PowerShell module Connect-ExchangeOnline
- Create a mail enabled security group which contains all the accounts you want to send mails from $restrictedGroup = New-DistributionGroup -Name “Mail service accounts” -Type “Security” -Members @(“yourorgemail@company.com”)
- Optionally hide the group from the address list Set-DistributionGroup -Identity $restrictedGroup.Identity -HiddenFromAddressListsEnabled $true
- Create the application access policy to only allow sending the app mails for the specified distribution group
- Run this last set of commands:
$params = @{
AccessRight = “RestrictAccess”
AppId = “1f5ffbea-f13f-4f1a-af63-258ce4344daf”
PolicyScopeGroupId = $restrictedGroup.PrimarySmtpAddress
Description = “Restrict app permissions to only allow access to service account”
}
New-ApplicationAccessPolicy @params
Once this group is created you can go to into in admin.microsoft.com (Admin portal) and Navigating to Users / Teams & Groups / Mail Enabled Security Groups and making changes as necessary:
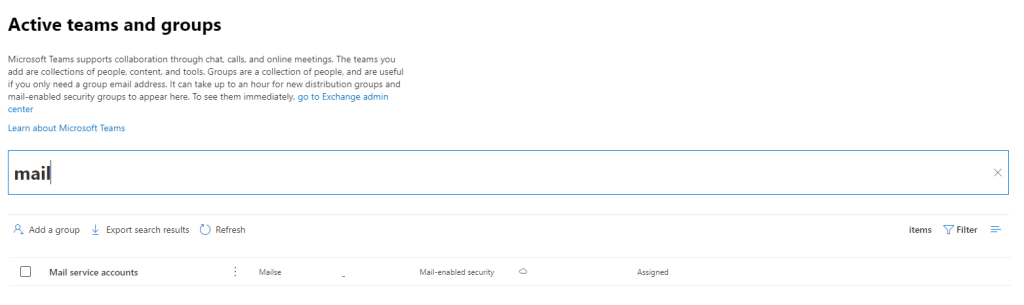
When you send mail using MS Graph, only the email address list above will be the only one able to send as.
Step Three – Send Mail In PowerShell (Use MS Graph in PowerShell)
In order to send mail in this new set up, you need to take note of three pieces of information from your app registration:
- Tenant ID – you can get it by looking here
- Client Secret (NOTE:) from above
- App (Client ID) – you need to got to the listing of your app registration and you App (Client ID will be listed here (See below)

Then, use this script to send your mail:
#Declare Parameters
$clientID = “your ID from App Registration”
$clientSecret = “your client secret from App Registration”
$tenantID = “your tenant ID”
#Run Script
$MailSender = “emailFromStep2@company.com”
#Connect to GRAPH API
$tokenBody = @{
Grant_Type = “client_credentials”
Scope = “https://graph.microsoft.com/.default”
Client_Id = $clientId
Client_Secret = $clientSecret
}
$tokenResponse = Invoke-RestMethod -Uri “https://login.microsoftonline.com/$tenantID/oauth2/v2.0/token” -Method POST -Body $tokenBody
$headers = @{
“Authorization” = “Bearer $($tokenResponse.access_token)”
“Content-type” = “application/json”
}
#Send Mail
$URLsend = “https://graph.microsoft.com/v1.0/users/$MailSender/sendMail”
$BodyJsonsend = @”
{
“message”: {
“subject”: “Hello World from Microsoft Graph API”,
“body”: {
“contentType”: “HTML”,
“content”: “This Mail is sent via Microsoft
GRAPH
API
                        "
                      },
                      "toRecipients": [
                        {
                          "emailAddress": {
                            "address": "yourToAddress@company.com"
                          }
                        }
                      ]
                    },
                    "saveToSentItems": "false"
                  }
“@
Invoke-RestMethod -Method POST -Uri $URLsend -Headers $headers -Body $BodyJsonsend
Conclusion
It seems like a lot of work but this is just to set it up. Now that you have a good base, whenever you need to send a mail for whatever reason in PowerShell all you have to do is make sure the required email sender address is in the Mail Enabled Security Group and in the variable in the script and you are good to go. A good example is notifying users that they are using external forwarding!
Happy IT’ing
Dan
Find Out Who is O365 External Forwarding With This One Trick

Now that you have disabled O365 External Forwarding for your organization, it’s time to find out who is using it….
List Users Who Are O365 External Forwarding
You may want to give your users a heads up that you will be disabling this feature. You can easily do this by connecting to the Exchange-Online PowerShell Module and using the Get-InboxRule commandlet. This example shows you how to get this list from a bunch of users:
#Connect to Exchange
Connect-ExchangeOnline
#Delcare Variables
$CSVPathUPN = “Path_To_UserList_CSV”
$StatusPath = “Path_To_User_Rules_Output_CSV”
#Run Script
#Try import UPN CSV file
try {
$UPNUsers = import-csv $CSVPathUPN -ErrorAction stop
}
catch {
throw “Error importing CSV: $($_.Exception.Message)”
break
}
#Go Through Each User
foreach ($UPNUser in $UPNUsers) {
#Go through each Rule and see if forwarding is set up
$x = 0
$user = $UPNUser.UPNUser
$items = @(Get-InboxRule -Mailbox $user)
$count = $items.count
while($x -lt $count) {

    $rule = $items[$x].RuleIdentity
    $ruleWithQuotes = "{0}" -f $rule
    $rulename = $items[$x].Name
    $rulenamelength = $rulename.length

    #"`r",$rulename
    #$("-" * $rulenamelength)

    $ForwardToObj = Get-InboxRule -Mailbox $user -Identity $ruleWithQuotes | Select ForwardTo
    $Contain = $ForwardToObj.ForwardTo

    if  ($Contain -like '*SMTP*') {
        $Contain

       } else {

        $Contain = "Not an External Forward or a Forward"
       }


    $ForwardAttachObj = Get-InboxRule -Mailbox $user -Identity $ruleWithQuotes | Select ForwardAsAttachment
    $Contain1 = $ForwardAttachObj.ForwardAsAttachment

    if  ($Contain1 -like '*SMTP*') {
        $Contain1

       } else {

        $Contain1 = "Not an External Forward or a Forward"

       }

$Rules = $user + "," + $rulename + "," + $Contain + "," + $Contain1

Write-Host $Rules
Write-Output $Rules | Out-File $StatusPath  -Append

    $x++
}
}
Write-Host All Rules Exported….
Disable External Forwarding for the Organization
When you are done writing and deploying the script, you need to make sure the default Anti-Spam Outbound Rule is enabled. As a Global Admin, go to admin.microsoft.com. Then go to Security / Policies and Rules / Threat Policies / Anti-Spam Policies:
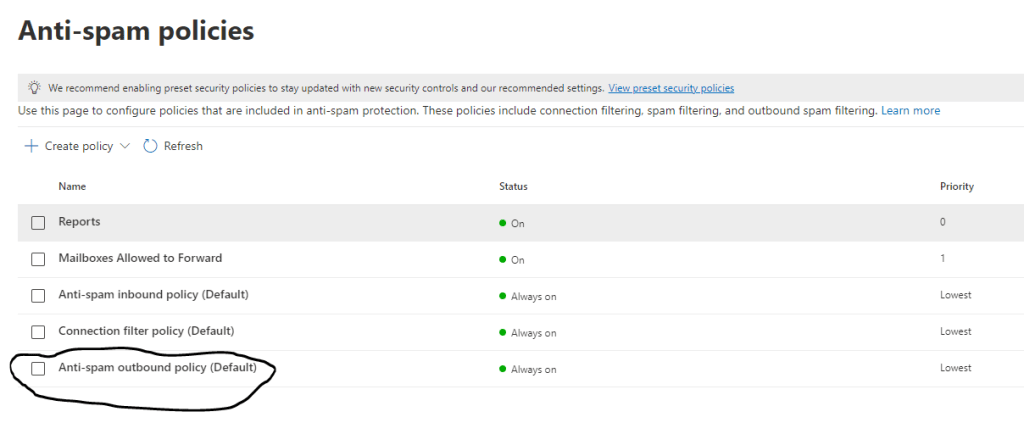
When you click on Anti-Spam Outbound Policy (Default), you will see a fly-out menu to your right. Click on “Edit Protection Settings” and make sure the Forwarding rules are set to off:
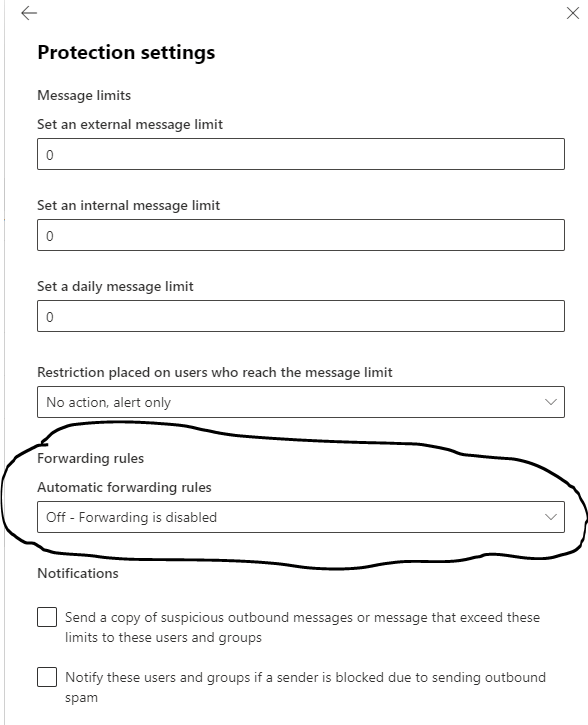
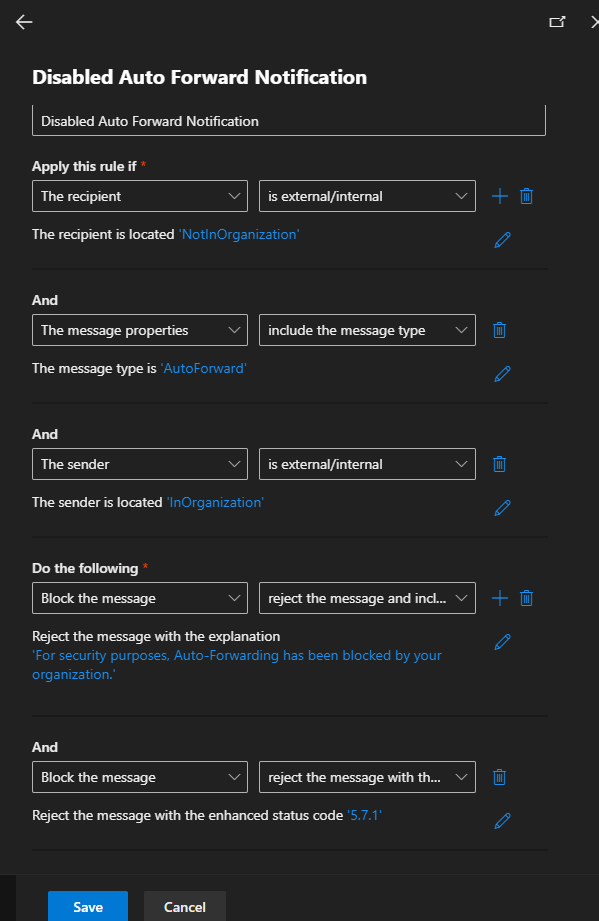
Save your settings and it is now turned off. Notify your list if users from step one and you are done. going forward, If you prefer sending an NDR to the user when they either setup a rule or try to use it you can set up a Transport Rule in Exchange admin instead.
Go to admin.exchange.com and navigate to Mail Flow / Rules. Set up a rule to block Auto-Forward to recipients outside the organization with an explanation:
This article explains it very well.
Your Users may not like it but it protects the organization from comprised email through phishing attacks and rogue employees.
Happy IT’ing
Dan
Quickly React To M365 User Compromise

At some point you are going to deal with a M365 User Compromise. It could be a password leak of some kind. It could be through a phishing attempt or as simple as password sharing. Either way, it can be dealt with easily and quickly in 3 steps. I will show you how.
M365 User Compromise Account – Reset the password
Go to admin.microsoft.com and under Active Users search for the user of the compromised account. Click on the Username and then find:
This will help guard against any new logins with the account.
Revoke Sign In For Compromised Account
After a password reset, the next step is to sign the compromised account out of everything. While still in the user flyout, sign the user out from all sessions:
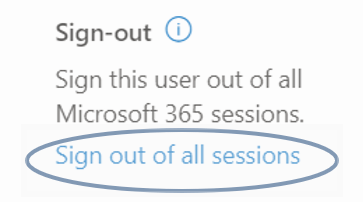
Similarly, you can do this in PowerShell. I wrote a great article about it here.
Block Unapproved Email Apps and Protocols
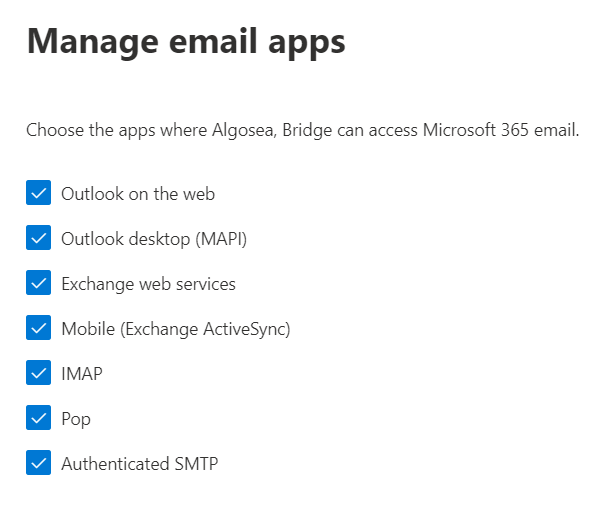
As a result, going forward, make sure you are not using any App or protocol you do not need. Click the Mail Tab if the User Fly out and click the Manage Email Apps Link:
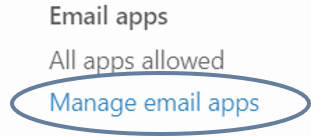
From here, uncheck any email app or protocol that could be used on a compromised account. It is a good idea to do this organization wide and not just for the user:
Voila. Not only has your user compromise been dealt with quickly, you have security hardened your M365 tenant. It gives bad actors a smaller attack surface and this could only be good for your organization!
Thankfully, I have written several articles on M365 Security. I encourage you to review them. They can help you quickly react to security compromises quickly when they happen or harden your system preventing it from happening in the first place. If you use these 3 steps to deal with an M365 User Compromise you will have it fixed in no time!!
Happy IT’ing
Dan
Disable External Forwarding With These 2 Steps

You, for many reasons (Security being a big one), that you need to Disable External Forwarding for your M365 Users. In this article I can show how to check which users are using forwarding and then how to turn it off for the entire organization so it won’t be a concern going forward.
List Users Who Use External Forwarding
You may want to give your users a heads up that you will be disabling this feature. You can easily do this by connecting to the Exchange-Online PowerShell Module and using the Get-InboxRule commandlet. If you only have a few users to look at you can run the following script manually:
#Connect to Exchange
Connect-ExchangeOnline
#Delcare Variables
$user = “username@domain.com”
$x = 0
$items = @(Get-InboxRule -Mailbox $user)
$count = $items.count
#Main
#Show all Rules on mailbox
$items
#Go through each Rule and see if forwarding is set up
while($x -lt $count) {
$rule = $items[$x].RuleIdentity
$ruleWithQuotes = "{0}" -f $rule
$rulename = $items[$x].Name
$rulenamelength = $rulename.length

"`r",$rulename
$("-" * $rulenamelength)

Get-InboxRule -Mailbox $user -Identity $ruleWithQuotes | Select -Property ForwardTo
Get-InboxRule -Mailbox $user -Identity $ruleWithQuotes | Select -Property ForwardAsAttachment


$x++
}
If you need to run this command for many users, I would suggest wrapping it in a For-Each Loop based on a CSV of your Organizations users and Export to a CSV if you need it as a list.
Disable External Forwarding for the Organization
For this, you need to make sure the default Anti-Spam Outbound Rule is enabled. As a Global Admin, go to admin.microsoft.com. Then go to Security / Policies and Rules / Threat Policies / Anti-Spam Policies:
When you click on Anti-Spam Outbound Policy (Default), you will see a fly-out menu to your right. Click on “Edit Protection Settings” and make sure the Forwarding rules are set to off:
Save your settings and it is now turned off. Notify your list if users from step one and you are done. They may not like it but it protects the organization from comprised email through phishing attacks and rogue employees.
Happy IT’ing
Dan
Can’t Join Teams Meeting Online? Try This.

Did you create a meeting either through Outlook 365 or directly in Microsoft Teams and can’t join teams meeting online? You used the Teams Meeting Button in Outlook, or you checked the “Online Meeting” Check box in Teams, but you still can’t join?
If you already tried signing in and signing out or deleting your Teams’ cache, here is a hack to get it back.
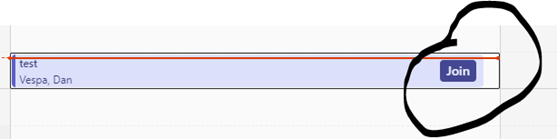
When you create a meeting in Teams directly it is supposed to automatically have the online option. The join button in the meeting should show up when it gets close to the meeting time. In fact, the only way at this point where it won’t be online is if you use a version of Outlook that doesn’t support the Microsoft Teams Meeting.
You Invite the others in the meeting, and they get the meeting info like this:
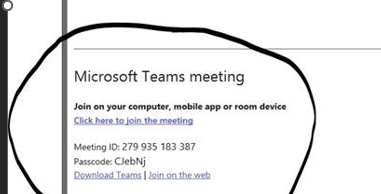
But the meeting you created in your calendar does not have the Join Button like what you see below:
If this happens to you there are two ways to Join Online.
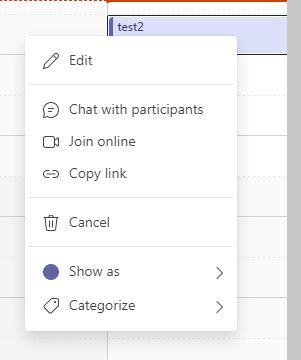
Right Click on the Meeting
You can right click on the meeting and choose the “Join Online” option:
Still Can’t Join Teams Meeting Online? Refresh.
It is a hack, but it works.
- Open the meeting in Teams.
- Invite someone to the meeting.
- Remove them from the meeting.
Now, when you right click on the meeting. The “Join Online” Option is there. This refreshed the meeting details and brought the Join Online back!
The good news is at least you can fix the meeting and do not have to call the HelpDesk!
Happy IT’ing,
Dan
Adding a Number to a Teams User

So your organization has decided to do away with their phone system an go directly to Microsoft Teams Voice. Now all that is left to do is Adding a Number to a Teams User. The only prerequisite is that you have a block of DID assigned to you by your Telco.
If you don’t have many users to add telephone numbers to, you can manually enter them using some PowerShell commands. However, if you have a lot to do I can show you a way to automate them. Let’s add some numbers!!
You Only Have a Few Users To Do
This is also a good way for adding the odd number after the migration.
Connecting to the Teams Module
Connect-MicrosoftTeams
Add User Number
Set-CsPhoneNumberAssignment -Identity userid@company.com -PhoneNumber ‘+1XXXXXXX’ -PhoneNumberType DirectRouting
Grant-CsOnlineVoiceRoutingPolicy -Identity userid@company.com -PolicyName “Policy set up by you or Telco”
Set-CsOnlineVoiceMailUserSettings -Identity userid@company.com -VoicemailEnabled $true
If you make a mistake you can easily remove the number and start again:
Remove User Number
Grant-CsOnlineVoiceRoutingPolicy -Identity userid@company.com -PolicyName $null
Remove-CsPhoneNumberAssignment -Identity userid@company.com -RemoveAll
But what if you have a lot of users to to???
You Have a Many Users To Do
You can run these commands in a batch but I would recommend testing it with a small block of users before you go ahead with the whole group. You could run a batch delete and start from scratch but that sounds like a headache….
You can use a for each loop going through each user in an import CSV you created. Create a CSV file with two field names: UPName and PNumber. Populate it with your users and then create this PowerShelScript:
$CSVPath = “<Path To File Goes Here>”
Connect-MicrosoftTeams
#MAIN
#Try import CSV file
try {
$Users = import-csv $CSVPath -ErrorAction stop
}
catch {
throw “Error importing CSV: $($_.Exception.Message)”
break
}
#Add Numbers
foreach ($User in $Users) {
Set-CsPhoneNumberAssignment -Identity $User.UPName -PhoneNumber $User.PNmuber -PhoneNumberType DirectRouting
Grant-CsOnlineVoiceRoutingPolicy -Identity $User.UPName -PolicyName “PolicyNameGoesHere”
Set-CsOnlineVoiceMailUserSettings -Identity $User.UPName -VoicemailEnabled $true
}
Write-Host User Numbers Added!
This should help you get your phone numbers added quickly.
Happy IT’ing
Dan
Delete Tap Scheduler Reservations With This One Trick
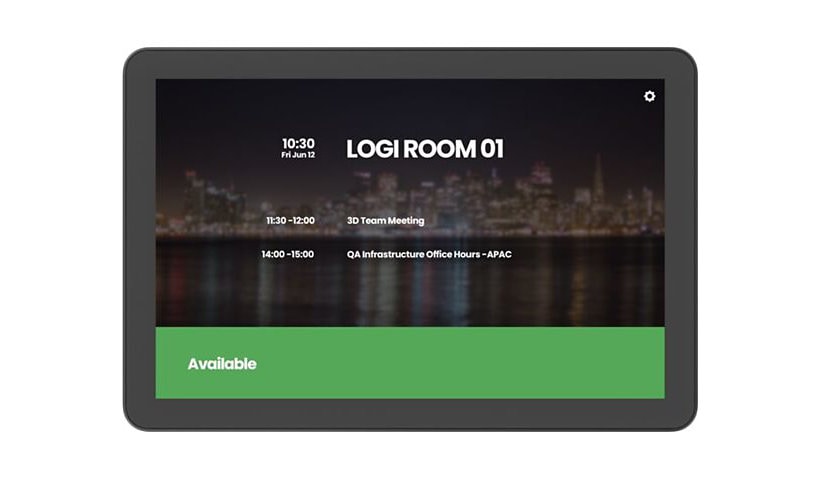
Don’t you wish you could Delete Tap Scheduler Reservations when a user makes them by mistake or realizes they don’t need the reservation anymore? It is fairly straight forward.
Making a Reservation Using The Logitech Tap Scheduler
The Logitech Tap Scheduler is a useful display board device that shows the status of a resource room in your organization. It has the ability to work with several calendaring systems (Teams, Zoom, Meetio and Robin). You can set up a system where a user can easily reserve a meeting room through a shared resource calendar or ad hoc right at the device. But what if you reserve a the room on the fly and realize you don’t need it?
How to Delete Tap Scheduler Reservations
Unfortunately there is no way to delete on the device itself. I researched high and low and even reached out to Logitech support. They agreed that the way I chose was the best way. For the future, they put a feature request with Microsoft Teams since that is the Calendar provider I use.
The best way is to make a member(s) of your support staff have at least Editor rights to the resource calendar that is connected to the Tap Scheduler. Have you users put in a request to delete it. Then your HelpDesk Staff can go to the calendar in question and delete the reservation and it frees up the room.
You can use PowerShell to quickly execute this task but it is just as easy to open the shared calendar and delete the reservation!
Happy IT’ing
Dan
Reclaim O365 Licenses From Deleted Users
O365 admin is funny. There a lot of things that you do a certain way if you came from an on premise environment. You don’t think about it (Like disabling a user). Well you have now moved into a hybrid environment and hopefully soon and all cloud environment. You need to Reclaim O365 Licenses.
Why do you need to start thinking about licensing when you disable / delete a user. If you don’t, you will need to reclaim O365 Licenses From Deleted Users. After awhile it might get expensive. Recycle the licenses as much as you can! Here I will show you how to quickly do this in a cloud environment and what steps you need to do differently in a Hybrid environment.
How to Reclaim O365 Licenses From Deleted Users in a Cloud Environment
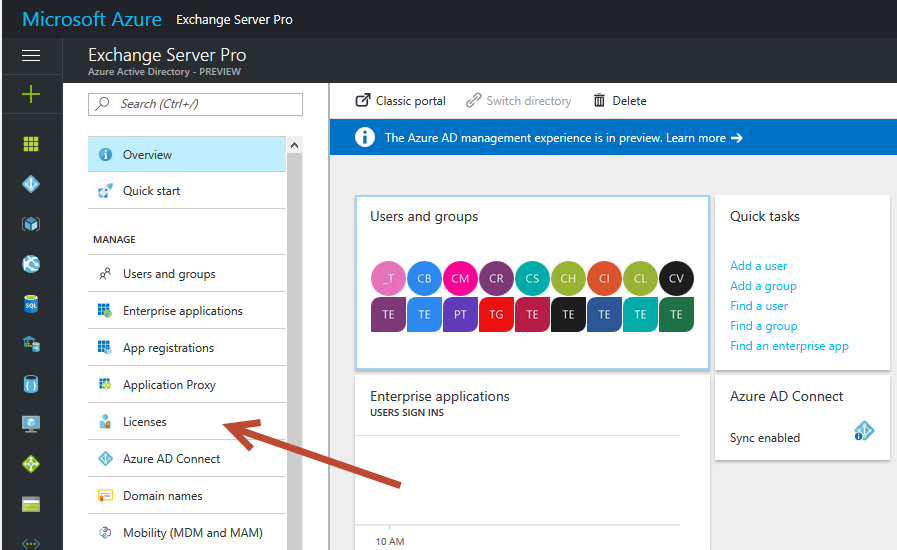
This can be done very easily using power shell. A disabled used in strictly the cloud is deleted. You can go into the admin panel of O365 (now it’s called Entra??) and go into “Delete Users”. Pick the user with the license you want to recover and click “Restore User”. From there you can uncheck the license and then delete the user again….or…you can use PowerShell for if you need to reclaim more licenses.
Using PowerShell
Here is a great script that will help you with what I mentioned above especially if you have several users to go through (This is similar to the one I wrote on MFA):
#Connects to your Office365 tenant
#Connect-MsolService
#MAIN
$delUsers = Get-MsolUser -ReturnDeletedUsers | select UserPrincipalName,IsLicensed | Where-Object {$_.IsLicensed -eq $true} | export-csv c:\Temp\IsLisc.csv
$delUsers| foreach{
$UPN = $_.UserPrincipalName
Restore-MsolUser -UserPrincipalName $UPN
(get-MsolUser -UserPrincipalName $UPN).licenses.AccountSkuId |
foreach{
$License = $_
echo “Removing license: $License”
Set-MsolUserLicense -UserPrincipalName $UPN -RemoveLicenses $License -ErrorAction SilentlyContinue
}
Remove-MsolUser -UserPrincipalName $UPN -Force
}
#showing list again for verification
Write-Host Show list of deleted users so you can verify that there are no outstanding licenses. List should all be false
$delUsers = Get-MsolUser -ReturnDeletedUsers | select UserPrincipalName,IsLicensed | Where-Object {$_.IsLicensed -eq $false}
Return $delUsers
In a nutshell, this script connect to the MSOLservice, writes all delete users who are still licensed to a CSV file (located in C:\Temp – you can change this to whatever folder you want). Restores the user in the list, removes all the the licenses attributed to it and then deletes it again.
It is a little different in a hybrid situation.
How to Reclaim O365 Licenses From Deleted Users in a Hybrid Environment
You will need to go into AD and find all the disabled users and re-enabled them. Then either wait for an AD sync or perform a sync with a Start-ADSyncSyncCycle -PolicyType Delta on a domain controller. Then rerun the script minus the lines about deleting the users:
#Connects to your Office365 tenant
#Connect-MsolService
#MAIN
$delUsers = Get-MsolUser -ReturnDeletedUsers | select UserPrincipalName,IsLicensed | Where-Object {$_.IsLicensed -eq $true} | export-csv c:\Temp\IsLisc.csv
$delUsers| foreach{
$UPN = $_.UserPrincipalName
Restore-MsolUser -UserPrincipalName $UPN
(get-MsolUser -UserPrincipalName $UPN).licenses.AccountSkuId |
}
Go back to AD and disable the users again. That should do it.
Happy IT’ing
Dan