
Two Ways Why Your SPF Record is Broken and How to Fix it

You have made some changes to your SPF record in DNS (or not) and your SPF record is broken. One day resources that depend on it in your organization stop working? What happened? There are generally two ways this record can become problematic but first, What is an SPF record anyways…..
An SPF Record is a TXT DNS Entry
For those of you familiar with DNS it is just one of many types of DNS entries you put in your records for your domain. For example, an “A’ record is for hosts and “MX” is for mail exchangers, etc. SPF stands for “Sender Policy Framework”. It allows other domains to send on behalf of your domain without being marked as spam. You see, way back when the Internet was on the honor system (LOL), people wouldn’t dare spoof other domains when sending email. That would be wrong as it is spamming. That was sarcasm. If you have services that use other domains to send on behalf of your domain, a broken SPF record will likely cause an NDR of the email being sent by a non-trusted domain. Microsoft has a great explanation in the NDR on how to fix such errors.
Format of an SPF record
In its simplest form it is this:
v=spf1 include:spf.protection.outlook.com ~all
This would be in the case that you use M365 as you email provider but obviously it would vary depending on your email service. A great explanation on how to build your SPF record is located here.
Here are the 2 ways this error might occur.
The Statement in the SPF record was formatted wrong
This record is quite finicky. If you do so much as add an extra space or misplace a tilde your email service will throw errors. If you are unsure, use a service like MXTool Box to generate the SPF record for you. That way all you must do is copy and paste the info into a new or already existing TXT record in your company’s DNS. Save and test!
One of the Resources Specified in the SPF record no Longer Exists
This is more likely if one of the services that send on behalf of your domain no longer exists or stops functioning. One day it works and the next day it doesn’t. It is likely on of the IP Address for server that specifically send on your behalf or one of the domains you specified in your include statements no longer exist or is not functioning. Find out from the company that provides you with this service what the new information is so you can replace it in the SPF record or if you need to remove it from the record. Either way, until it is fixed the record will stop working and your email flow will be adversely affected. If you need to gather some information before you reach out user an online SPF analyzer. It will tell you where the breakdown in the record has occurred.
These two issues when resolved will get your mail flowing again for the service that depends on it. That is all we really want, right, to the mail keep flowing!
Happy IT’ing
Dan
Enrolling an Android Device in Endpoint MDM / Intune Part 1
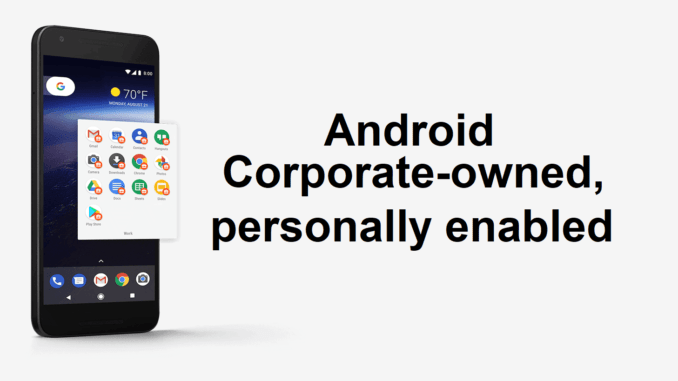
You have finally got around to enrolling an Android Device in Endpoint Manager. If you have not done it before it is a bit of a process. These are the following steps to get an Android device enrolled with screenshots.
Prerequisites to Enrolling Android Device in Endpoint
For the ability to Wipe a device the “Corporate- Owned device with Work Profile” must be set up. If you want to check out how to enroll using a Fully Managed Profile, go to part two of the article.
Getting the QR code
A profile has been set up to enroll devices (Android only now) with a QR code. The code is located here:
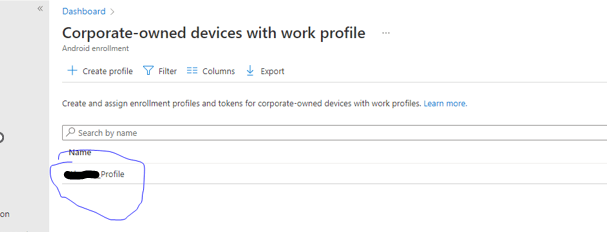
Click on the Work Profile You created.
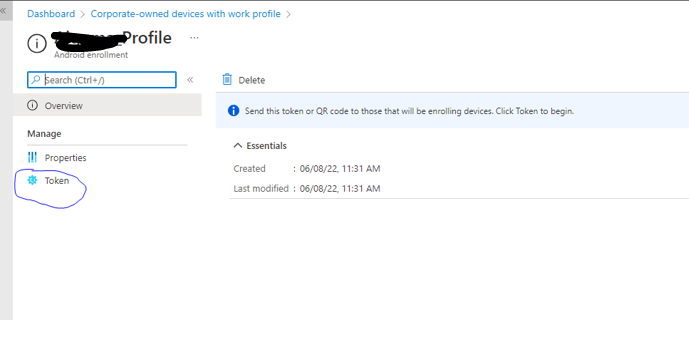
And then token:
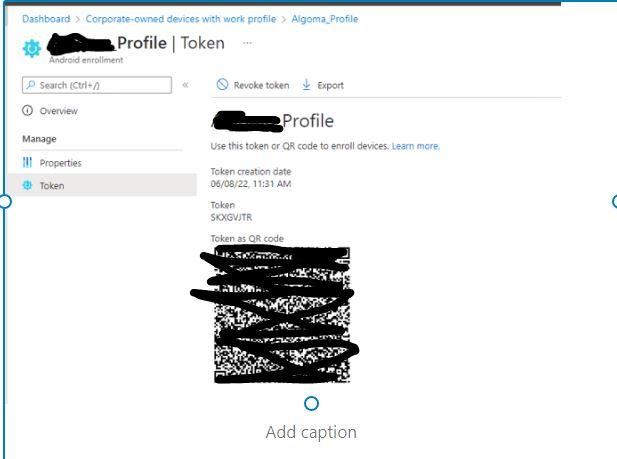
Here is the QR Code:

You can print this code out and have it ready when you need to enroll a mobile device.
Enrolling a Mobile Device
The mobile device you are enrolling must be set to factory defaults. If it is a brand-new phone this has been done already. If it is a phone that has never been enrolled in Endpoint Manager, it needs to be factory reset. If the phone is already enrolled in Endpoint Manager and you need to redeploy it to another user, also need to wipe the phone and re-enroll. The Device Name and Management Name field in the portal need to be changed to reflect the new user (See Renaming the Device and Description in Endpoint Manager)
- To begin enrolling, at the first screen you see when the phone is turned on, tap continuously in the center of the screen until you see the QR code scanner. Samsung S10 and above the QR code scanner is built in. If the phone is lower than an S10 you will have to install QR Code scanning software first. Scan the QR code mentioned above. The process will begin.

- Next you will be asked to connect to Wi-Fi. Connect
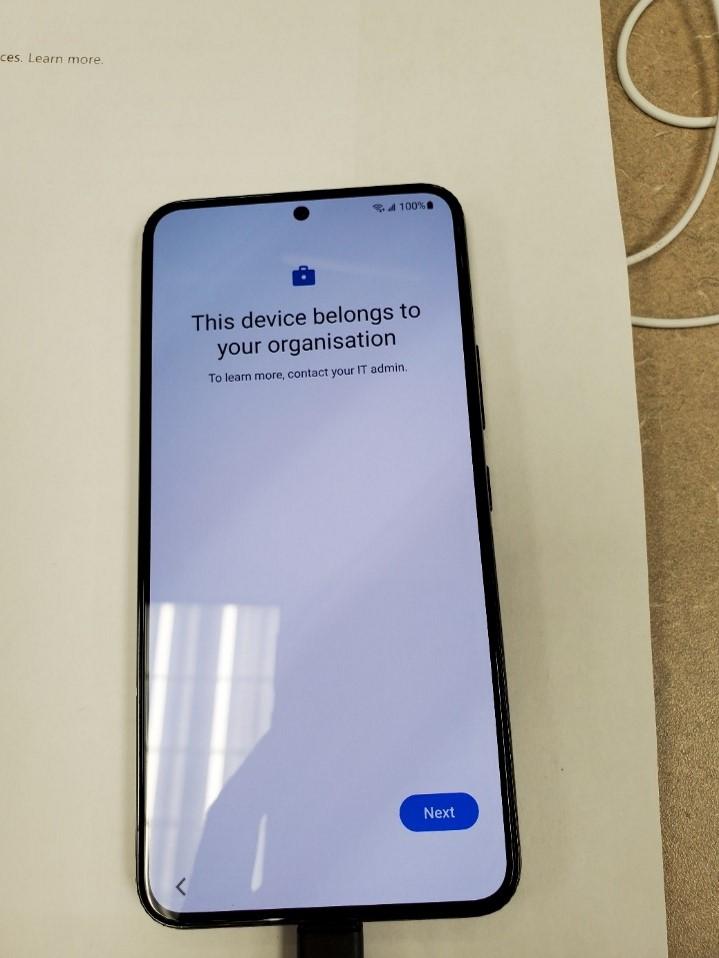
- Tap Next
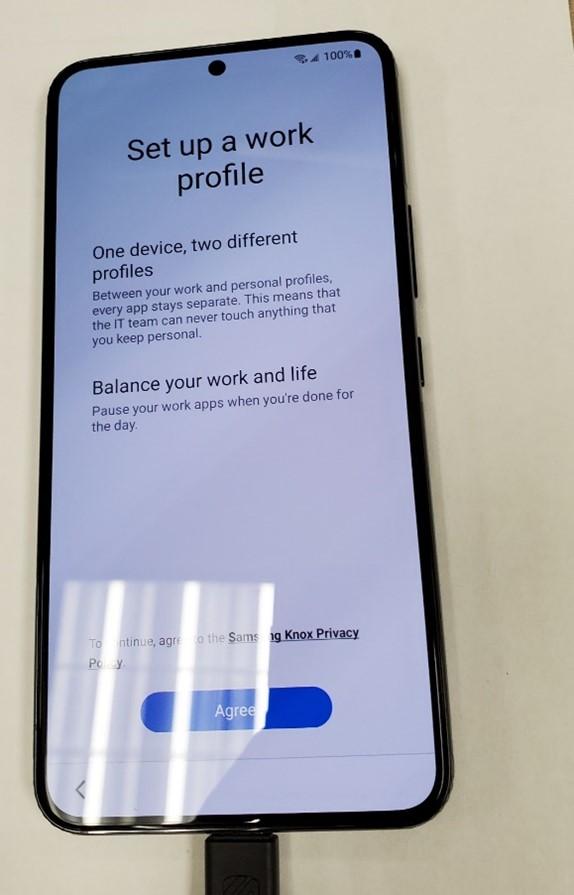
- Tap agree,
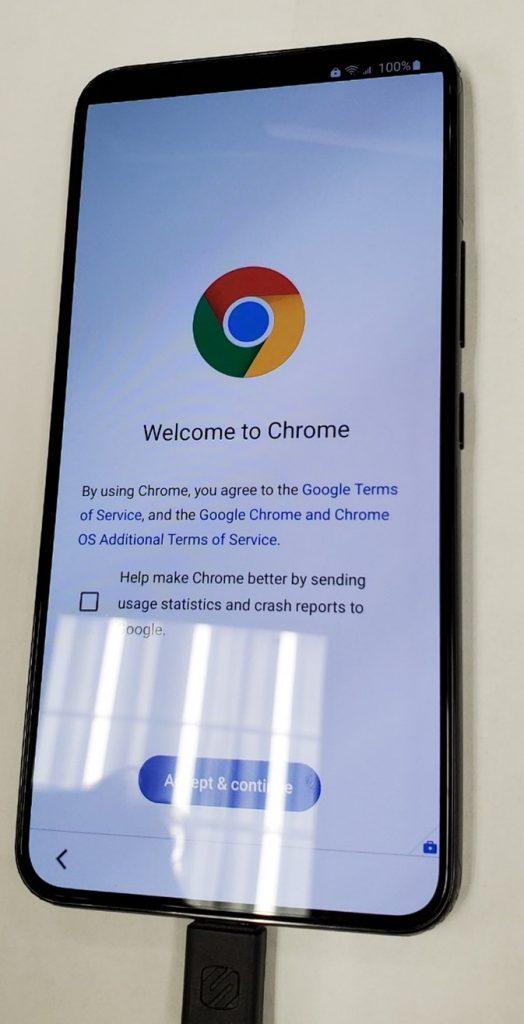
- Uncheck the check box and Tap “Agree and Continue”.
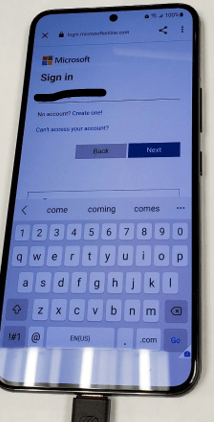
- Sign the user in.
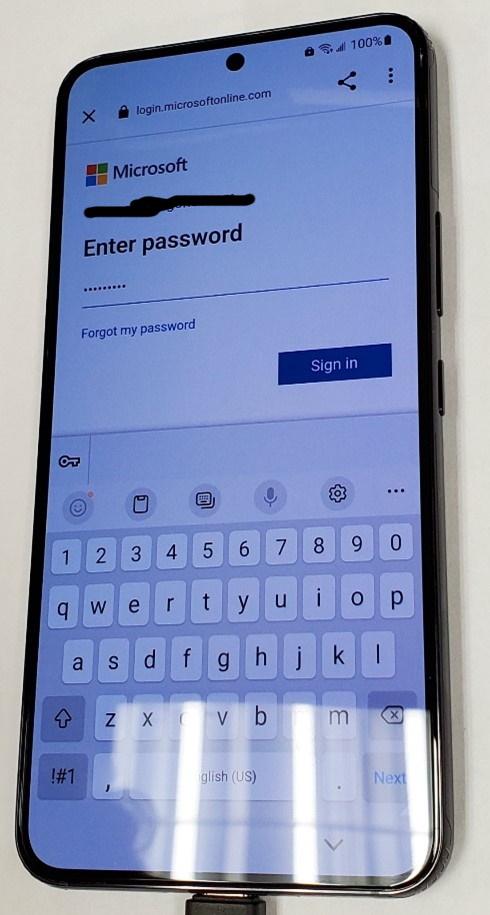
- Once you have signed in the user, tap “Install Apps”

- The following Apps are installed. Outlook for mobile and Teams will be installed after due to a configured and applied App Configuration Policy. Tap done.
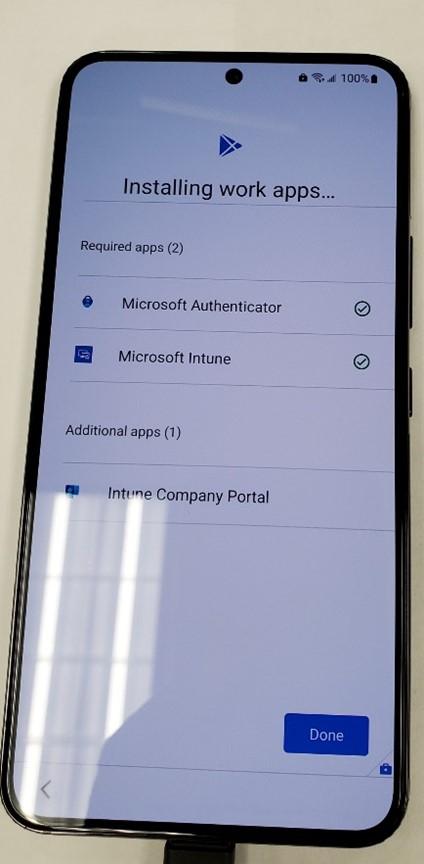
- Tap “setup” to register the device.
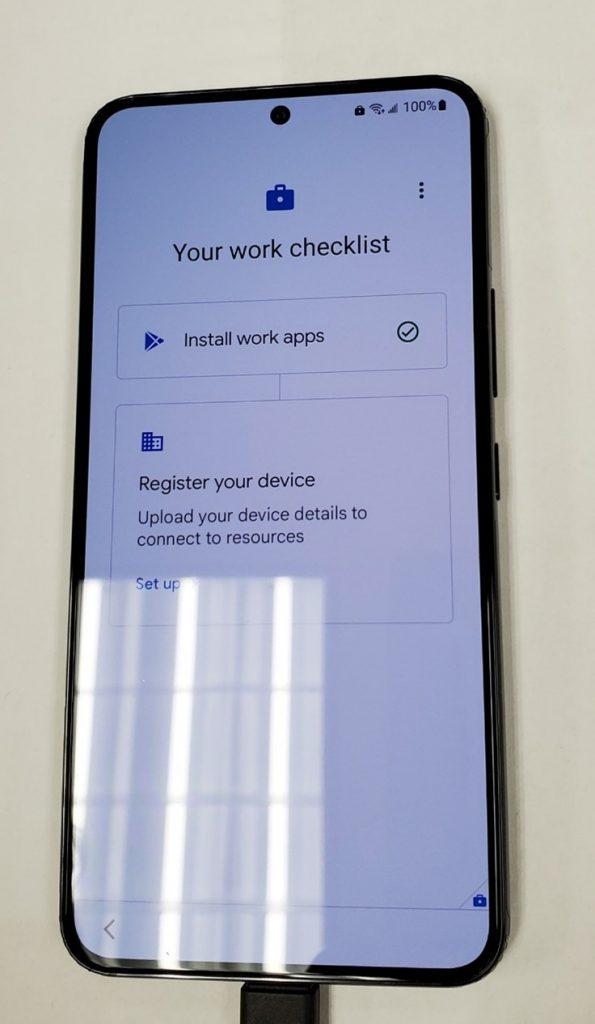
- Tap “sign in” to for Intune.
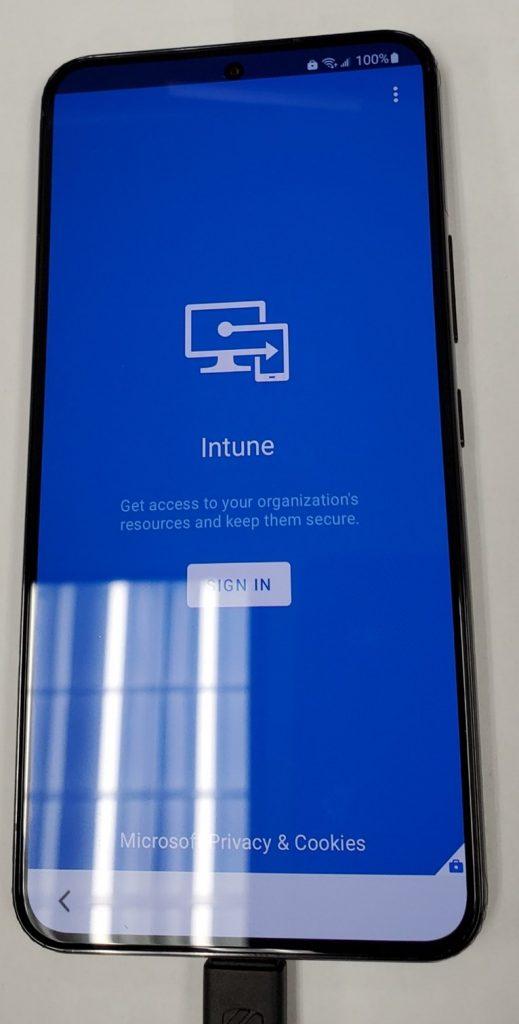
- Sign in with the users’ credentials again.
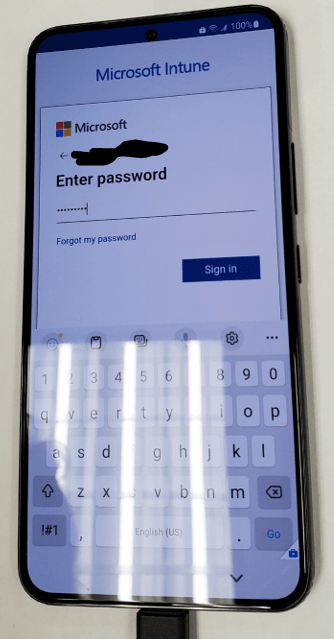
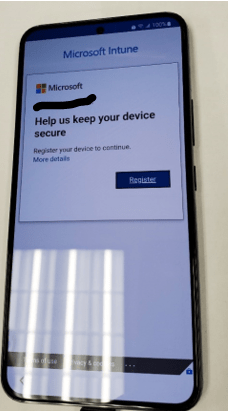
- Tap “Register”.
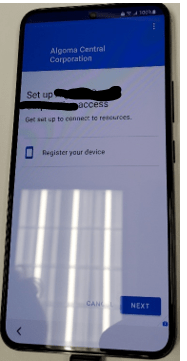
- Tap “Next”
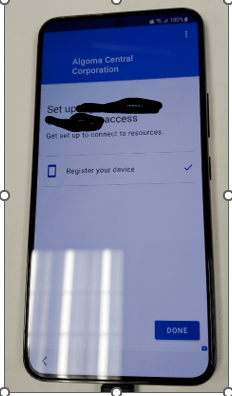
- Tap “Done”.
- Tap “Next”.
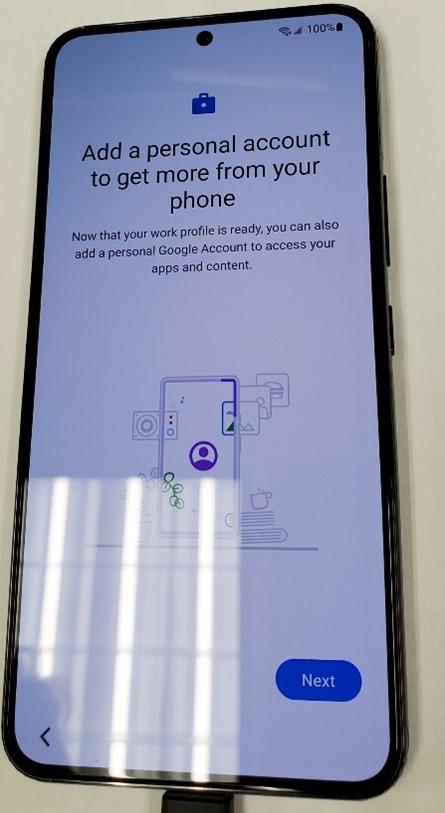
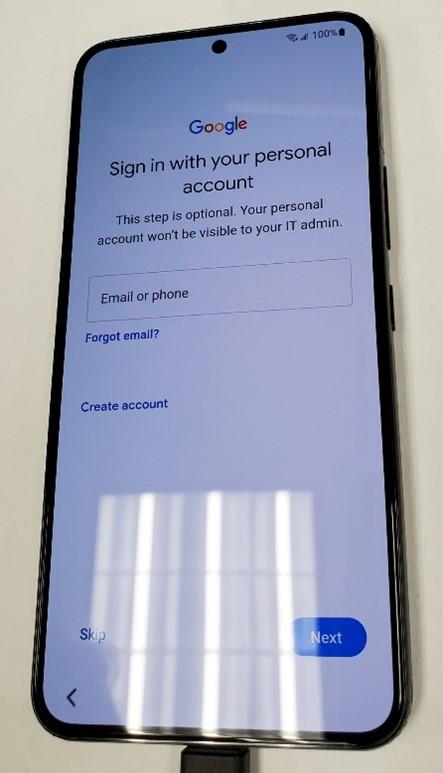
- If you want to add the users Google Account, you can do it here. If not, Tap “Skip”.
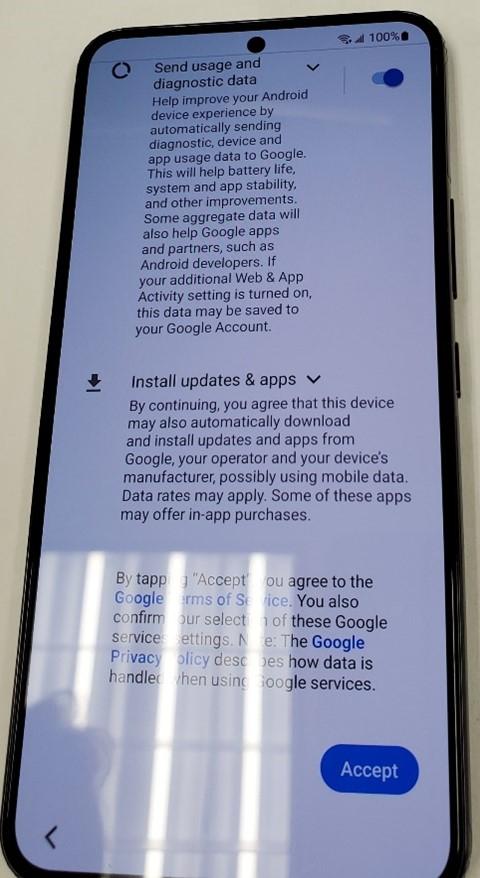
- Swipe up and tap “Accept”.
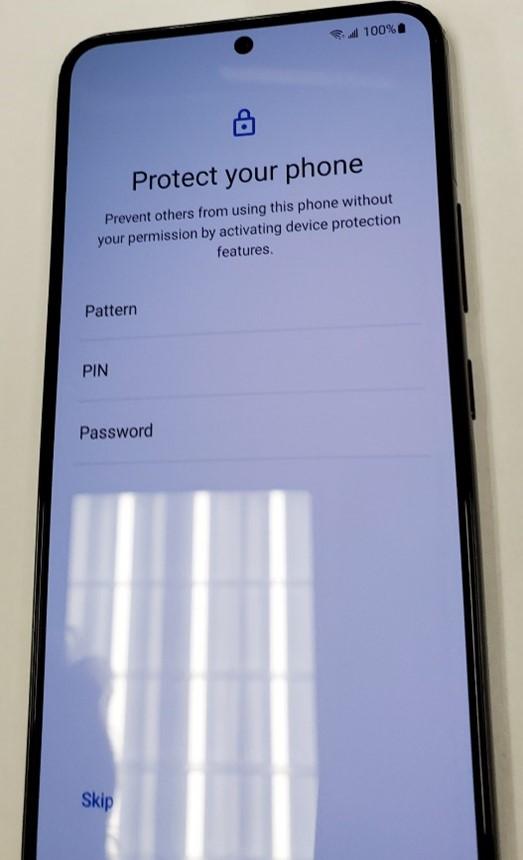
- Give the phone a passcode. I would use password as it is more secure.
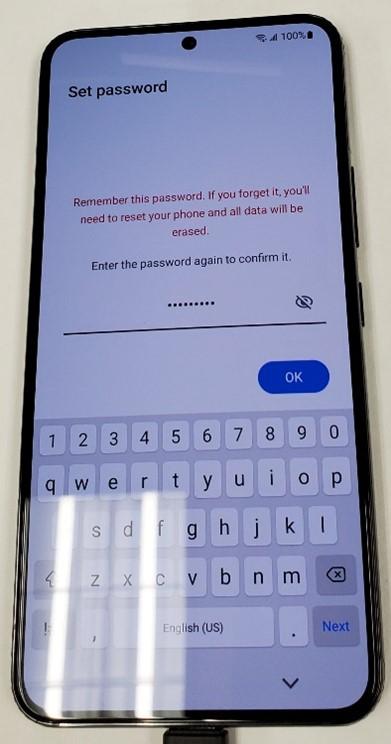
- Check the first two radio buttons and tap “Agree”.
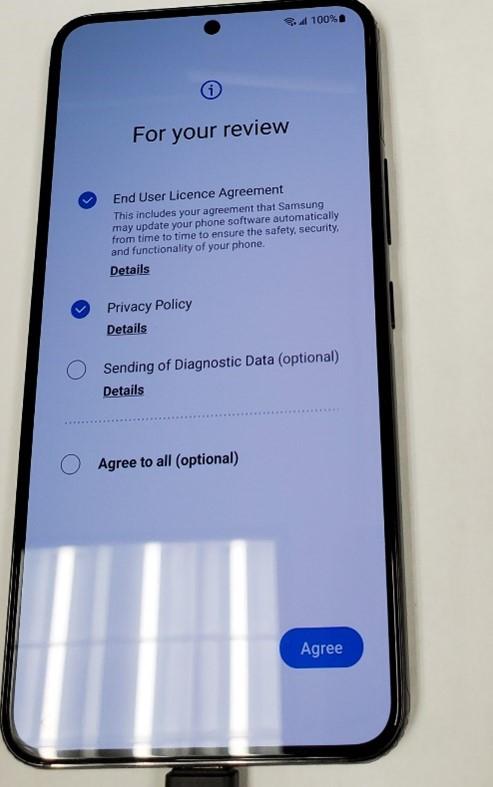
The phone is now set up in endpoint manager.
Renaming the Device and Description in Endpoint Manager
The device is now in endpoint manager. To view the Android devices that are enrolled go here in Endpoint Manager:
It looks like this:
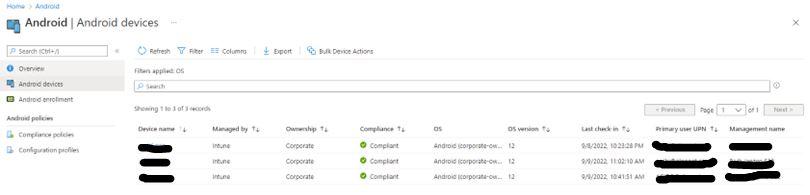
The two fields you need to change are the Device name and Management name. When the device is first registered the fields are auto generated. Change them so it is easier to read and distinguish who the device belongs to. I changed the Device Name to <userId>_model_number (i.e., abc123_S22). Change the Management Name to <User_Full_Name> <Model Number> (i.e., John Doe S22)
Common Tasks Performed in Endpoint Manager
With the Corporate Owner with Work profile enable you can perform the following tasks:

Retire – Good for when person leaves company but wants to take the phone. It removes all company data and email profiles assigned through Intune but leaves personal data.
Wipe – For Mobile devices it resets the phone back to factory defaults. Good for a lost or stolen devices
Delete – Removes the device from Endpoint but does not remove company data
Remote Lock – Locks the phone. Good for when phone is lost but the user may know where it is.
Reset Work Profile Passcode – Locks the Work Profile on the phone. A temp password is generated in Endpoint manager that allows for the workspace to be unlocked. DOES NOT reset the passcode of the device. You still need to let the user know to NOT change the assigned device passcode.
Play Lost Device Sound – Good for when user misplaces phone but is sure it is nearby. The lost alert sound can be played from one to 5 minutes on the phone while the user looks for it.
The steps for enrolling iPhone device are similar but I have only been involved with Android device. When I work with some Apple devices.
Happy IT’ing
Dan
Clean up any Download Folder With This One Tip
Download Folder Cleanup
Downloading files to your computer can quickly fill your hard drive. If you’re frequently downloading files, it may be necessary to delete them. Deleting unneeded files is generally good maintenance and will help with your systems performance, so you wont’s get angry about that!! More importantly, it is good for security and that will be a relief to most.
Since most most browsers in Windows (Chrome, Edge, Safari) default to this download folder you will be able to easily navigate to this place and clean it out.
The Steps to Clean Out Your Downloads Folder
Open Windows Explorer. The fastest way to do this is to use the Windows+E key. You can also use the search bar in the bottom left of the screen and search for “Windows Explorer”. Alternatively you can open the Windows Explorer icon on the taskbar if it is there.
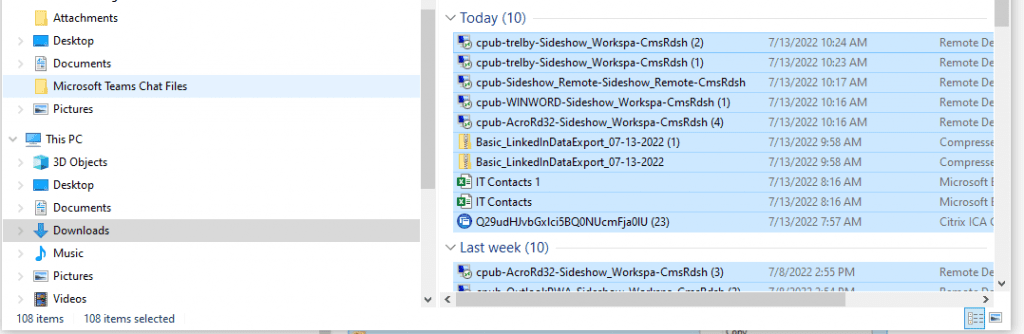
Select the Downloads folder in the left pane. Press Ctrl+A to select all the files or choose them individually.
Right-click the selected files and choose Delete.
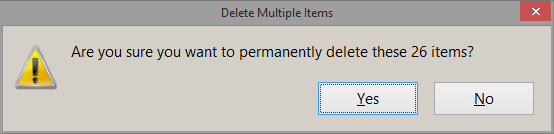
For good measure, hold the shift key while you select Yes to confirm. The items will bypass the recycle bin and be permanently deleted.
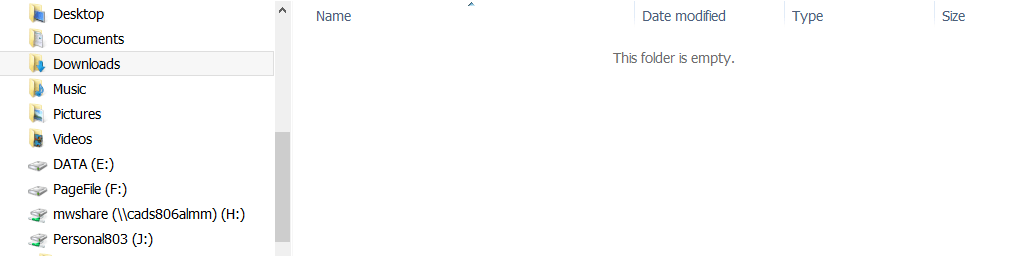
The Downloads folder will now be empty.
Why Should You Do this
If you download frequently, you should be emptying your downloads folder on a regular basis. It is better for overall performance of the system and it is could for security too. A lot of time you download personal or confidential documents from your web browser. The less that could get compromised the better and this is one way to do it.
This is also useful if you are in a Citrix environment. I published a funny TikTok about it!
Hapyy IT’ing
Dan
How to Set up an Entire WordPress in Under One Hour

Are you anxious to try WordPress but worried you don’t know enough to get it set up? This guide will show you how to get a basic WordPress site running in under an hour. To be clear, this is how to get a WordPress site running on your own domain and NOT a site through WordPress.com or WordPress.org. This is not by any means an exhaustive list on how to set up WordPress. It is a guide on how to set it up quickly.
Step One – Get a hosting provider with domain registration
The hosting provider that I use is cPanel. It has an administration tool to set up the webhost and domain. I find it intuitive to use but I have been using it for years. You can also use Go Daddy or Bluehost . They are all very similar.
Whichever one you choose, just remember to get the domain name with the hosting service. I am with Canadian Webhosting and I pay about 10 bucks a month for up to 5 hosts. My domain costs are 12 bucks a year for .com domains and 25 bucks a year for .ca.
I can’t show you step by step but when you are on the webhosts site, they will have video tutorials on how to do it. You can also contact their support ahead of time.
Step Two – Install WordPress for Your Domain
You can do this two ways. The first way is to go to WordPress.org and follow the 5 minute install procedure. In a nut shell:
- Download the install files via FTP to your webhosting providers site that is allocated to you.
- Extract the files.
- Set the correct file permissions.
- Create a Database and user in MySQL.
- Run the install Script
OR
If you have a webhosting provider with an install system (like cPanel and WordPress Install Manager by Softaculous), all of the above steps are taken care of for you.
Let’s hope you have the latter, especially since this is your first time.
Step Three – Pick a theme
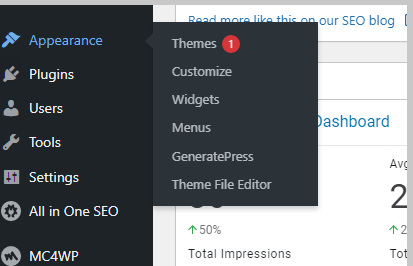
Your default install of WordPress will come with some themes. I recommend using those until you get more acquainted with the system. To install or switch themes you go to your dashboard and select Appearance / Theme. Hover your mouse over the theme you are interested in and then click the activate button. If you are not sure click the “Live Preview” button to preview the theme. It really doesn’t matter you can easily switch between themes.
Step Four – Install Some Basic Plugins
Now that you have WordPress Installed, some essential plugins that help your site run smooth and help with administration are in order. All you need to do is go to your dashboard and click plugins in the left middle of the screen and let the plugins screen load on the right. At the top left of the screen is the “Add New” button.
Click it and you will be brought to the plugin screen. Here you can search for any plugin your heart desires and it will be available to you. They are all free to download and install but if you need more functionality than the plugin has and the developer has it available, you will need to purchase the premium plugin.
Once you found the plugin you are looking for click install and the plugin will be installed:
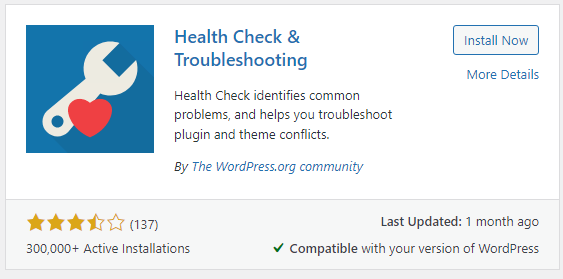
The above example shows you. Once it is installed the “Install Button” will change to an “Activate Button”. In order for the plugin to start functioning you will need to click it. I recommend you read the documentation on how to use the plugin you downloaded. They are all a bit different but the settings for each plugin will be along the left-hand side of the dashboard or in the plugins section.
Here are the essential plugins:
Really Simple SSL
All websites use SSL when users connect to them now. It used to be only for banking and ecommerce sites but all sites use them now. All the commercial web browsers even give a warning now if you connect to a non-SSL site. How do you know you are connected to an SSL site? There will be a padlock icon next to the address of the site in the address bar. You want people to feel safe when they browser you WordPress site even if it is just viewing picture of your pets! Really Simple SSL makes this very easy to do.
Maintenance Plugin
While you are getting you site up and running it might be a live site (meaning people can browse it). A good maintenance plugin will let them know that the site is going through “scheduled maintenance” or “coming soon”. They are all generally pretty good. The one I use is simply called Under Construction.
Caching Plugin
Caching is a process whereby any content deemed static on your site will not have to be fetched and rendered on your client’s screen. If it is already in your site memory it just has to be rendered. This is great for content or images that do not change very often. It speeds up your site and gives a more positive experience to the user. As your site becomes bigger and bigger this becomes more important. The plugin I use is WP-Optimize .
Social Sharing
You want you user to spread the word about your blog. A great way is to do it through social media. Make it easy for a user to click a button a share it to their favorite social media platform. I use the Easy Social Sharing.
Search Engine Optimization
You would like your articles to eventually start showing up on Google (I was going to say “search engines” but who are we kidding!). A good SEO plugin that can help you tweak your blog post after you create it is to make sure it is search engine friendly. Your content and format of the post have to be written in a certain way. It changes all the time so you need to check on this from time to time and make sure you are still following the right trends. I use the All In One SEO plugin. It does a great job of grading my content. In fact this article got 97 /100!
Subscriber List
Contrary to popular belief email is not dead. Another way to get more views on your blog is to get interested users to sign up for email updates to your content. A good email subscriber plugin will do this. You can customize the message they receive when they subscribe / unsubscribe / change mailing preferences and receive content. All plugins even have the ability for you to choose where you would like the sign-up screen to appear on your site. I use Mail Poet .
As an aside, I would always enable Auto-Update. It will keep your site as secure as possible.
There, you know have spent less than an hour getting your basic site set up and ready to go! This next step occurs after set up so this is after the hour, but you are on a roll so why not?
Step 5 – Write a blog post.
Now that you are a blogger you will be cycling through steps 2 – 5 indefinitely!! You will want to get other items on the go like Google Site Kit but let’s get the hang of blogging and we will go from there.
Now that I have given the article that SEO wants me to write I just wanted to add some of my personal experiences to the post. You see, I have been using WordPress on and off since 2014. I ran a life style blog for about two years and at one time managed about three different WordPress sites. Apart from my own site, I only manage my wife’s business site at the moment.
Now go start your blog and make your mark on the world!
Fix Citrix Display With This One Step
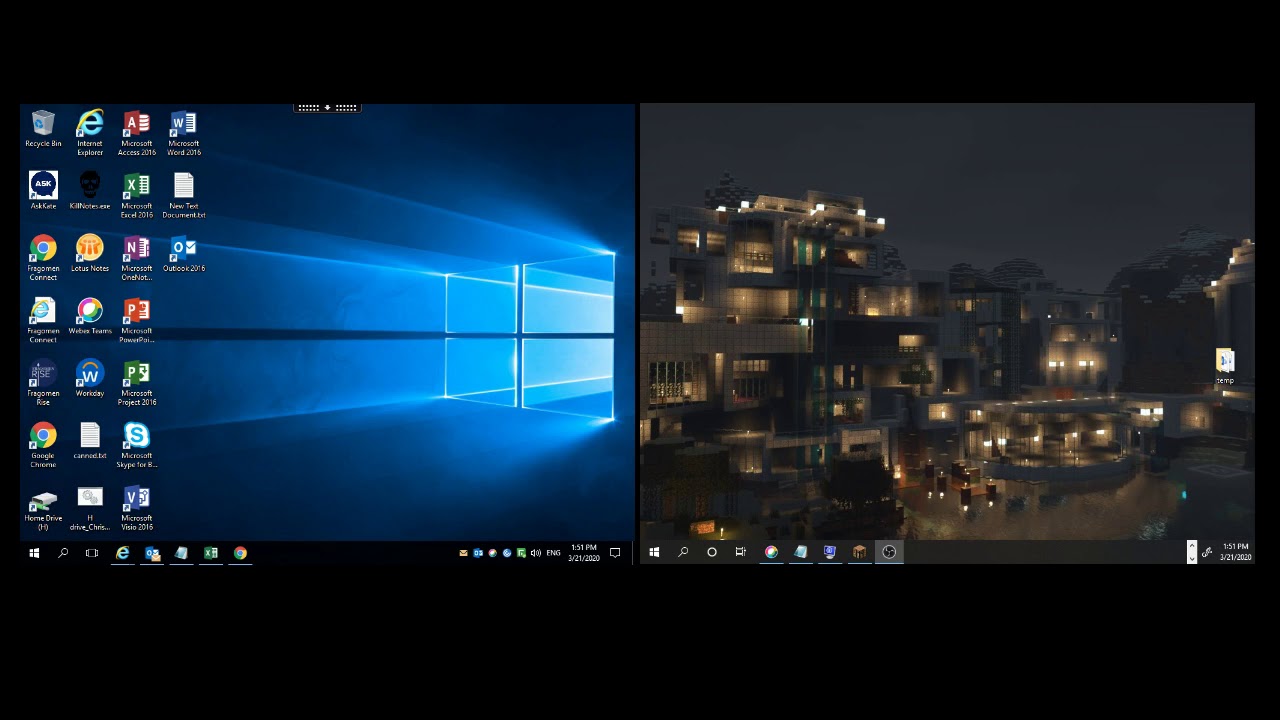
Are you using Workspace with more than one screen and your Citrix Display is not looking right? For example, all of a sudden you can’t drag a published app from one screen to another properly?
What Causes this?
There are several reasons. Whatever causes it changes the scale and layout properties of you monitor(s). When the scale and layout of the monitors you use in your Citrix session are not 100% identical, published apps will not render correctly across those screens.
This tends to happen when a user is on a mobile device like a laptop and they are moving between office setups. For example when moving between the office and home. With the hybrid office becoming more and more prevalent, this will happen a lot more often. Luckily the fix is quite easy.
How to Adjust Scale and Layout in Windows 10
Search for “Display Properties” in the Windows search bar. Click on each monitor listed in the Display section and make sure that the scale and layout are exactly the same.
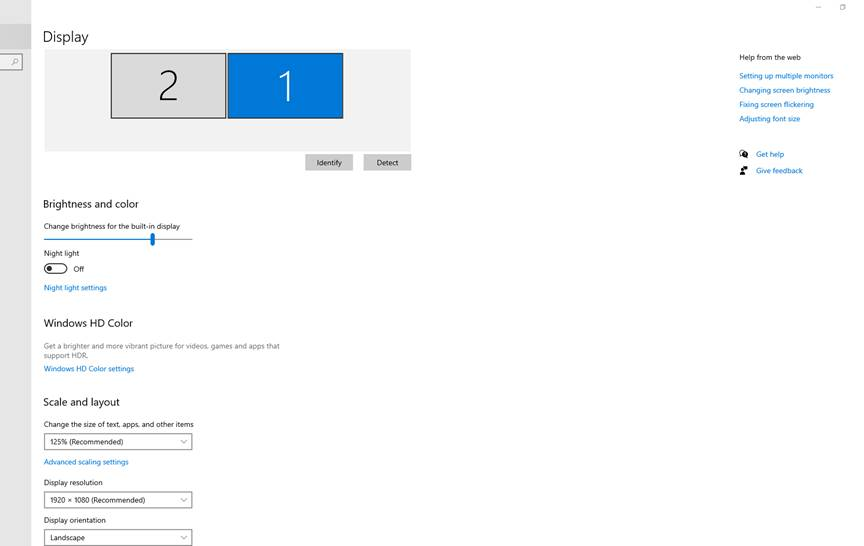
Now when you open your app in Citrix it will render correctly. If you use this with other Citrix Hacks, your Citrix Experience will be a better one.
Happy IT’ ing
Dan
3 Ways to Fix DNS issues
Have you heard the expression “it’s is always DNS”? Well it is true. I found myself in this situation a few days ago and it reminded me it was time to regale you with another blog post!
Are you having trouble connecting to a site or service over the internet? You have tried all the steps to troubleshoot your environment but you still can’t connect. For example, you have rebooted all your internet equipment, cleared app caches, reinstalled the app, updated the app or service or maybe even prayed to the Internet gods to rectify things (that last one was a joke).
Before I go through the 3 Ways to fix DNS issues, lets briefly discuss what DNS is in the first place.
DNS is a Directory / IP Address Translation Service
I like to use the analogy that DNS is like a phonebook but in reverse. You need to find out someone’s telephone number so you look up their name. With DNS you know the name but the app or service you are using needs to know the number to be able to connect. You see computers are great with numbers (like IP addresses) and humans are great at names (like cayville.ca). DNS, like a phone book ,is great at bridging the gap.
So when you type a website into your browser or open an app on your phone or tv box etc. , it resolves to an IP address that connects you to the service on the Internet. Sometimes the IP address changes for a particular site and DNS needs to update to reflect the change. This could be instantaneous or take a few hours or days. There are DNS servers all over the Internet and they have to update (a process known as propagation). Now here are the three ways you can fix this problem.
All deal with flushing the DNS cache which will force updates if certain DNS names have changed IP’s but where?
Clear Browser Cache
Your browser stores lots of info about the websites you visit. It could be as simple as clearing it and the website or service you are connecting will start to render properly. Here are instructions for the most popular web browsers:
Flush Your Devices DNS Cache
You device will have a DNS list cached locally on your device. It updates regularly but sometimes it doesn’t. You can flush it by dropping down to a command prompt (Windows) and typing “ipconfig /flushdns”. In Linux “$ sudo systemd-resolve –flush-caches” , then ” $ sudo resolvectl flush-caches”. You will have to consult your Linux flavor’s documentation for exact syntax. Same goes for MacOS.
Another quick way if you are connected to Wifi is forget the Wifi network and reconnect to it. DHCP will take care of the rest and refresh the DNS settings.
Flush Local DNS Server Cache
This is for the intermediate user. If you run a local DNS server on your network it is mainly used to resolve your local network’s domain names. If a device on your network needs to resolve an address outside your network (probably 99.99999% of the time) it has been set up with a forwarder. This will happen when the same site or site is not working on all of the devices on your network. Flushing your local DNS servers cache will fix this. Depending on what local DNS server software you use it will be a different procedure. However, it is quite simple; restart the the service.
So remember, no matter what the issue is when having Internet connectivity problems, if it isn’t something physical like a cut cable, dead modem / router / switch, it is always DNS!
Happy IT’ing
Dan
3 Considerations When Upgrading to Windows 11

Should you upgrade to Windows 11? It depends….
As with most Windows new releases, early adopters are usually faced with a lot of problems. I like to wait for the system to be out for awhile and I get a chance to upgrade my hardware before I upgrade. It minimizes problems.
If you feel you should upgrade there are 3 things to consider when upgrading to Windows 11.
Does Your System Meet the Minimum Requirements?
Old hardware hates new software. You should always remember that when considering upgrading. Microsoft has some pretty heavy system requirements for this version of Windows. They demand that your PC have a TPM (Trusted Platform Module) 2.0 installed.
You can read this guide What is a TPM? And here’s why you need it for Windows 11 for a rundown of what these modules do and how to find out if you have one. In a shell, TPM 2.0 support is required by Windows 11. If you are not sure, check with your laptop or motherboard manufacturer to see if your PC has TPM 2.0 support that can be enabled via the BIOS.
Other specifications include:
- CPU: 1 gigahertz (GHz) or faster with 2 or more cores on a compatible 64-bit processor or System on a Chip (SoC)
- RAM: 4GB
- Storage: 64GB of larger
- System firmware: UEFI, Secure Boot capable
- TPM: Trusted Platform Module (TPM) version 2.0
- Graphics card: Compatible with DirectX 12 or later with WDDM 2.0 driver
- Display: High definition (720p) display that is greater than 9” diagonally, 8 bits per color channel
- Internet: Windows 11 Home edition requires internet connectivity and a Microsoft account to complete device setup on first use, so no more “I don’t have Internet” option when installing.
Check if your PC is compatible with Windows 11
You can download the Windows PC Health Check app from the official Windows 11 page
Once the app is installed and open, you need to locate the Windows 11 banner at the top of the page and click Check Now. It will tell you right away if your PC is capable of running Windows 11 or not. Decision as to Why you should Upgrade
Weather or not to Upgrade to Windows 11
You should upgrade to Windows 11 if ….
If your PC meets the requirements, upgrading to Windows 11 from Windows 10 s pretty easy and free. Early adopters live for this but if you are a fan of technology or change (or both) you should hold off.
The biggest change you’ll notice when upgrading is the look. Windows 11 still has the traditional desktop and taskbar, but now there are some new buttons on the taskbar alongside the Start button and they’re all centered in the middle, rather than clustered in the left corner.
There is other options but I will let you play around.
Wait on upgrading to Windows 11 if…
Your PC doesn’t meet the requirements, or you like using older apps and peripherals / equipment. If your PC doesn’t meet the minimum system requirements for Windows 11, then definitely hold off until you can upgrade the components on your system or the entire system (depending on it’s age). If you don’t mind rebuilding your system after any trouble, then go ahead. Just remember to back up your system first. Unfortunately, Windows 11 is getting more aggressive about bugging users on unsupported PCs with warnings that their PCs aren’t up to snuff. I know Windows 10 has been around since 2015 but some user are still getting used to it!
Should I upgrade to Windows 11 Verdict
I suggest waiting if you have older equipment and / or can live with the feature of Window 10. If you love technology and experiencing the new features before the majority of user, go for it. But like I said before, if you requirements aren’t up to snuff you have the time to investigate any potent upgrade problems, prepare for a bumpy ride!! Oh yeah, did I mention backing up?
Special shout out to Tom’s Guide for the research on this!
Once again….a funny TikTok!
Happy IT’ing
Dan
5 Quick And Amazing Tips for Using O365 Web
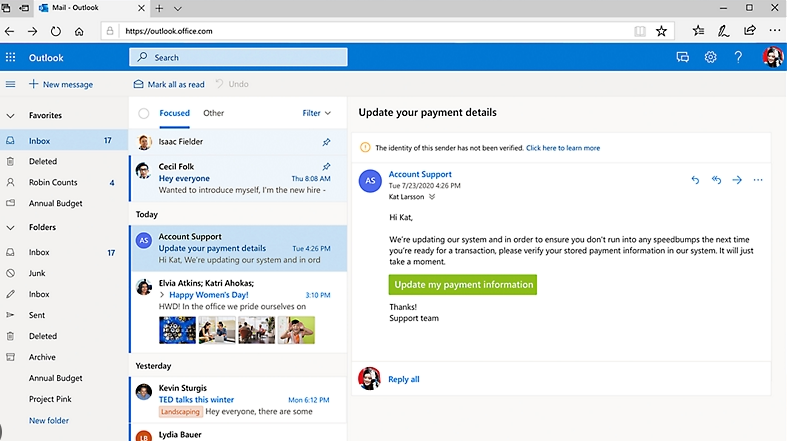
Use this post for 6 Quick Tips for Using O365 Web. IT will take care of the most common settings when initially setup up your email in Office 365 Web.
Adding your Signature
While in O365 Web, go into your sent items and find an email with your most recent signature. Highlight it and copy the text and logo. Then go into settings () in the top right of your O365 window and click Mail / Compose and reply. From here click the
button. Give your signature a name. In the textbox below the signature name, proceed to paste you signature that you copied. Click save and you have a signature for your O365 Web App.
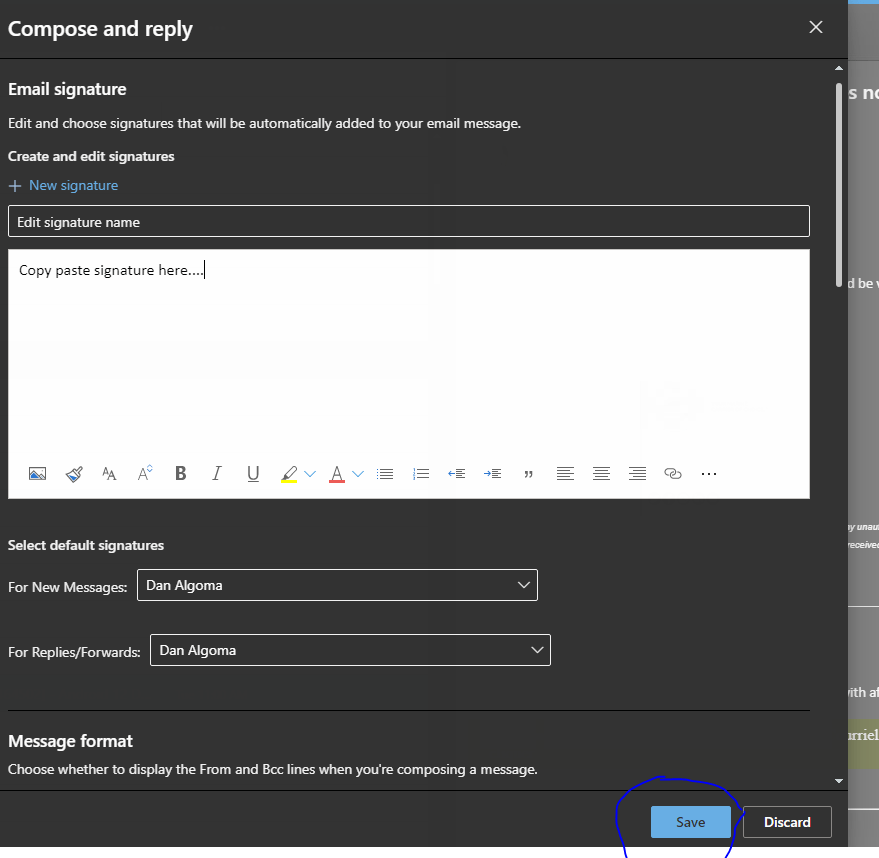
Once you have saved your signature, click on the down arrow “For New Messages” and select the new signature you just created.
Disabling Focus inbox
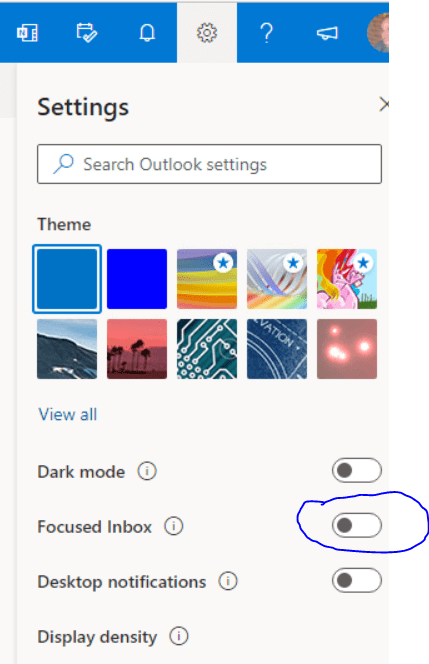
Focus inbox allows for messages to be sorted into your regular inbox and other emails considered to be newsletters, bulk email, etc. but not junk email. If you prefer to see all of your email in one inbox, just click the toggle to switch this feature off. Click the settings icon () in the top right of your O365 window and turn the focused inbox toggle off:
Accessing your to-do- bar
You may want to see your calendar and tasks on the same page as your email. To do this in O365 Web all you have to is click the “Your Day” button on the main page:
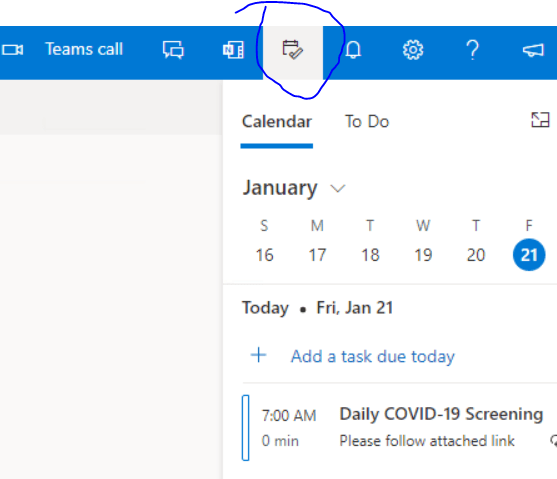
You will have to do this each time you start the O365 Web App to show this view.
Turning Conversation View Off
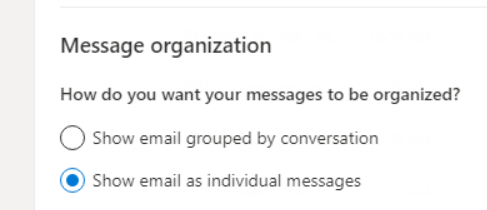
O365 has this set by default. Turn it off, click the settings gear () and click and then at the bottom right of the screen click “View All Outlook Settings”. Then click Mail / Layout / Message Organization. Choose “Show email as individual Messages”:
Page Break
Viewing Other Mailboxes
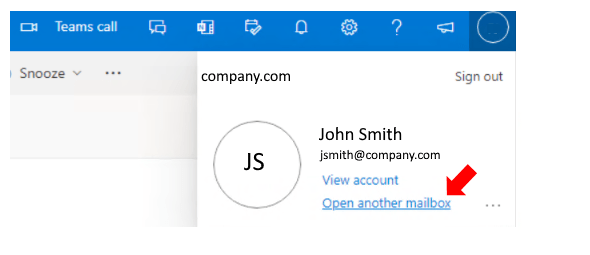
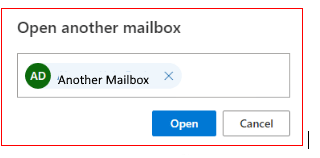
Start typing the name of the mailbox you would like to view and then click on the OPEN button
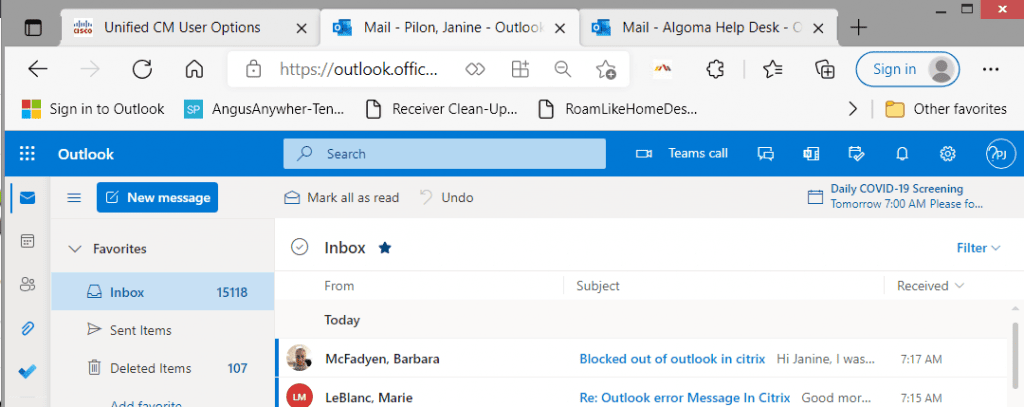
The new mailbox will open in another tab and you can switch back and forth between your mailbox and the other mailbox using the tabs.
Creating Out of Office Message
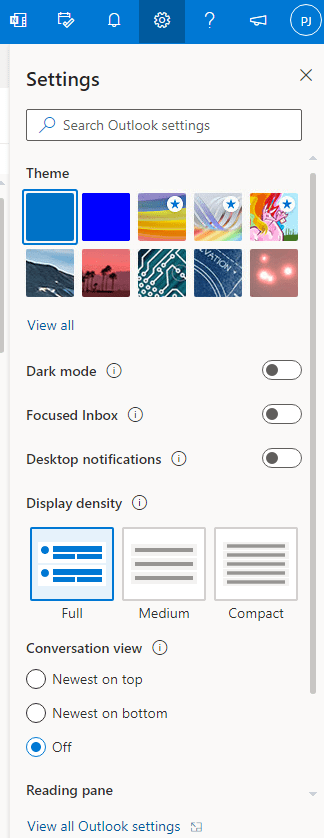
Click on Settings Icon and then “View All Outlook Settings”
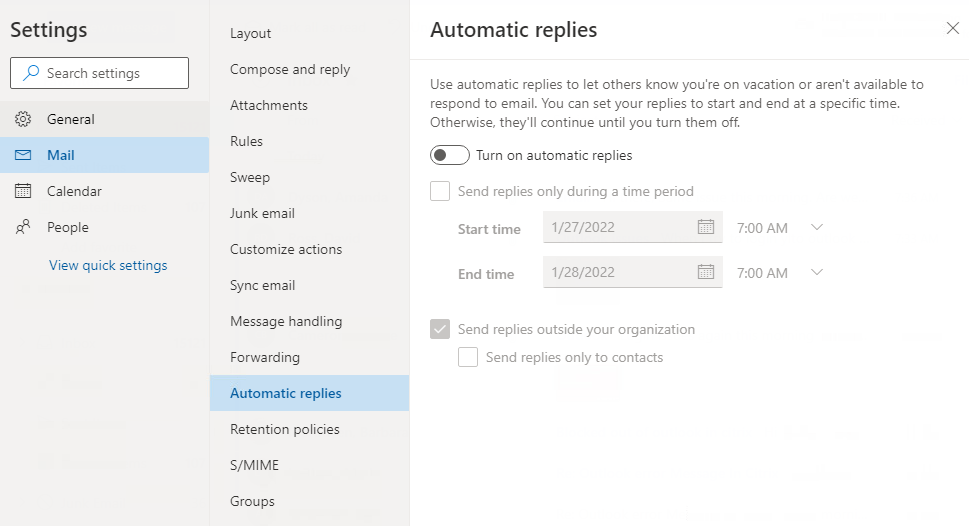
Click on “Automatic replies”
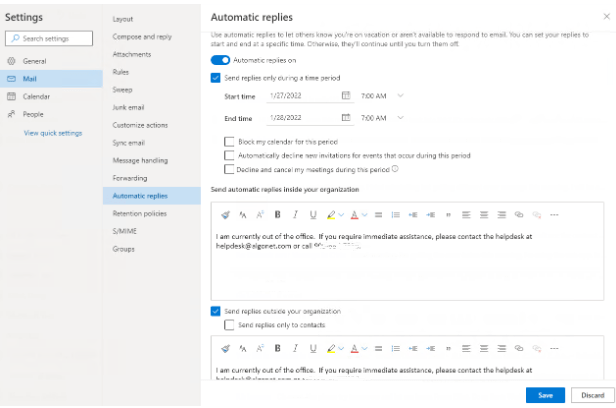
Turn on radio button “Automatic replies on”
Click on “Send replies only during a time period” and enter the dates you will be out of the office.
Add the automatic reply text for both inside and outside your organization and click on the SAVE button . If you use this with my post on setting up O365 in first place, you will have everything covered.
To be honest, not many read my posts. Blogging about IT is boring as fuck. If you email me at danv@cayville.ca and let me know you found this Easter egg of profanity, you will get a shout out in my next blog post.
Happy IT’ing
Dan