
Getting the Disabled Users PST
Importing a PST to another Users In-Place Archive can be done in many ways. One, you can get a PST Exported from the disabled users Desktop Outlook Client through exporting.
You could also use the eDiscovery Export Tool if you have access to Microsoft Purview at least the eDiscovery Manager Role.
Another way is to use various 3rd party cloud service that back’s up user email and download as a PST (DRUVA, Rubrik and Cohesity come to mind).
The main goal is to get the disabled users email as a PST and then upload it to the users In-Place Archive. I have chosen the In-place Archive instead of their regular mail store for two reasons:
- It gives a logical separation of the disabled users Archive and…
- It does not count toward their mail quota in the main mail store. There are going to be using the archive eventually….
Prerequisites for Importing a PST to another Users In-Place Archive
They are as follows:
- You will need to have In-Place Archive set for the user.
- You need to have the role of Compliance Manager to import into Purview.
Importing a PST to another Users In-Place Archive
Step 1: Prepare for Upload
- Go to https://purview.microsoft.com/datalifecyclemanagement/
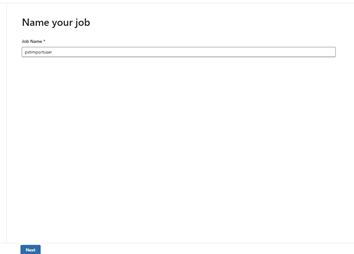
- Click on new import job and name the job. It can only be 2-26 characters, and no space. Click next.:
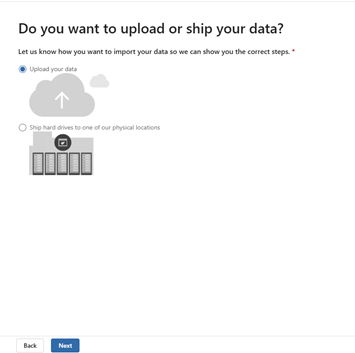
- Choose Upload Data and then Next:
Step 2: Get the SAS URL and Download AZCopy
- On the next Window, click on “Show network upload SAS URL” and copy to notepad.
- Download a Windows 64bit version of AZCopy and make sure it is in the same folder as the .pst files.
- Take note of the file location of the PST Files on your local computer and copy this path into notepad alongside the site of the URL you copied in step 4.
Step 3: Upload PST Files to Azure Storage
Now that you have the SAS URL and AZCopy installed, it’s time to start the actual upload and start Importing a PST to another Users In-Place Archive. This step involves transferring your PST files to a temporary storage location in Azure, from where they will be imported into the archive mailbox.
- Open a command prompt (or terminal if you’re using macOS or Linux).
- Use the following command to upload the PST files:
azcopy copy “C:\path\to\your\pstfiles\*.*” “SAS_URL”
*** get the file path and SAS URL from your notepad ***
Replace “C:\path\to\your\pstfiles” with the actual path where your PST files are stored.
3. Monitor the upload process. Depending on the size of the files, this may take some time. The upload progress will be displayed in your terminal window.
Step 4: Create the PST Import Mapping File
Once your PST files are uploaded to Azure, the next step is to create a PST import mapping file. This file tells Microsoft 365 where each PST file should go in the archive mailbox.
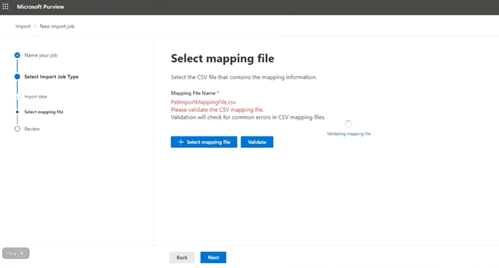
- In the compliance portal, click Create a PST import mapping file. A sample is shown here:

This file shows one line, but you may have past that is chunked in 5GB increments. They will need their own line so you will have to copy to create more lines in the file. Just change the columns. you now are well on youtr way to Importing a PST to another Users In-Place Archive.
Workload – this will always be “Exchange”
Name – this is where you list the exact name of the PST file. If you need to rename the downloaded .pst file(s) to make it simpler, do that.
Mailbox – I use the UPN of the user. You could probably also use the email address. Sometimes they are one in the same!
IsArchive – Set this to “TRUE”. If you don’t it will put the PST into their regular mail store increasing its size significantly. This will be a problem if you DO NOT have in-place Archive set up and it goes over the limit (Exchange Plan1 50GB, Exchange Plan 2 or E5 100 GB).
Target Root Folder – Ensure that you specify a folder name in “Target Root Folder” that is descriptive in the Drive mapping CSV i.e. (UserDisplayName_Archive). It will load the PST content into that Folder in the In-Place Archive. It makes it easier to distinguish between the users’ own in-place Archive and other users Archives if they have more than one etc.
- This step will require you to specify the user’s mailboxes and archive mailboxes that correspond to the PST files you’ve uploaded. You’ll be asked to input details like email addresses and the locations where the PST files should be imported.
- After creating the mapping file, download it and review it for accuracy. This file must be uploaded back to the portal during the import job setup. Here is what it looks like to add and validate the mapping file:
Step 5: Create a PST Import Job
With everything in place—your PST files uploaded and the import mapping file ready—it’s time to set up the actual import job.
- In the compliance portal, click new import job.
- Follow the prompts to upload your import mapping file and select the appropriate PST files.
- Review the settings, and once everything looks good, click Start import.
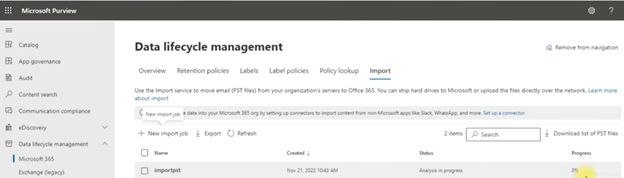
- After the PST file has been analyzed, the import will begin using the values from the mapping file when you click “Import to Office 365”. It will take several hours for larger PST files.
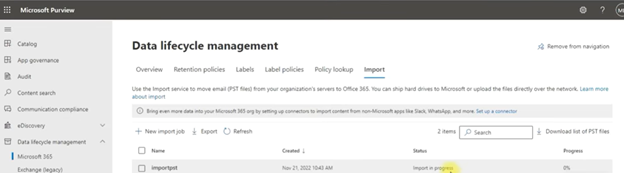
At this point, the PST import job will be queued, and Microsoft 365 will begin importing the data into the archive mailboxes as per your mapping file. You will be asked if you want to filter out some data before the import. I would touch base with the user to see how much data they want as it could significantly shorten the import process:
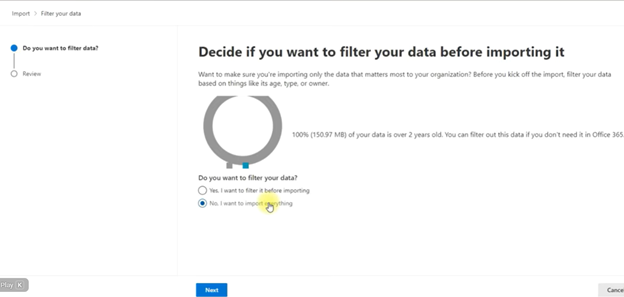
If you choose yes, you can specify how many years you would like to include in the import. If you say no, it will import everything. Choosing 3-5 years instead will significantly reduce the file size of the imports in most cases.
Step 6: Monitor the Import Job
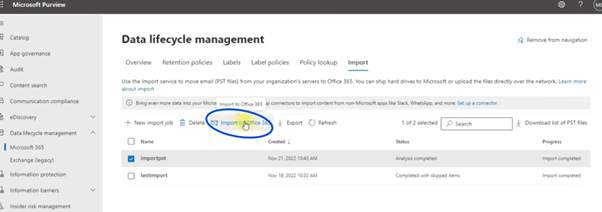
Once the job starts, it’s important to monitor the import process to ensure everything goes smoothly. In the compliance portal, you can check the status of your job by clicking on the Import section. Here, you’ll see whether the job is running, completed, or if there are any issues during the process:
After the job finishes, the imported PST files will appear in the specified archive mailbox. You can review the results in the portal to ensure the imports are successful.
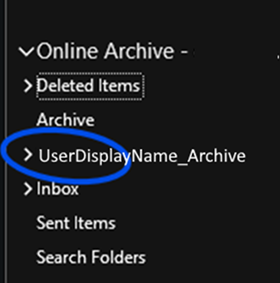
The user will see the following in their in-place archive:
Here is a link to a YouTube video that outlines the entire process: (https://www.youtube.com/watch?v=J60dhhWG3_c&t=334s)
You now have been able to get god at Importing a PST to another Users In-Place Archive. However, this article outlines it in more depth!
Dan
I am an Senior IT professional with over twenty five years experience in the field. I have supported thousands of users over the years. The organizations I have worked for range in size from one person to thousands of people. I have performed support from Help Desk, Network / Cloud Administration, Network Support, Application Support, Implementation and Security.