
Setting Up Locate Device in Endpoint for Android
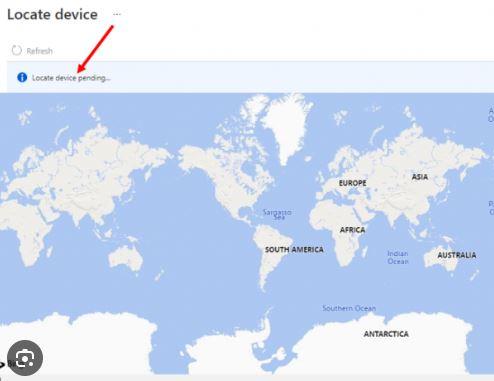
So, you want to set locate device in endpoint for your Android devices. Enrolling them in Endpoint is not enough!! There are several considerations and prerequisites that need to be set up first. I will show you how to do this.
Step 1 – Create a Group for Enrolled Devices
You have probably already done this. Creating a dynamic device or user group based on membership rules is the best way to set up Locate Device in Endpoint for success. Once the group is created, enroll a device based on the membership rules. Then you can go to step 2 create a configuration profile.
Step2 – Create a Configuration profile for Locate Device in Endpoint
Here we create a configuration profile that enables locate device for enrolled devices.
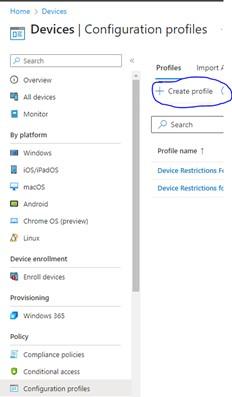
- In Endpoint, go to Home/Devices/Configuration Profiles and click “Create Profile”:
- On the create a profile choose “Android Enterprise” from the first dropdown and “Device Restrictions” from the profile type.

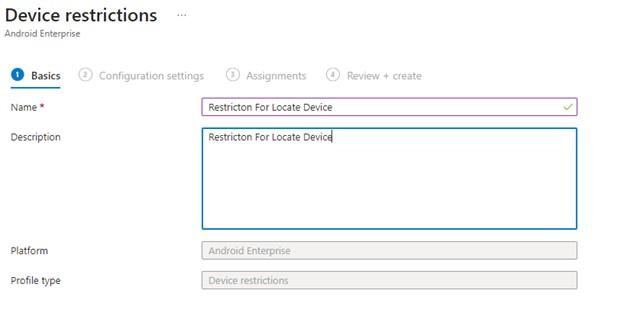
- Give the configuration a name and description and click next:
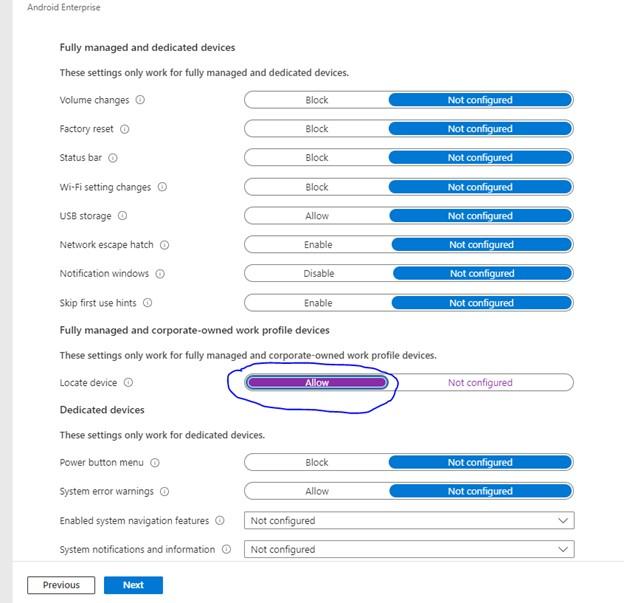
- On the screen, click the “General” Tilde and scroll down to “Fully Managed and Corporate owned Device Profiles” and find “Locate Device” and click the slider to allow:
- Click next. On the next screen you will be asked to add group to the configuration. Add the group your created in step one to apply the configuration profile to:
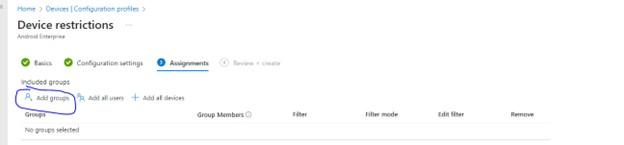
- Click next and then create. You have your configuration policy.
Step3 – Ensure Location Services are Enabled on Enrolled Android Device
Location Services should be enabled by default on the enrolled android device, but it needs to be on for locate device in Endpoint to work properly, On the Android device go to Settings / Location and make sure the location settings are toggled on.
Step4 – Ensure App Permissions are Set for Intune
You need to make sure the Intune App is set to use location service every time.
- Do this while still in the location settings from the step above and tap app permissions.
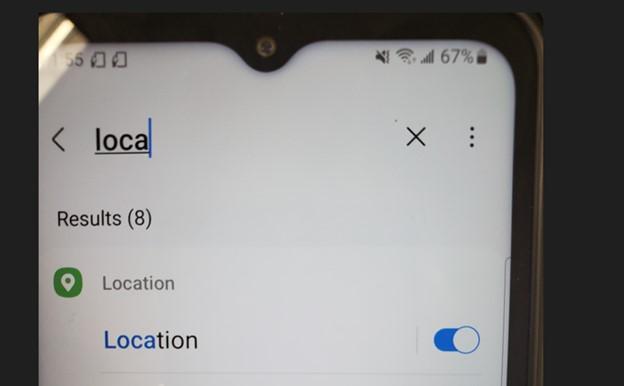
- Scroll Down to the Intune app:

- And make sure the app is set to “Allow All the Time”. Also, make sure the “use Precise Location” is toggled on:
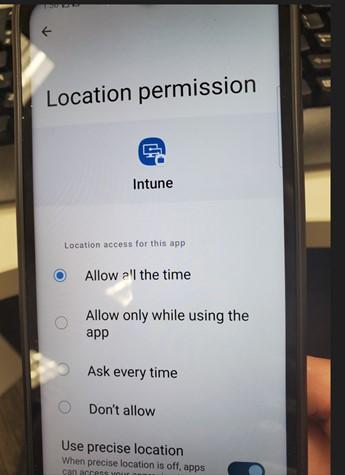
Step5 – Manually sync Policies in Android Intune App
You can probably wait for the configuration policy to get pushed out to the device but if you want to see if Locate in Endpoint works properly, go to the Intune app and manually kick off a sync:
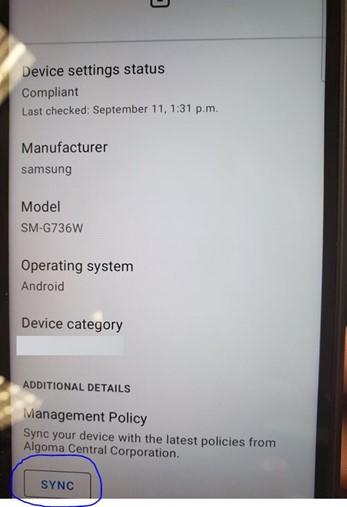
Putting Locate in Endpoint all Together
Now that you have properly configured your device to Locate in Endpoint, when you decide to do this:

You will get something like this:
Instead of this:

2 Ways to Change The Primary Email in Hybrid Environment
Thakns for visiting! It means a lot. Why not by me a coffee?
These are the best ways to Change The Primary Email in Hybrid Environment for a user. This may happen when you move from an on Premise AD environment to a Hybrid one.
You look in admin.microsoft.com and the use has the wrong primary SMTP address but you can’t change it in the portal….
It is simple to change the Primary Email Address of an M365 user when your tenant is not being synced to your on-premises active directory, but if you are syncing to M365 with any of the following tools:
- Windows Azure Active Directory Sync (DirSync)
- Azure AD Sync (AADSync)
- Azure Active Directory Connect
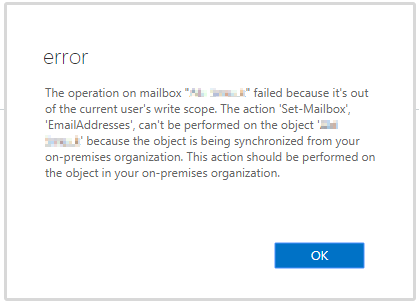
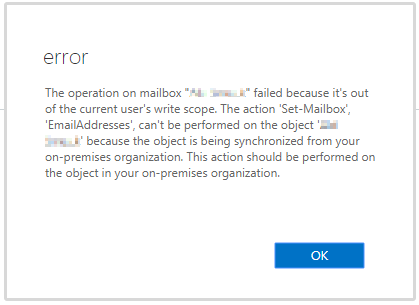
Then you will be unable to change any of email addresses associated with that account, and you will get the following error:
How to Change The Primary Email of an Active Directory – Microsoft 365 user using ADUC
- Open Active Directory Users and Computers
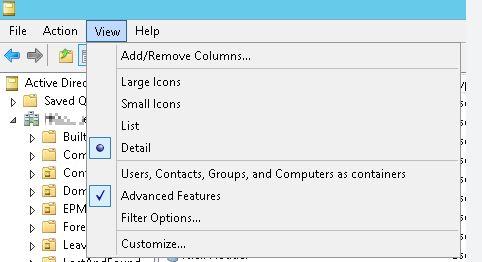
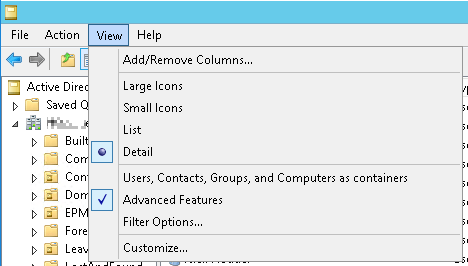
- Ensure you have “Advanced Features” enabled from the view menu:
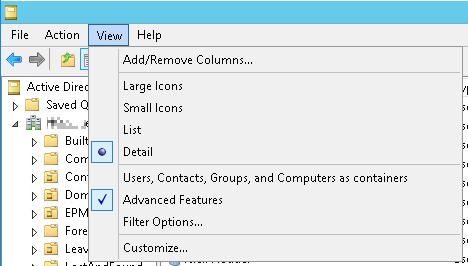
- Double click on the user that you want to edit the email addresses for. (Note: You cannot search for the user. The attributes tab will not be available). You must manually search out the user.
- To do this, find the user and then look at this users “Object” Tab. It will show you exactly where the user is in AD.
- Go to the “Attribute Editor” tab.
- Go to the “proxyAddresses” attribute and click edit.
- Edit the email addresses as per your requirements. Note that the primary address (which is the address that the user will send emails from) is in uppercase “SMTP”.
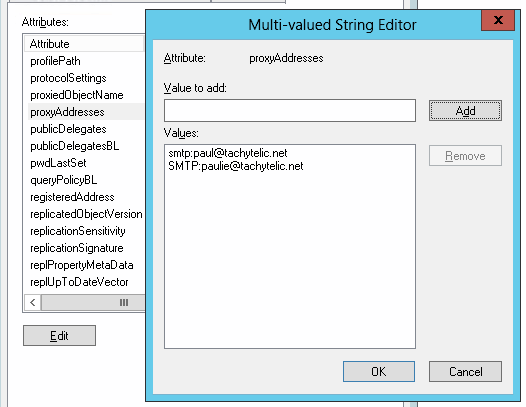
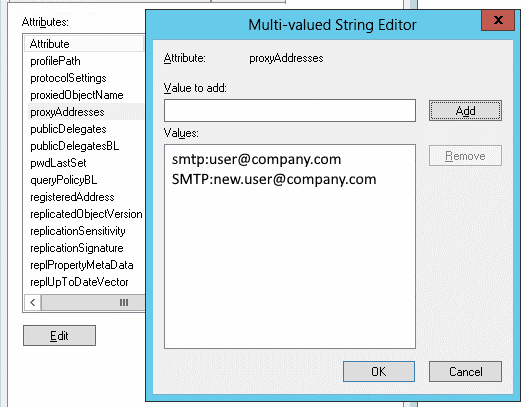
How to change Change The Primary Email in Hybrid Environment using PowerShell
You can perform the same operation to Change The Primary Email in Hybrid Environmentusing Windows PowerShell, the basic syntax is like this:
Set-ADUser user -Add @{ProxyAddresses=”SMTP:new.user@company.com”}
The problem with running this command is that you may already have a primary SMTP address set and this will not stop you from adding another one. So first of all run:
get-aduser user -properties proxyaddresses | Select-Object Name,ProxyAddresses |fl
This will show you all the current proxy addresses for this user. If you want to remove an existing proxy address, you can use:
Set-ADUser user -Remove @{ProxyAddresses=”smtp:user@company.com”}
Items like Distribution Lists will work better. Now your user will have its primary SMTP Address set correctly in a hybrid environment!
Check M365 Health Status Using 3 Ways
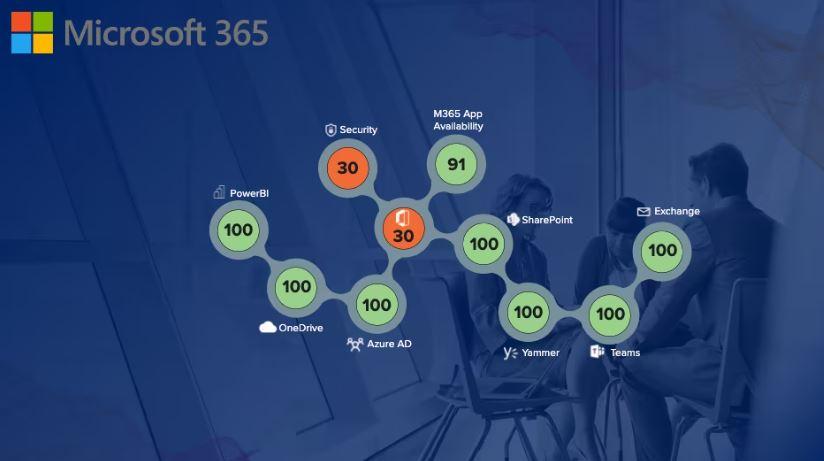
Why would you want to check M365 Health status? A good example of when your users are experiencing issues with the M365 ecosystem, and you want to check to see if it is a system wide issue before you engage in a bunch of troubleshooting your specific tenant. This is one of the many ways to enhance your M365 tenant.
In the article I will show you three different ways to check M365 Health status. The good news is it can be automated or done manually. It is your choice. So, let’s get to it!
Check M365 Health Status Dashboard
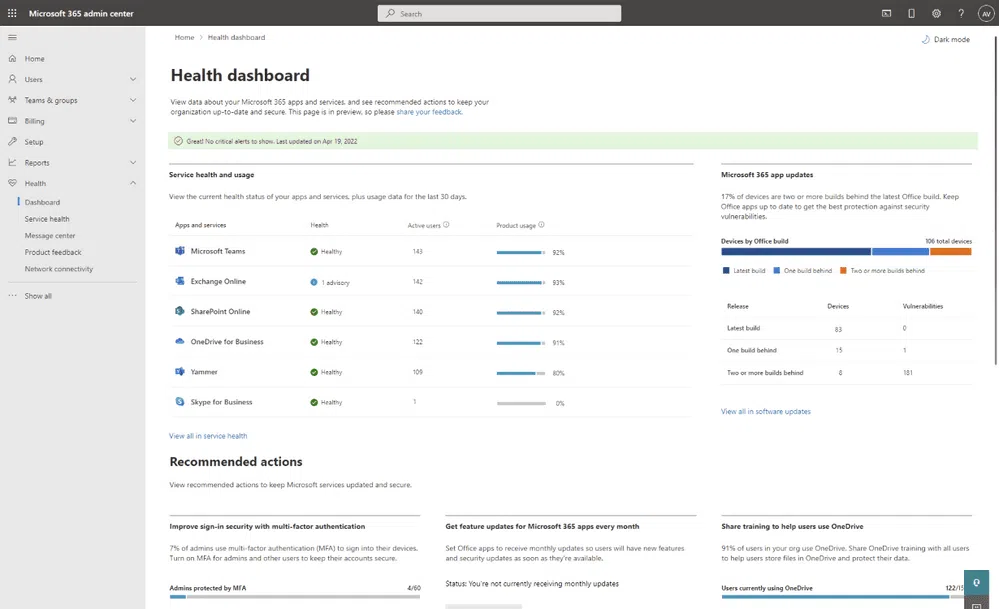
The Microsoft 365 Health dashboard lets customers view insights about the service status, software update status, as well as security compliance. It also shows critical alerts about general service incidents and billing issues.
It is designed to show the health status of the M365 services you use including the health of your environment, software and device updates, security as well potential billing issues.
Sign Up for Health Status Alerts
This is a great automated way to receive updates when you Check M365 Health Status of your environment, Do the following to sign up for alerts:
- Login to admin.microsoft.com.
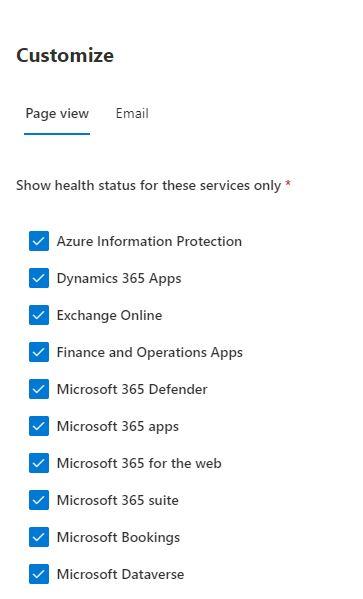
- Click on Health/Services Health and then customize in the top middle pane.
- Choose which services you want to view:
4. Choose what service you want health status emails on:
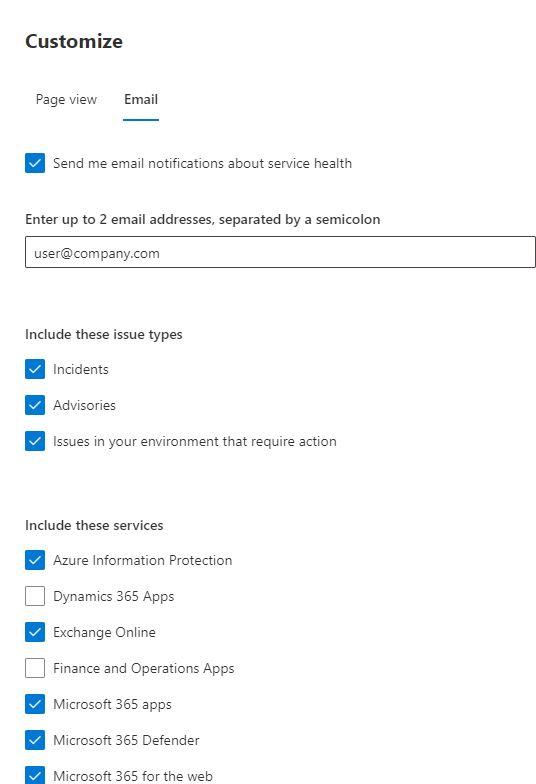
Whenever there is an issue with one of those services that affect your tenant or region, you will get notified via email.
Check Tenant Release Status
The is a great way to check M365 Health Status too. Sometimes is not a question of a service failing or degrading performance. It could be that your region hasn’t had a service update that takes care of the issue you are having. Consider it like a firmware upgrade for your tenant.
Before checking the service version of your Intune tenant, it is important to know that Microsoft releases monthly service updates to Intune. These updates are rolled out to tenants in an order.
• Day 1: Asia Pacific (APAC) gets the Intune updates.
• Day 2: Europe, Middle East, Africa (EMEA) gets the Intune updates.
• Day 3: North America gets the Intune updates.
• Day 4+: Intune for Government gets the updates.
It might not have got to your region yet. To check for your release version:
- Sign into the Microsoft Intune Portal.
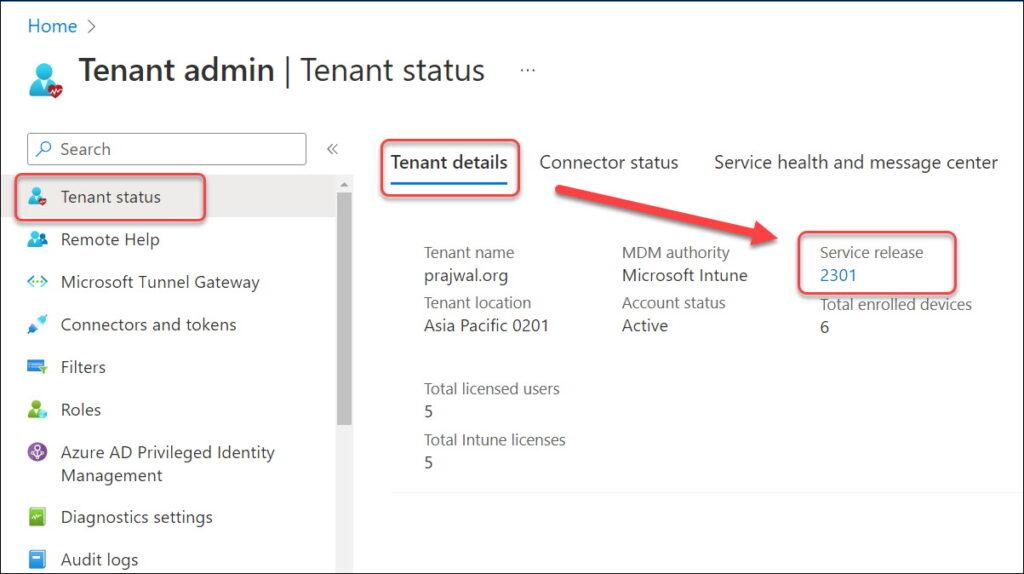
- Navigate to Tenant Administration and now select Tenant Status.
- Select the Tenant Details tab, and here you can find the Service release version of your Intune tenant.
Using these 3 ways to check M365 Health Status, you will be able to differentiate between any potential issue being caused by your specific tenant or if it is an issue that affects the M365 eco-system in your region!
Create Teams Chat Autoreply with Power Automate
Create Teams Chat Autoreply with Power Automate
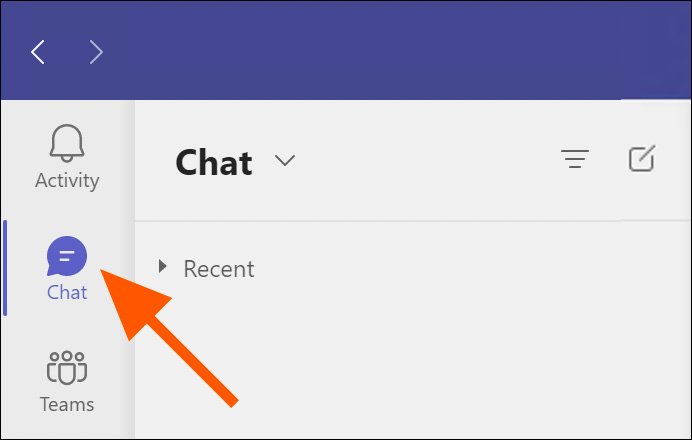
Here is a great example of why you would want to Create Teams Chat Autoreply with PowerAutomate. Your organization has an email address that forwards to several people. If you work in any form of a support group, this is common. The only thing is that it renders MS Teams on that account useless. You need Teams though because you are probably using the phone functionality on that account.
Nobody logins directly into the forwarded account so if anyone sends a chat message withing the organization you will only hear about it later in an email. By that time the person is probably wondering why they haven’t received support yet. If you use Power Automate (Microsoft Flow) it is more secure.
Why You Can’t set an Out of Office Message
It is an account that is not directly accessed so why not just send an out of office reply to incoming message. It works for Teams, right. Well, the problem here is that Outlook and Teams go hand in hand. With an OOO set up whatever goes to Outlook will also go to Teams and vice versa.
It would be hilarious if your support email sent out a reply that this this channel is not monitored! Here’s how you set up an autoreply in MS Teams.
Steps To Use Power Automate (Microsoft Flow) to Create Teams Chat Autoreply
- Go to https://make.powerautomate.com/ and sign in as the email account that is forwarded to your group if you are not already.
- On the left-hand side click “+Create”
- Choose Automated Cloud flow.
- Give your flow a name and search and choose the trigger “When a new chat message is added”.
- Click Create.
- You will be presented with a screen like this:
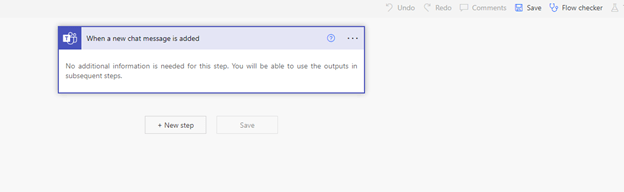
From Here you will add a step at a time by clicking on New Step. I will explain the flow in the next screenshots.
How the Flow Works
Power Automate can take almost anything you can do manually in M365 and automates it. A good example is when you Create Teams Chat Autoreply. The problem is that there is so much information you can automate is it hard to find documentation. Essentially the Output of a flow is an input to the next flow.
If the output from a flow has several values (like a search), it applies a “apply to each” step and will perform an iteration for you. My example only has one value. Creating the initial is ok, if you must go back and edit it, the “apply to each” becomes nested and it is a real pain. The flow I created is short, so I just recreate it every time in need to edit it. There is a way to remedy this but can show you in a future blog post.
Remember Each Output of one step is the input of the next.
Parse The Users Email Address (ObjectID)
The step in the screenshot below takes its input from the initial step of the flow (When a chat message is added). There are several possible items (Dynamic Content) you can pick from the message. The item you need to pick for this step is “Message Link”.
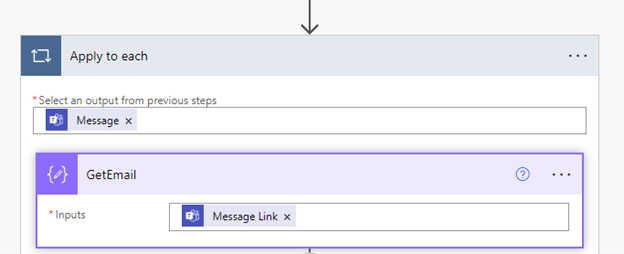
The next screenshots show how to parse the ObjectID’s from the Message Link Dynamic Content:
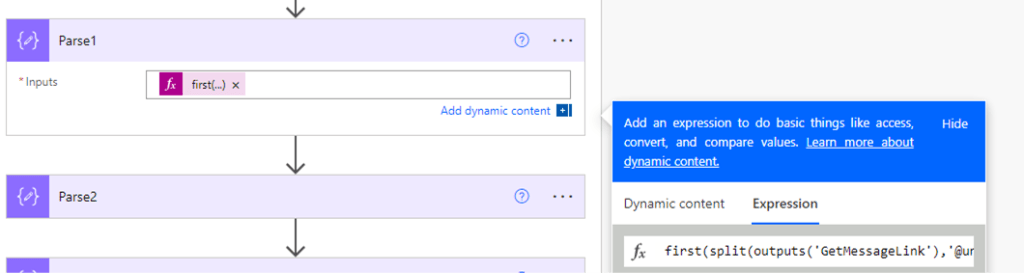
first(split(outputs(‘GetMessageLink’),’@unq’))
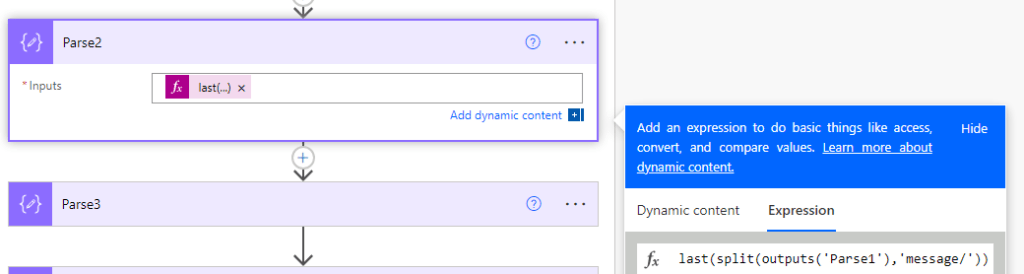
first(split(outputs(‘Parse2′),’_’))
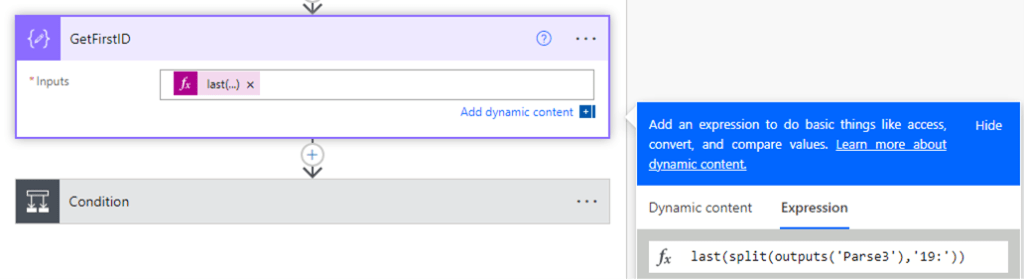
last(split(outputs(‘Parse3′),’19:’))
Now we have the 2 possible Object ID’s to parse out of the message link content:
Here is an example of data is trying to get at:

It is grabbing the info between “19:” and “_”. That is the ObjectID you will need in the following steps.
The thing is depending on how teams register the chat in the message link it will either be what you parsed or not. The good news is the chat is only between two users (The MS Teams account set up as and autoreply through flow and the user). So, you will have to set up a condition but first we need to determine what the account set up for autoreply’s Object ID is….
Getting Object ID to Create Teams Chat Autoreply Account
This can be easily accomplished by going to admin.microsoft.com and search for the user you want to use for the autoreply and then export the information to a CSV file:
Using Condition in Teams Chat Autoreply Account

Then look at the ObjectID field. You need to use that in your condition:
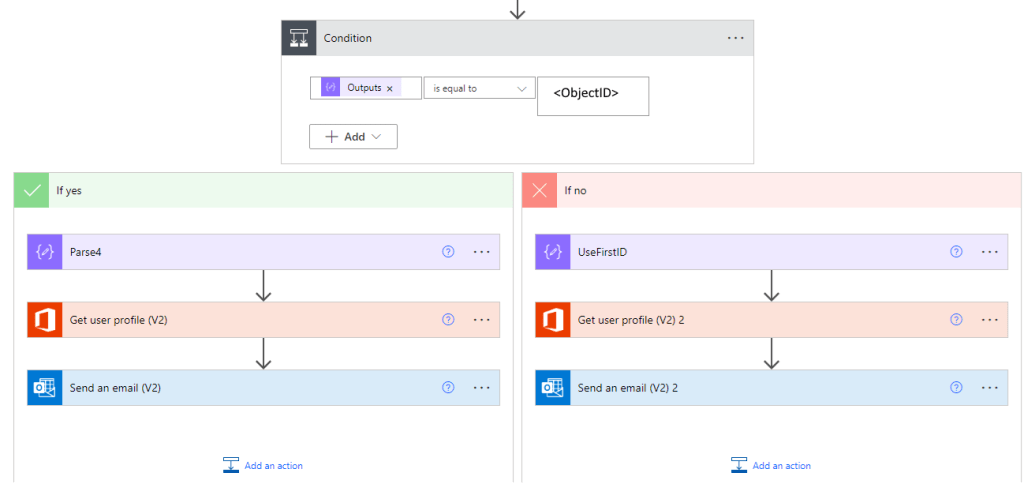
If the ObjectID you parsed is the Autoreply account ID you will need to go back a reparse to get the other ID:
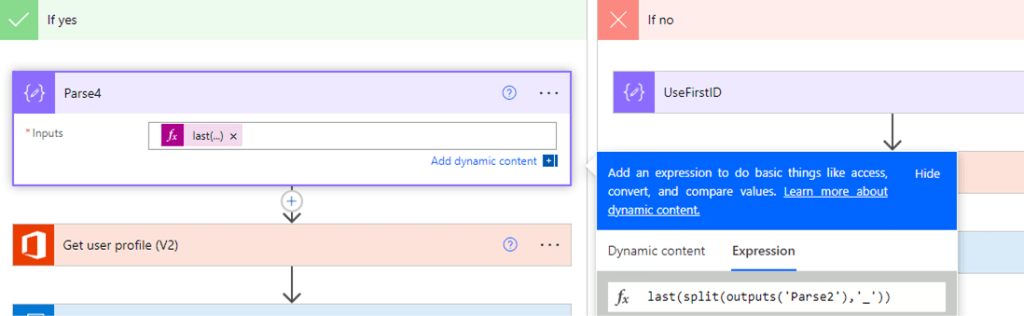
last(split(outputs(‘Parse2′),’_’))
Then you can get the user profile. “Get User Profile” takes it input from the results of all the Parse4.
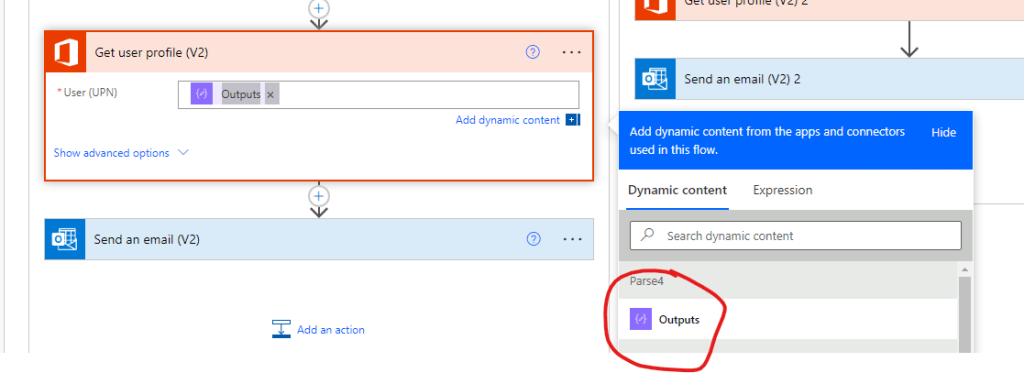
Now that you have this information, you can send an email to the user who tried to chat the Autoreply’s Teams Account. It grabs all the information based on the lookup from the Object ID and all you must do is select the Mail field dynamic content from the lookup, add your subject and autoreply message you would like to send. You can use the WYSIWYG editor or if you know HTML code you can add the message formatted that way.

If the Object ID does not match what you parsed from GetFirstID, then you have the correct Object ID and the flow will follow the “No” branch of the condition:
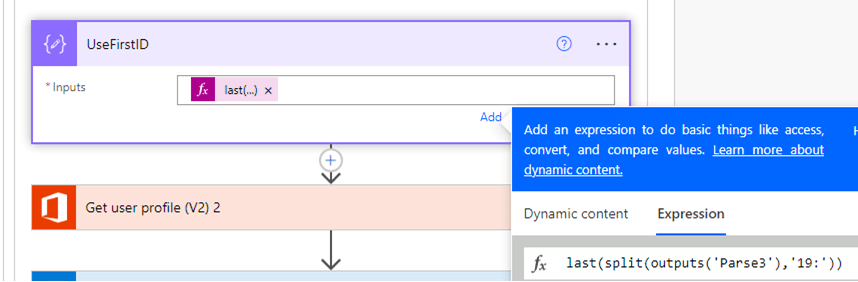
last(split(outputs(‘Parse3′),’19:’))
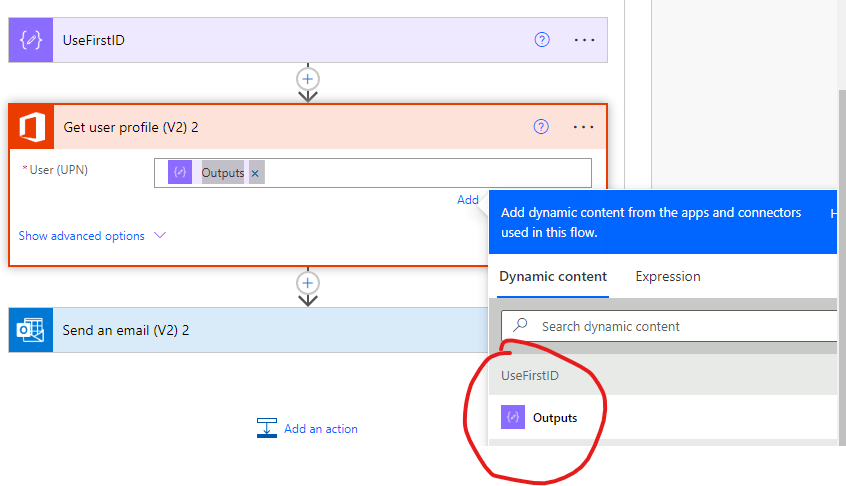
Now that you have this information, you can send an email to the user who tried to chat the Autoreply’s Teams Account. It grabs all the information based on the lookup from the Object ID and all you must do is select the Mail field dynamic content from the lookup, add your subject and autoreply message you would like to send. You can use the WYSIWYG editor or if you know HTML code you can add the message formatted that way.

Test The Flow
Once the flow is created, save it. Then, use the flow checker to make sure there are no errors:

Lastly you can test it by clicking the test button. You have the choice to manually test or automatic. The flow is triggered by a chat event in production so just choose “manual” and it will then sit and wait for an event that you will send immediately!
Use another Teams account to send a chat to the account where you set up the flow and the test account will get an email with the subject and the message you specified in the previous steps.
Result of Create Team’s chat autoreply.
- You have an email address that is not directly accessed but sent to several other email addresses.
- MS Teams chat is not monitored but needed for another reason (phone functionality).
- You can’t set an OOO on the outlook account because it defeats the purpose of having the email address in the first place!
- Someone sends a chat to this account.
- Using Power Automate, a flow has been set up that replies to the message in an email that the account is not in use and probably suggests other ways to get in contact with the group.
Easy peesie, right? With a little help from Power Automate you can Create Teams Chat Autoreply!
Scanning With Microsoft Lens The Right Way

Scanning With Microsoft Lens
Scanning With Microsoft Lens is a great way to get documents that are not on your phone scanned and sent to various outlets. Good examples are PDF, OneNote, PowerPoint, Word or Saved to OneDrive. You can later take the scans and share there using your normal methods on your phone (Email, Text, Teams, etc…). It definately can be used as part of the apps you deploy when you enroll devices like smartphones.
How To Scan With Microsoft Lens
This assumes you have already downloaded and installed the app from your normal app stores (Google Play, Apple. Samsung Galaxy, etc.).
Once installed do the follow:
- Tap the Lens Icon on Your Phone:
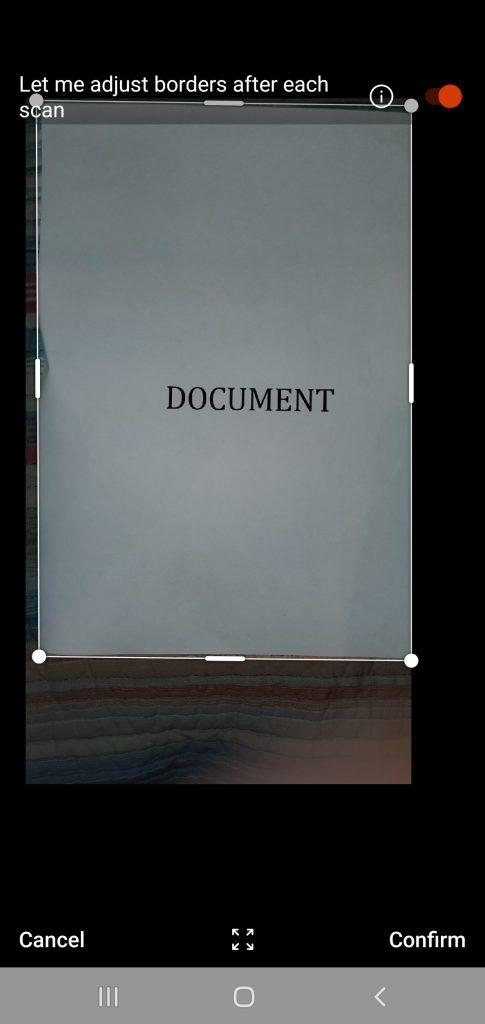
- It will open to a scan window with the Setting Document:

- Tap the shutter button and then tap confirm on the focused document:
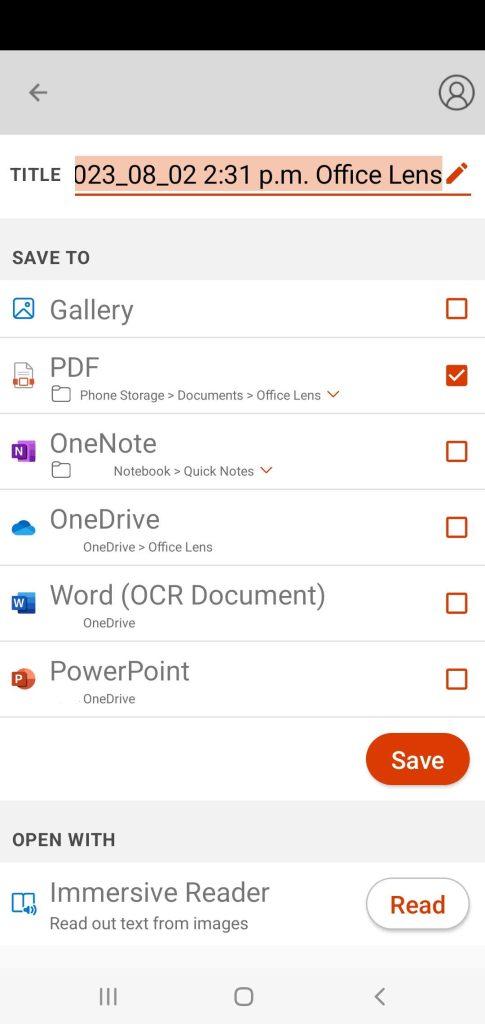
- Then click Done:

- Here you will have the options to save as. Once you choose your method, tap Save:
- The scan is saved to My Scans:
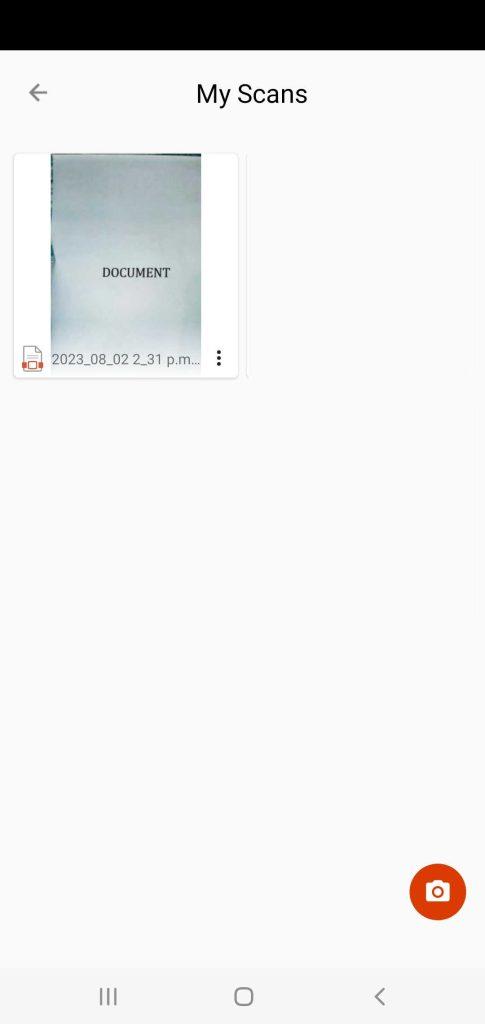
- Tap on the scan you just created and tap the share button :

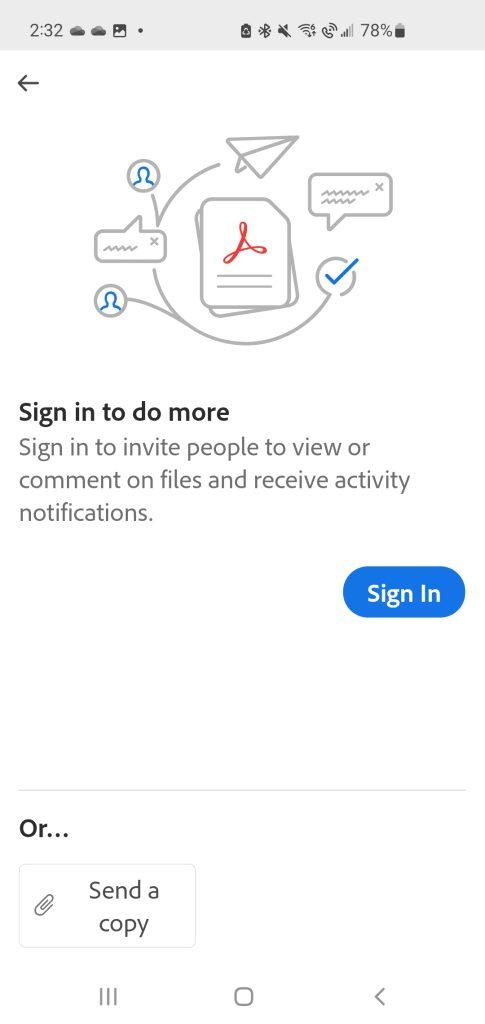
- Your default PDF reader will open the document. In this example I am using Adobe. I do not have a cloud account to Adobe, so I tap “SEND A COPY”:
- Your default email app will open you will be able to send the document as an attachment.
As an aside, above I mentioned that there are several options you can choose to put your scan (PDF, Word, PowerPoint, OneDrive). If the device you are using is for personal reasons it really does matter what you choose. However, if it a business device, your O365 Administrator may disable some of those options even though they show as available.
I will give you an example. You have Microsoft Lens on a company enrolled device but the device is a general purpose used by many users. I explained in an earlier post how to deal with devices when MFA s not possible. You will want to disable option like OneDrive if you do not want items saved in the cloud.
This is just the start of what Microsoft Lens can do. If you want more info, go here.
One Way to Enhance Conditional Access
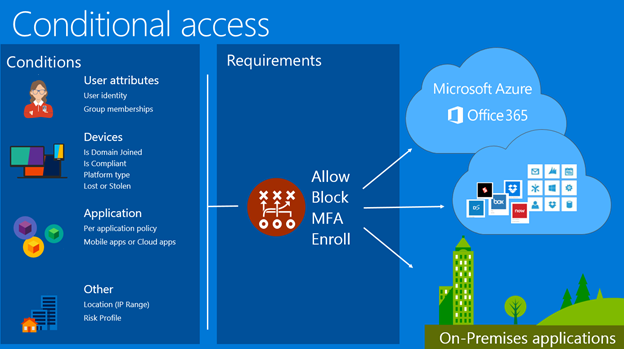
Enhance Conditional Access
I wrote an article awhile ago about how to use conditional access when MFA is not possible. In some cases you need need to enhance conditional access.
What is Conditional Access?
As a refresher, Conditional Access is a part of Azure AD that helps organizations improve security and compliance. By creating Conditional Access policies, you can tweak your authentication process.
Think about the old way of authentication: You require user to supply a username and password. Most of the time, it’s the legitimate account owner typing them in, the user can go on to access all the data, applications and other resources they’ve been granted permissions for. But consider this, an attacker has stolen or guessed a user’s credentials. Now they are accessing your network, and could have a breach on your hands.
You can use Azure AD Conditional to strengthen the authentication process. For example, you can create a policy to require users in a certain group to only login on devices that are recognized by the organization (At least Azure AD registered) and block all others. This will also help you pinpoint a breach a lot quicker. I will show you how in the next section.
Limit A Users Login With Conditional Access
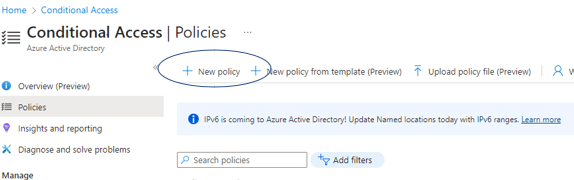
Login to your Azure Active Directory (AD) portal and go to Conditional Access and add a new policy:
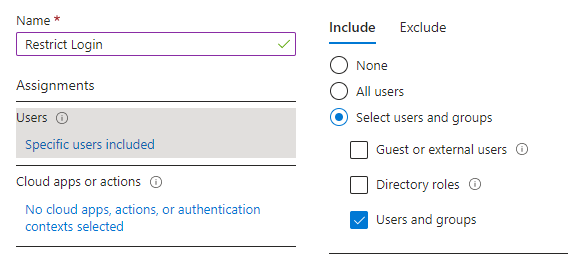
Give your Policy a name and then add users or groups that you want to include in this policy ( In my example I added a group):
Next, you can move to the next step, which is what applications you want to restrict login to. In this example, I have chosen Office 365:

Enhancing Conditional Access
The next part enhance the access by making sure all types of apps are block. This means no browser access and no desktop or mobile app access. Click on conditions and then client apps:
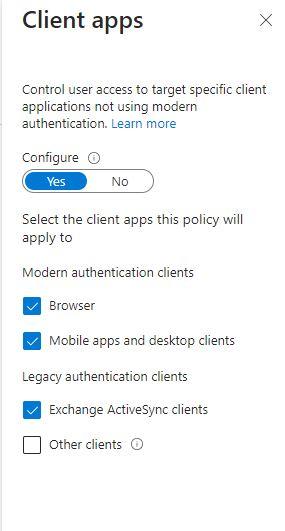
Check other clients if you still use POP, IMAP and SMTP but I hope you don’t. Those are legacy protocols.
This is the most important part the Conditional Access Policy:

In the Filter for Devices Section, you exclude devices from the policy by “Trust type”. If a user account from the group specified above is NOT one or more of the trust types you specify, they ARE included. I kept it simple and chose Azure AD registered. I am in a Hybrid environment and our devices are not joined to the cloud, only registered.
The last section is to block all access to the aforementioned apps:
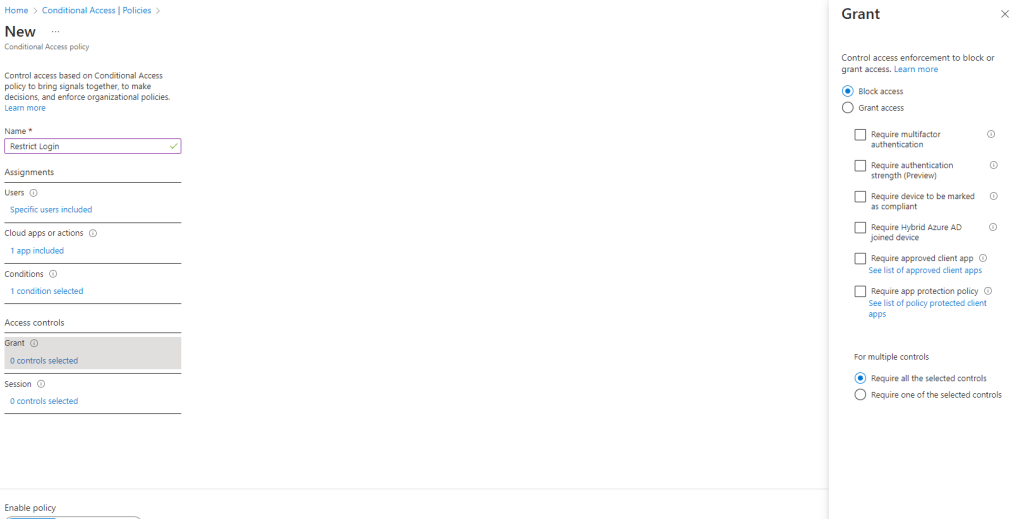
You could save the policy and start using it right away but that would not be a good idea. Save it as “Report-Only” and then check you Azure AD sign in logs to make sure it it working. Look at the logs by going to Azure AD / Users / Sign-in Logs. You will see a list of your users sign-ins. Filter for a time period where you have the Report-Only Conditional Access Policy in place.
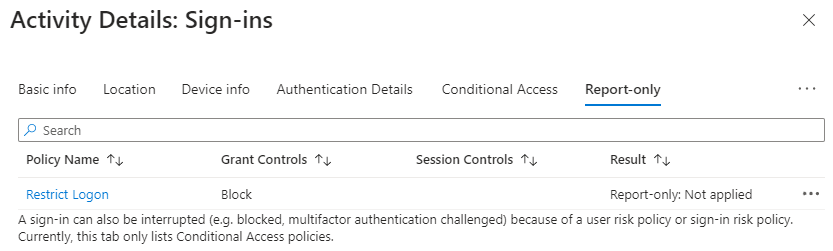
Pick a user account that you know in included in the policy, if you see this then the policy would not block them if it were on:
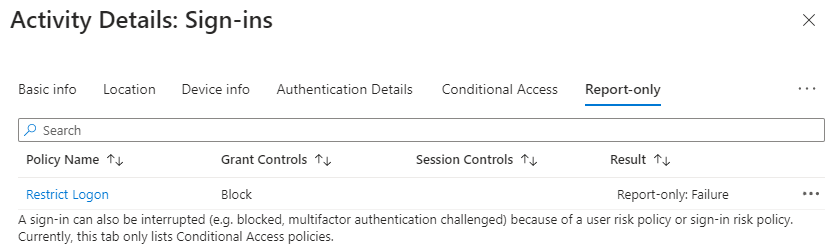
If you see the following you the device would be blocked from signing in if it were on:
Users would expect to get this screen when they try to login:
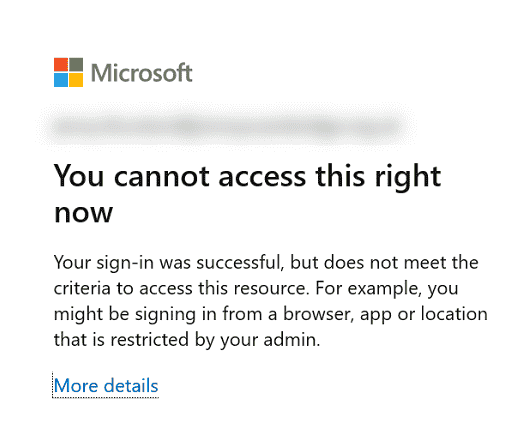
You can investigate the sign-in to make sure it is not a false positive. Let the policy run in “Report-Only” Mode for awhile until you are sure it is running as it should and then turn it on. You have now enhance your conditional access policy.
Happy IT’ing
Dan
Add External Email to a Distribution List in Exchange Online
You may find a need to send an External Email to a Distribution List in Exchange. We always think of DL’s in Exchange as primarily internal but technically you can set up a list that only goes to external recipients,
A good example is sending a notification to a group of external recipients on a regular basis and you don’t want your users to address them individually each time.
This is similar to creating a list for a resource, but externally.
How do you create a DL for external recipients? It is quite easy. You create Mail Contacts and add them into an internal DL.
Here’s how:
Create an External Email to a Distribution List in Exchange
- Open the Microsoft 365 Admin Center
- From the Users Pane, select Contacts.
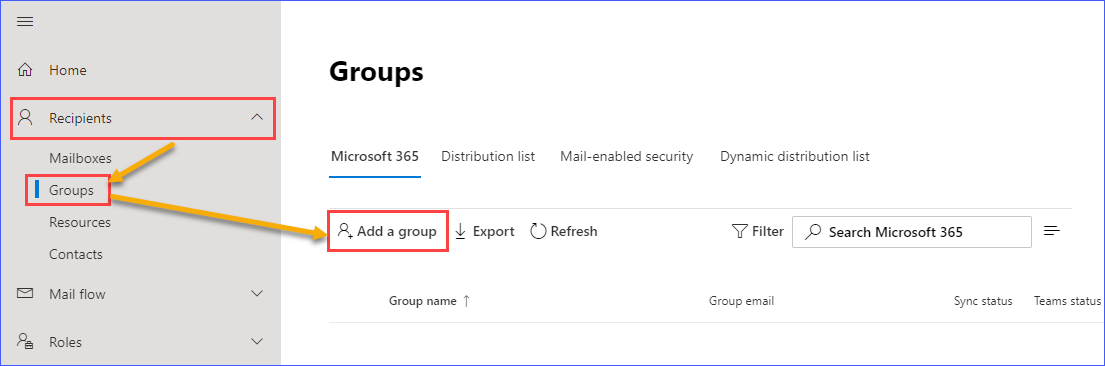
- Click Add Contacts
- Enter the details of the external contact. If you only want the contact(s) to only be used in the DL, check Hide from my organizations global address list:

- Once you have the external contacts you want to use for the DL, go to the Active Teams and Groups pane, click Distribution list tab and click Add a Group:

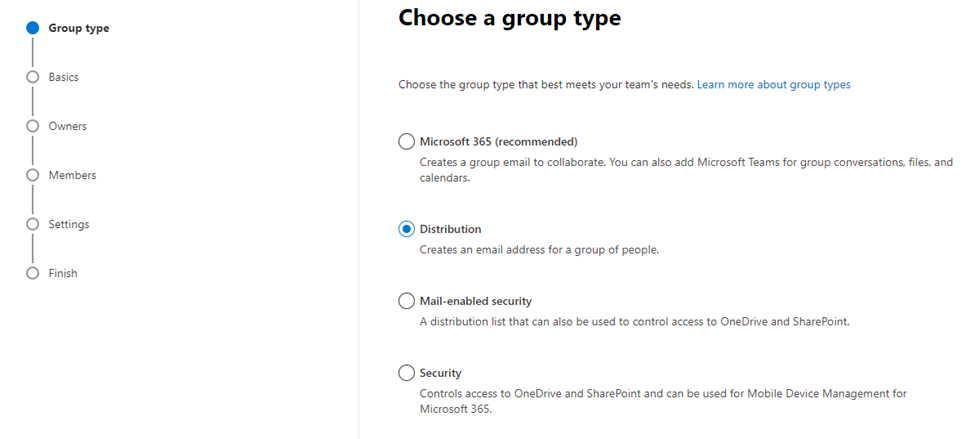
- Follow the wizard:
Choose Distribution
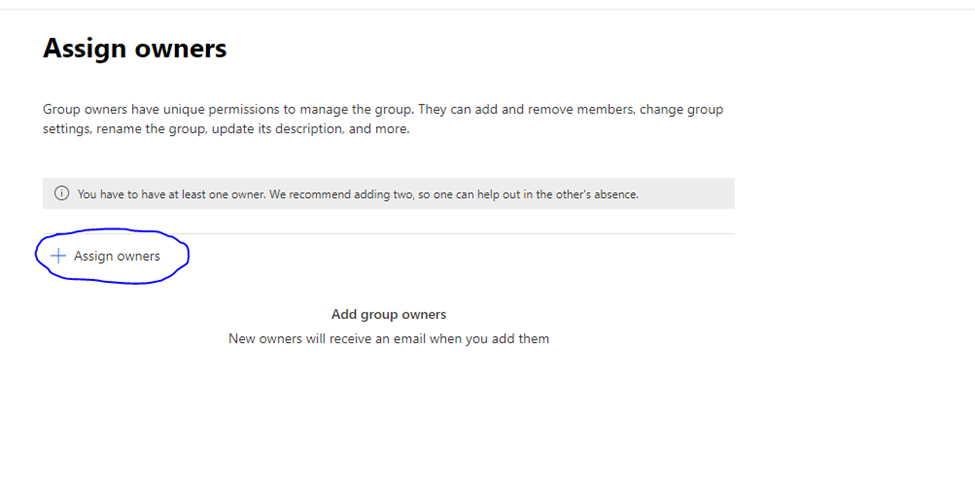
Assign an owner to the DL
Add the contacts you created in Step #4

Give the DL a name. Decide whether or not you want people to send email to this DL
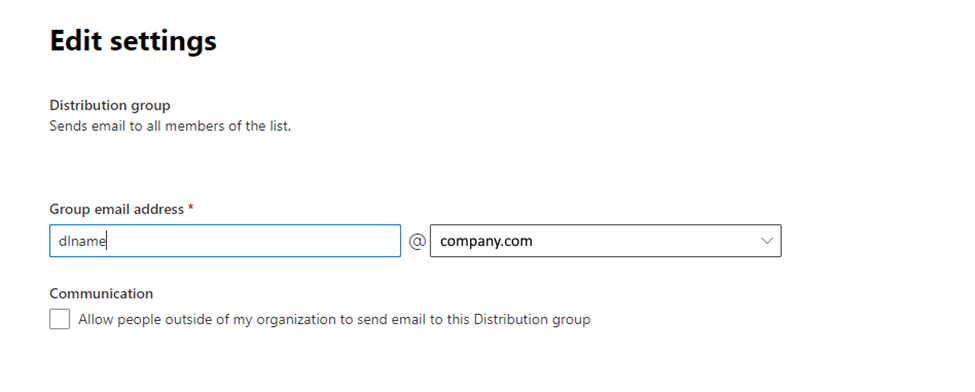
When you are done, click Create Group:
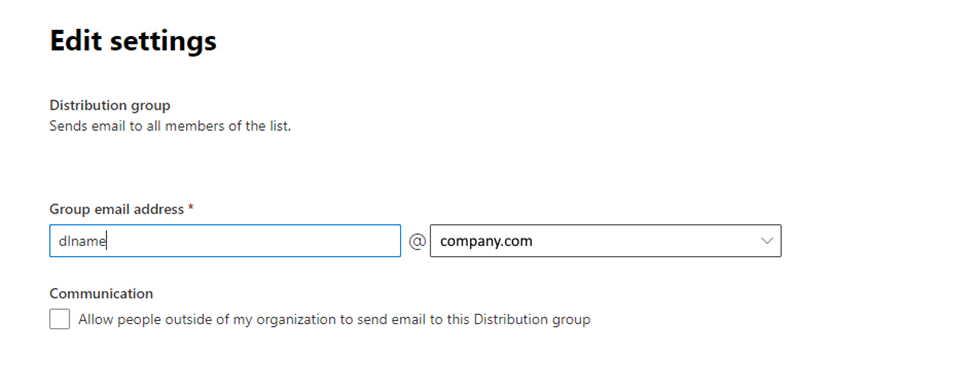
Voila. You have created a DL that your company can use that sends to External recipients. You can also do this using Exchange online but it easy to set this up using the Microsoft Admin Center too.
The good thing about M365 is that there is a lot of functionality in it. If you look in the right places you will find out how to do most tasks well enough to administer your tenant effectively.
Happy IT’ing
Dan
Only Specific Users Can Reserve a Resource in Exchange Online
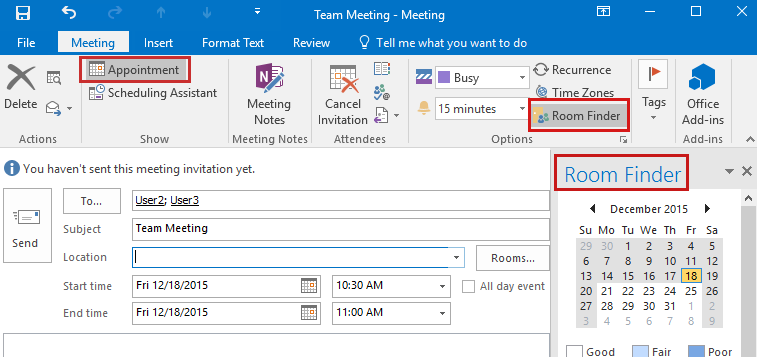
As an administrator of M365 you may be required that Only Specific Users Can Reserve a Resource in Exchange. Normally a room or resource would be for the entire organization to reserve and the only things stopping them from booking it would be its availability. Other things like room capacity, equipment resources in the room, working hours, etc., can also be a factor.
However, sometimes the room might be an office used by one person but they need the ability for a group of users (maybe members in the department) to be able to book it like a resource. I will show you how to enable this through PowerShell.
You thought you only had to worry about a calendars working hours…
How Only Specific Users Can Reserve a Resource in Exchange
When you initially set up a resource mailbox, it processes meeting requests from all users. What if you need to restrict it to specific users?
We can use PowerShell for this:
Logon to Exchange Online (Connect-ExchangeOnline), then issue the command below.
Set-Mailbox -Identity “resourcemailbox@domain.com” -AcceptMessagesOnlyFrom “username1@domain.com ″,”username2@domain.com ″,”username3@domain.com”
AcceptMessagesOnlyFrom is used for specifying what users can send to email addresses and distribution groups. However, a resource has a mail box so why not use it to specify who can book meetings. You can’t hide the resource and only notify only the users who you want to use it so this is the next best thing!
The “Only specific users can book the resource” by sending meeting requests requirement is satisfied. The resource mailbox automatically process the meeting requests by accepting or rejecting depending upon availability.
A pretty neat hack if I do say so myself. Sometimes it takes a little digging but you can find out different ways to use what M365 already has available, you can pretty much accomplish anything you need to properly administer your M365 tenant.
Happy IT’ing
Dan