
Automatically Add Signature to Outlook with VB Script
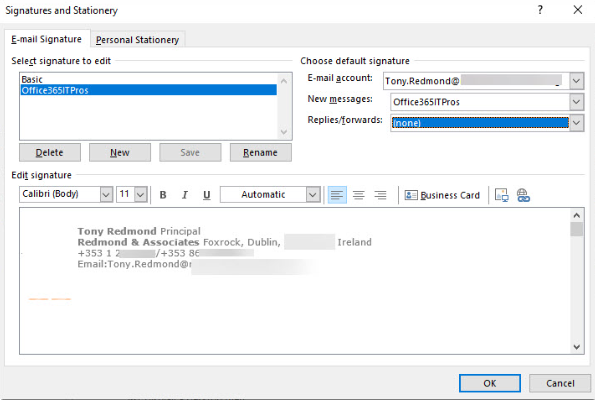
Microsoft has added the ability for email signatures to roam. This is great news for users who use Outlook on multiple devices as it stores signature settings at the mailbox level and not directly in Outlook’s settings. You want to Automatically Add Signature to Outlook but sometimes, you can’t.
If the signature is created programmatically for you by your IT admin or roaming signatures are turned off (also done by your IT admin) you will have to find other ways.
I will show you two ways. One way if you are an administrator and another way if you are a user.
Create a Signature for Your users as an Administrator
This might fall out of your skill set. It does require some scripting and HTML programming knowledge. Don’t worry, there are a lot of articles on the internet to help you with this. I will walk you through the steps.
Get familiar with the names of the names of the attributes in AD. You will be referring to them as you write the script that renders the HMTL code. The code will be written to a file and then placed in the %AppData%\Microsoft\Signatures\ location as an HTML file.
Here is the sample vbs code for a simple signature:
On Error Resume Next

Dim strUser,strName,strTitle,strMail,strPhone,strFax
Dim strCompany,strLocation,strAddress,strCity,strState
Dim strZip,strWeb,strInfo,ADObject

strSourceDir=replace(wscript.scriptfullname,wscript.scriptname,"")

Set fso=CreateObject("Scripting.FileSystemObject")
Set objSysInfo = CreateObject("ADSystemInfo")
Set WshShell = CreateObject("WScript.Shell")

                            'Active Directory Info Object
Set ADObject = CreateObject("ADSystemInfo")

strUser = ADObject.UserName

                            'Active Directory Connection
Set objUser = GetObject("LDAP://" & strUser)

                            'Pull Active Directory Info for this User

strOutlookVersion = Left(objOutlook.Version, 2)
strUserid = objUser.userPrincipalName
strFName = objUser.FirstName
strLName = objUser.LastName
strTitle = objUser.Title
strEmail = objUser.mail
strPhone = objUser.telephoneNumber


Dim objFSO, objWsh, appDataPath, pathToCopyTo, plainTextFile ,imagePath
Dim plainTextFilePath, richTextFile, richTextFilePath, htmlFile, htmlFilePath, SigFilename

Set objFSO = CreateObject("Scripting.FileSystemObject")
Set objWsh = CreateObject("WScript.Shell")
appDataPath = objWsh.ExpandEnvironmentStrings("%APPDATA%")
pathToCopyTo = appDataPath & "\Microsoft\Signatures\"

'Create HTML Signature


htmlFilePath = pathToCopyTo & "ACMESignature.htm"
Set htmlFile = objFSO.CreateTextFile(htmlFilePath, TRUE)
htmlfile.WriteLine("<html>")
htmlfile.WriteLine("<head>")
htmlfile.WriteLine("<p>" & strFName & " " & strLName & "</p>")
htmlfile.WriteLine("<p>" & strTitle & "</p>")
htmlfile.WriteLine("<p>" & "Acme Company" & "</p>")
htmlfile.WriteLine("<p>" & "P. " & strPhone & "</p>")
htmlfile.WriteLine("<p>" & "E. " & "<a href=""strEmail"">" & strEmail& "</a>" & "</p>")
htmlfile.WriteLine("</body>")
htmlfile.WriteLine("</html>")

htmlFile.Close

'Applying the signature in Outlook’s settings.
Set objWord = CreateObject("Word.Application")
Set objSignatureObjects = objWord.EmailOptions.EmailSignature

'Setting the signature as default for new messages.
objSignatureObjects.NewMessageSignature = "ACCSignature"

Set objFSO = Nothing
Set objWsh = Nothing

'Connect to Registry
Dim objShell, RegKey
Set objShell =  CreateObject("WScript.Shell")

Set objShell = Nothing
Create a Signature as a user
You will need some skills in HTML Coding. You can use any WYSIWYG editor to do the job. There are also a lot of tutorials on the net to do this. In this case all you need to do is create an HTML file to your liking and copy it to %AppData%\Microsoft\Signatures\ . Here is the sample html code you can save as a .html:
<html>
  <head>
  <p>John Smith</p>
  <p>President</p>
  <p>Acme Company</p>
  <p>P. 555-1212</p>
  <p>E. <a href="mailto:jsmtih@acme.com">jsmith@acme.com</a></p>
  </head>
  <body>
</html>
The Result When You Automatically Add Signature to Outlook
Whether you programmatically add it through a script of manually ad the html file you will get this:
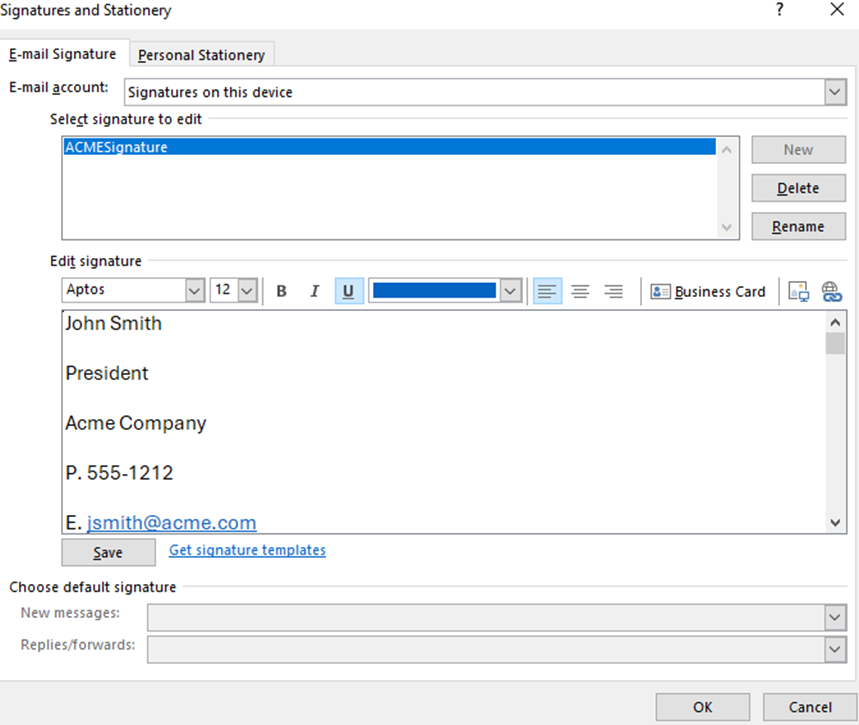
This is one of the many aspects in outlook you can automate. At least being able to Automatically Add Signature to Outlook can be easy.
Switching M365 Licensing using PowerShell
PowerShell can automate several tasks that you might find yourself in M365 Administration. You may find yourself in an organization in the need of Switching M365 Licensing using PowerShell. At least I would use PowerShell. Changing licensing requires you to remove the older license and add the new licensing. Try manually doing that for hundreds of accounts…not cool. Using PowerShell is a lot faster. I will show you how to get it done in no time.
Figure out the SKU for your Licenses
When I say licenses, I mean the ones you currently have and the ones you want to replace them with. There are 2 ways to do this. If you don’t have a lot of licensing with Microsoft you can just look it up by going to this article by Microsoft. If you have a lot of different licensing or you would just like a handy CSV of what you currently have, go to this site. It has a nice PowerShell Script.
Switching M365 Licensing using PowerShell Example
In this example I am going to use an example of a company that is upgrading their licensing from M365 Business Premium, with Teams Phone Standard and Exchange Online Plan 2 to M365 E5, which includes all the old licensing plus more.
First things first, make sure you have enough of the new licensing. Go to licenses in the admin portal and make sure you have enough. The script will err after it runs out of licenses to switch. At that point you can also go back to the portal and see what users were missed and manually switch them.
The User List
For Switching M365 Licensing using PowerShell you need to create a CSV File that has the UPN of the user and their Display Name. the script will need it. In licenses you can go to the exact license and it will show all the users licensed to it. You can download the list as a CSV and it will help you create the list you need in the script.
The License SKU’s
Make a list of old SKU’s and the new ones. In my example I have the following:
Old – SPB (M365 Business Premium),MCV (Teams Phone Standard),EXCHANGEENTERPRISE(Exchange Online Plan 2)
New – SPE_E5 (M365 E5)
The Script
Here is the PowerShell Script that removes the old licenses and adds the new:
#Path to UPN File #

$CSVPathUPN = "C:\Path\To\CSV\usersexchplan2.csv"


##Run Script##

##Try import UPN CSV file##

Write-Host Importing CSV

try {
    $UPNUsers = import-csv $CSVPathUPN -ErrorAction stop
}
catch {
    throw "Error importing CSV: $($_.Exception.Message)"
    break
}

$busprem = Get-MgSubscribedSku -All | Where SkuPartNumber -eq ' SPB '
$teamsphone = Get-MgSubscribedSku -All | Where SkuPartNumber -eq ' MCV '
$exchplan2 = Get-MgSubscribedSku -All | Where SkuPartNumber -eq 'EXCHANGEENTERPRISE'

foreach ($UPNUser in $UPNUsers) {

$Uname = $UPNUser.UPName
$Dname = $UPNUser.displayName

# Unassign Bus Prem and Teams Phone Standard

Write-Host Removing Bus Premium, Teams Phone Standard Licensing and Exchange Online for $Dname ....
Set-MgUserLicense -UserId $Uname -AddLicenses @{} -RemoveLicenses @($busprem.SkuId)
Set-MgUserLicense -UserId $Uname -AddLicenses @{} -RemoveLicenses @($teamsphone.SkuId)
Set-MgUserLicense -UserId $Uname -AddLicenses @{} -RemoveLicenses @($exchplan2.SkuId)
}

Write-Host Need to Pause so removed licenses can sync before adding the new ones

Pause

$e5Sku = Get-MgSubscribedSku -All | Where SkuPartNumber -eq 'SPE_E5'

foreach ($UPNUser in $UPNUsers) {

$Uname = $UPNUser.UPName
$Dname = $UPNUser.displayName
# Assign E5

Set-MgUserLicense -UserId $Uname -AddLicenses @{SkuId = $e5Sku.SkuId} -RemoveLicenses @()

Write-Host Added e5 Licensing for $Dname ....

}

Write-Host All done
You Need To Test!
Please do not run this script with your entire user list. Take a small sample. If something goes wrong you only have to work with a few users and not hundreds.
This example script is great for installations where most users have the same licensing but in cases where the user licensing in all over the place or they use group-based licensing, you will have to tweak the script. In a later post I will show you how to deal with assigning / removing licensing in a group-based scenario.
Set up Auto Archive Fast for Outlook
If you use Exchange Online for email in M365, great! Depending on your licensing structure you will have anywhere from 50 to 100 GB in storage space. However, that might not be enough. This article will show you how to Set up auto archive fast.
Why Configure Auto Archive for Outlook
The are a few reasons why you would want to do this. I already mentioned above that you could be running out of online storage space and need to free some up. Another reason is that you have some older email you don’t really read very often but would like to have it is a reference that is easily searchable. More reason to Set up Auto Archive Fast.
Configuring AutoArchive
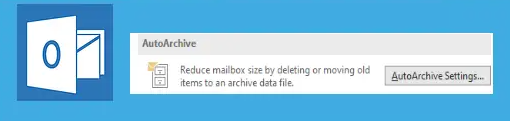
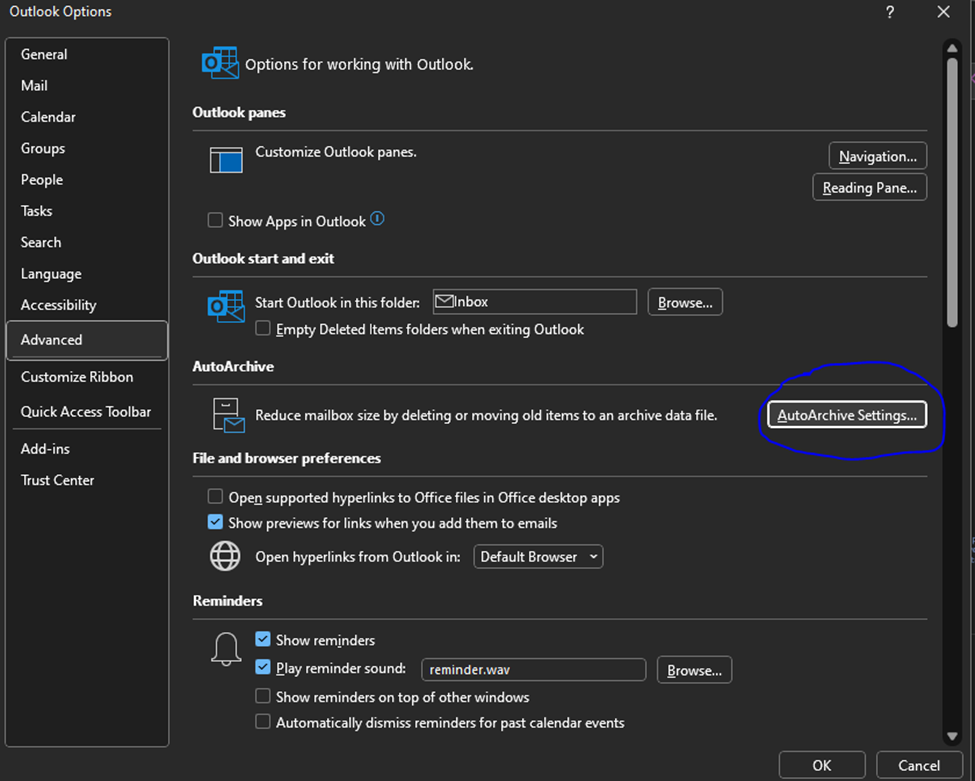
- Click File / Options / Advanced / Auto Archive Settings:
2. Once you have open AutoArchive Settings from options, you need to set them:
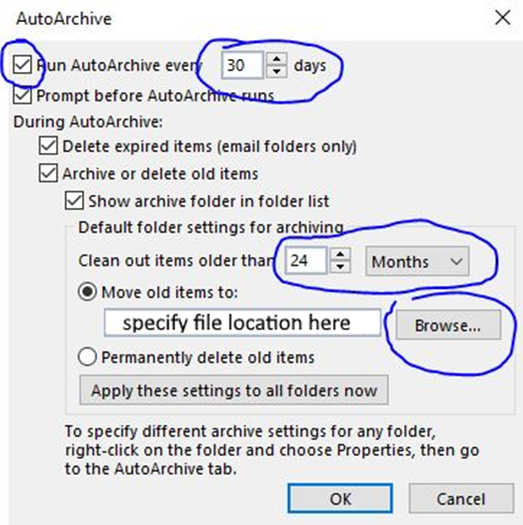
3. You will need to configure at least 4 settings. They are:
Enable Auto archive – You won’t be able to configure any other settings until you check this box.
Frequency – specify in Days how often you would like archive to run (in days).
Date to Start Auto Archive – When auto Archive runs it checks for items older than you specify and adds them to the archive. You can specify in Months / Weeks / Days, or you can choose to permanently delete old items. I wouldn’t recommend this unless you are an advanced user and know how to work with .ost files.
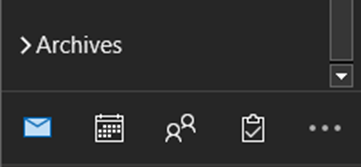
Once AutoArchive runs once you will see it in your Outlook underneath your inbox as a searchable mail store:
You can get pretty fancy with Auto Archive if you know what you are doing. But if you are not sure, reach out to your IT Department. If not, your IT department better have a good backup solution. Otherwise, this article shows you how to Set up Auto Archive Fast.
Clearing Teams Cache on Multiple Profiles

You upgraded to Microsoft Teams 2.0. Great. The only issue is the new Team’s hangs on login. Clearing the Teams cache will do the trick. You know how to clear the cache for one user but what if the machine in question is logged into by several users? Manually deleting dozens if not hundreds of profiles could take a very long time. How do you go about Clearing Teams Cache on Multiple Profiles.
If you follow the tips in this article, you will have it done in No Time.
Prerequisites
The following needs to occur when Clearing Teams Cache on Multiple Profiles:
- Be an Admin on domain (obviously 😊).
- Run PowerShell on Domain where the computer(s) reside.
- The WinRM services needs to be running when the cache is cleared.
- Use the invoke command to run the PS command on the remote machine.
- For security purposes, stop the WinRM service when done.
Location For Clearing Teams Cache on Multiple Profiles
Microsoft Teams 2.0 has a new local for its cache. It is C:\Users\<UserName>\AppData\Local\Packages\MSTeams_8wekyb3d8bbwe\ . This is the location you need to work into your PowerShell command. If are still using Teams Classic Use C:\Users<UserName>\AppData\Local\Microsoft\Teams* to work into your PowerShell command.
Constructing The PowerShell Command
The command is constructed like this for Clearing Teams Cache on Multiple Profiles:
Get-Service -ComputerName <ComputerName> -Name WinRM | Start-Service

Invoke-Command -ComputerName <ComputerName>  -ScriptBlock { Remove-Item "C:\Users\*\AppData\Local\Packages\MSTeams_8wekyb3d8bbwe\*" -Force} -credential <yourusername>

Get-Service -ComputerName <ComputerName>  -Name WinRM | Stop-Service -Force
Running this command remote will remove the teams’ files from every user profile on the computer. If you want to make sure the command works before you pull the trigger, you can add the -whatif switch to the end of the Remove-Item command (before the quote).
If you have more than one machine to work on you can run a for each loop with a variable for <ComputerName> that reads the variable from a CSV file. This is a lot faster
2 Ways to Check M365 App Registration Logging
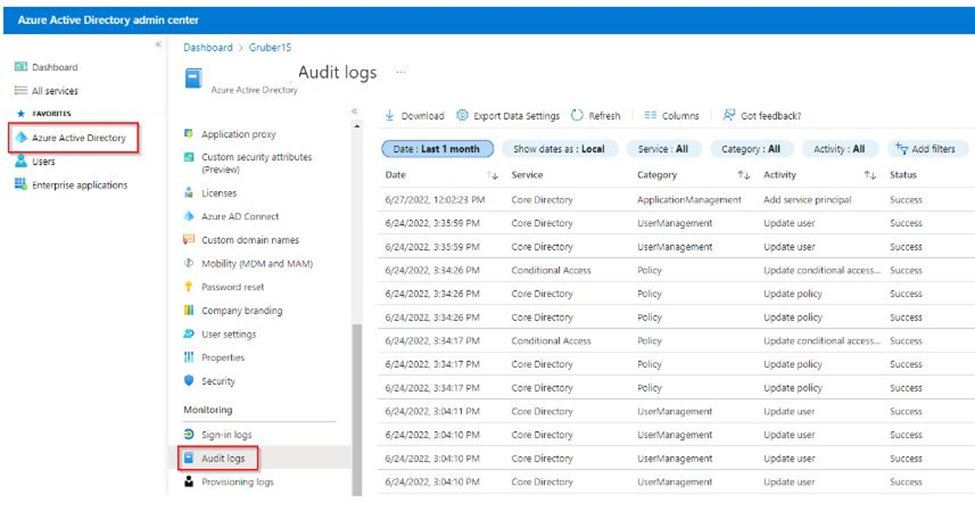
You have created an App in Microsoft Entra and need to see where you can look at M365 App Registration Logging. This is important because the service that depends on it, whether it be with M365 or a 3rd party, can fail and you need to find out why.
A log of any kind is always the best place to start. Here’s how you do it.
Accessing M365 App Registration Logging Through Sign-in Logs
It is quite simple really. All you must do is:
- Go into your Microsoft Entra Portal
- Go to Users / All Users / Sign-in Logs
- From here, you filter like you normally would but instead of filtering by user, you filter by Application.
- Enter your App Registration Name in “+Add Filter.”
- I like to filter by date so I can get a time window of what I am looking for.

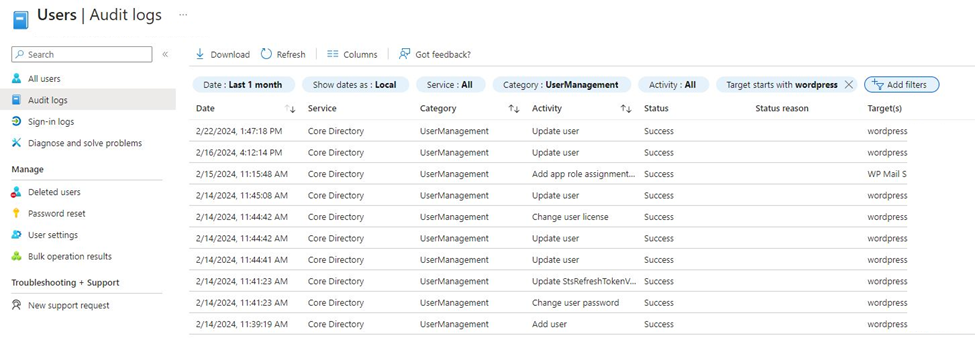
Accessing M365 App Registration Logging Through Audit Logs
You can also check M365 App Registration Logging by going into the Microsoft Entra audit logs.
It is also simple really. All you must do is:
- Go into your Microsoft Entra Portal
- Go to Users / All Users / Audit Logs
- From here, you filter by target (in this case, the user who the app registration is under).
- I also like to filter by date so I can get a time window of what I am looking for.
When Would You Need Logging
M365 App Registration Logging is useful if one of your services that depends on an App Registration fails. Direct examples include, when you have a PowerShell script or a custom app that uses the app registration and some has change where it could throw an error.
Another example is when you use a third part service like a WordPress Plugin that requires the use of an App registration, and it starts to throw errors for whatever reason. The third-party logs may only be able to tell you that it failed trying to access or use the app registration. Anything more, you must go into the M365 logs. In my experience, outdated plugins can cause this. Changes in security on the App registration side can also cause this.
Hopefully using these 2 Ways at M365 App Registration Logging will be helpful on your troubleshooting journey.
Use Get-PublicFolderItemStatistics for Notifications
You can Use Get-PublicFolderItemStatistics for Notifications to your advantage if you are an M365 administrator. Especially if you are in charge with doing something like maintaining a separate set of contacts for your organization based on a master list of Public folder contacts. You have to constantly check the Public folder for changes…
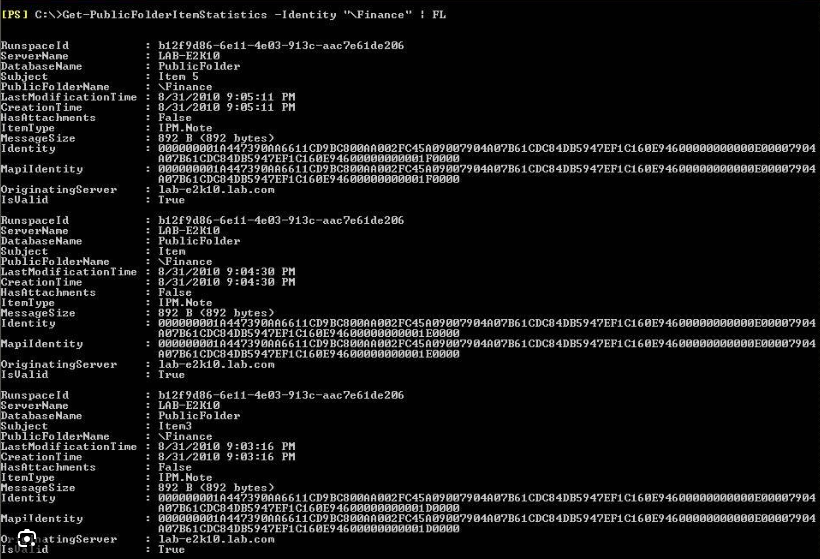
I guess you could ask the department that maintains the public folder to let you know when there have been changes made or you can set up an automated way using PowerShell and Tasks Scheduler.
Prerequisites On How To Use Get-PublicFolderItemStatistics for Notifications
This may seem like a long list but if you have been administering M365 for awhile you probably already have these set up. If, not please make sure you have the following:
- Be at least an Exchange Administrator in you Organization
- Have the Exchange Online Management Module Installed in PowerShell
- This is pretty important, you need to able to send mail in M365. This is not as simple as it used to be. You need to use an app registration in Azure AD to do this. I have written two articles about this. Please go here and here for more info
Once you have this set up, you can go on to the next step on how to Use Get-PublicFolderItemStatistics for Notifications.
Create a PowerShell Script To Check On the Public Folder
What this script does is allows you to Use Get-PublicFolderItemStatistics for Notifications that are sent by email to the email of your choosing. It looks for any changes that you set in the variable $baseline. If there is a change, the command Get-PublicFolderItemStatistics is piped into an html body that is formatted correctly for sending mail through the MS Graph API.
The contact listing in the public folder is sorted by modification date so you can tell which record was changed. In turn you can take this information and make the necessary changes to the separate copy of contacts you administer (more than likely through MS Graph). In the case of a delete, the record will not be there so you know which one to delete on your end.
After each change I edit the PowerShell script and change the variable $baseline. I add +1 for one Add, a -1 for one Delete and no change for a Change. You get the picture.
The Script
##Declare Parameters##

$clientID = "Your_Client_ID"
$clientSecret = "Your_Client_Secret"
$tenantID = "Your_Tenant_ID"

##Run Script##

Connect-ExchangeOnline

$baseline = <number>

$m = Get-PublicFolderItemStatistics -Identity "\Path\To\Public\Folder\Contacts" | Select Subject,LastModificationTime | Sort-Object -Property LastModificationTime -Descending

$m.count


if ($m.count -ne $baseline){


#Connect to GRAPH API

$MailSender = "sender_email"

#Connect to GRAPH API
$tokenBody = @{
    Grant_Type    = "client_credentials"
    Scope         = "https://graph.microsoft.com/.default"
    Client_Id     = $clientId
    Client_Secret = $clientSecret
}
$tokenResponse = Invoke-RestMethod -Uri "https://login.microsoftonline.com/$tenantID/oauth2/v2.0/token" -Method POST -Body $tokenBody
$headers = @{
    "Authorization" = "Bearer $($tokenResponse.access_token)"
    "Content-type"  = "application/json"
}

$h = $m | ConvertTo-Html | select -Skip 4

$HTMLBody = @"
$h
"@

$msg = $HTMLBody

#Send Mail
$URLsend = "https://graph.microsoft.com/v1.0/users/$MailSender/sendMail"
$BodyJsonsend = @"
                    {
                        "message": {
                          "subject": "Change in Public Folder Contacts.",
                          "body": {
                            "contentType": "HTML",
                            "content": "$msg"

                          },
                          "toRecipients": [
                            {
                              "emailAddress": {
                                "address": "email_you_specify"
                              }
                            }
                          ]
                        },
                        "saveToSentItems": "false"
                      }
"@

Invoke-RestMethod -Method POST -Uri $URLsend -Headers $headers -Body $BodyJsonsend

}else{
		Write-Host No Change!
}
Use Get-PublicFolderItemStatistics for Notifications Scheduled Task
You can run the above script manually if you want, you can set it up as a scheduled task to Use Get-PublicFolderItemStatistics for Notifications automatically. What you can do is write a small batch file and then call it periodically as a scheduled task. Here is the content of the simple batch file:
Powershell -File "C:\Patch\To\Batch\File\PublicFolderContactChange.ps1"
Create a task in Task Scheduler and used these settings if you like:
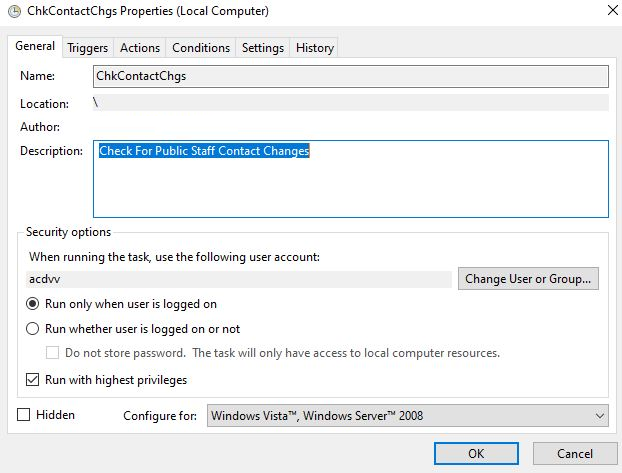
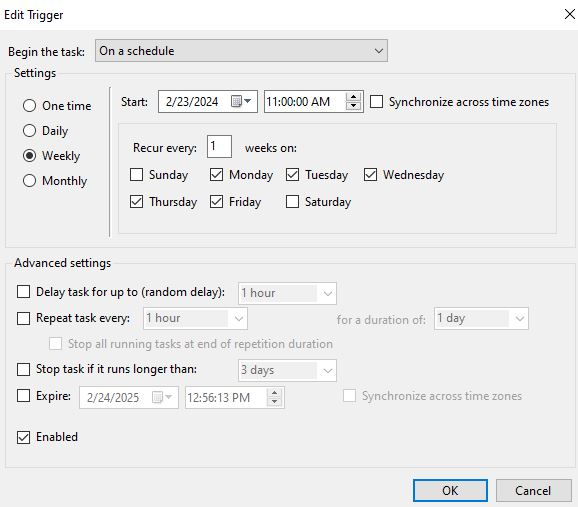
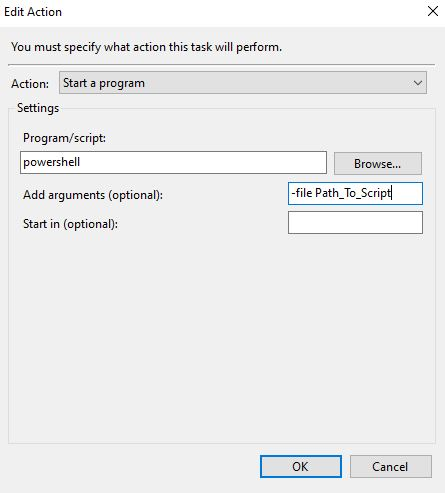
Now that you have the scheduled task set up, when there is a change in the public folder, you will be notified via email and you can make the necessary changes on your end. Beats having to remember!
Configure Hybrid Join in 2 Steps
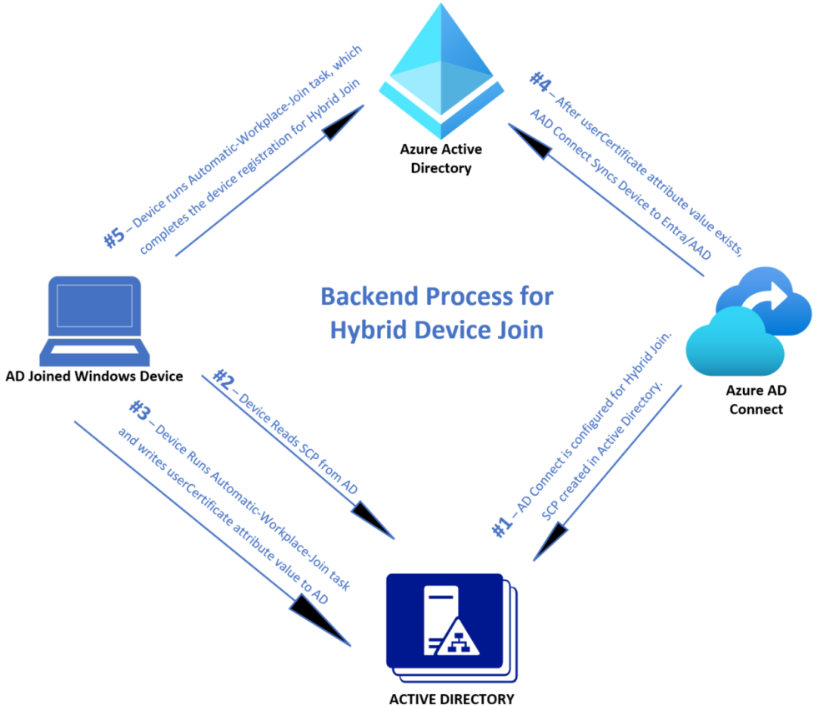
This is for you if you wish to Configure Hybrid Join in M365. You may be coming from a more traditional environment where all your devices (computers) are domain joined. You may have started with Azure AD Join by getting your mobile devices enrolled.
Now we have touched on the 3 types of enrollments in M365. Domain Joined (Entra Registered), Azure AD joined and now I am going to talk about Hybrid AD Joined. It is a neat little way to bring all your devices together eventually leading to a fully cloud implementation of your environment.
I will show two steps: One to get Hybrid Join set up on your network and two, how to manually join devices that won’t automatically join.
Configure Hybrid Join – Setup
Here are the prerequisites. It is a bit of a list but it will prevent a lot of headache in the long run:
Microsoft Entra Connect version 1.1.819.0 or later.
- Don’t exclude the default device attributes from your Microsoft Entra Connect Sync configuration. To learn more about default device attributes synced to Microsoft Entra ID, see Attributes synchronized by Microsoft Entra Connect.
- If the computer objects of the devices you want to be Microsoft Entra hybrid joined belong to specific organizational units (OUs), configure the correct OUs to sync in Microsoft Entra Connect. To learn more about how to sync computer objects by using Microsoft Entra Connect, see Organizational unit–based filtering.
Global Administrator credentials for your Microsoft Entra tenant.
Enterprise administrator credentials for each of the on-premises Active Directory Domain Services forests.
(For federated domains) At least Windows Server 2012 R2 with Active Directory Federation Services installed.
Users can register their devices with Microsoft Entra ID. More information about this setting can be found under the heading Configure device settings, in the article, Configure device settings.
Configure Hybrid Join Network connectivity Requirements
Microsoft Entra hybrid join requires devices to have access to the following Microsoft resources from inside your organization’s network:
https://enterpriseregistration.windows.nethttps://login.microsoftonline.comhttps://device.login.microsoftonline.comhttps://autologon.microsoftazuread-sso.com(If you use or plan to use seamless SSO)- Your organization’s Security Token Service (STS) (For federated domains)
You are Probably Running Managed Domains
Most company’s have a managed domain from previous Windows server installations so this is the most common scenario. Microsoft Entra hybrid join with managed domains. Managed domains use password hash sync (PHS) or pass-through authentication (PTA) with seamless single sign-on. Managed domain scenarios don’t require configuring a federation server.
Configure Microsoft Entra hybrid join by using Microsoft Entra Connect for a managed domain:
- Start Microsoft Entra Connect, and then select Configure.
- In Additional tasks, select Configure device options, and then select Next.
- In Overview, select Next.
- In Connect to Microsoft Entra ID, enter the credentials of a Global Administrator for your Microsoft Entra tenant.
- In Device options, select Configure Microsoft Entra hybrid join, and then select Next.
- In Device operating systems, select the operating systems that devices in your Active Directory environment use, and then select Next.
- In SCP configuration, for each forest where you want Microsoft Entra Connect to configure the SCP, complete the following steps, and then select Next.
- Select the Forest.
- Select an Authentication Service.
- Select Add to enter the enterprise administrator credentials.
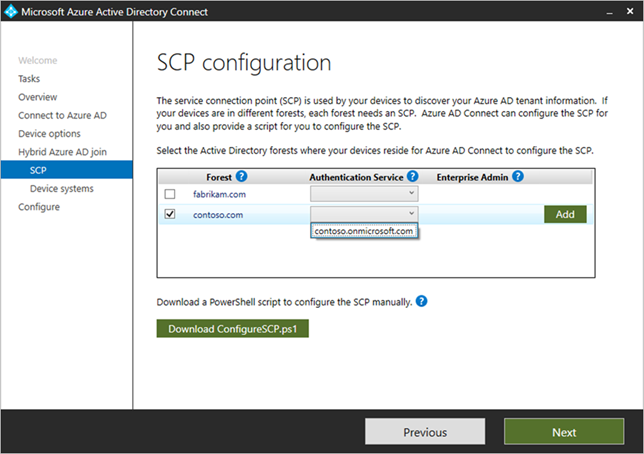
- In Ready to configure, select Configure.
- In Configuration complete, select Exit.
Troubleshooting Configure Hybrid Join
Microsoft has some great articles on trouble shooting this setup. I will list them here:
- Troubleshooting devices using dsregcmd command
- Troubleshoot Microsoft Entra hybrid join for Windows current devices
- Troubleshoot Microsoft Entra hybrid join for Windows downlevel devices
- Troubleshoot pending device state
Start by running the dsregcmd /status command, looking for the status of Hybrid join:
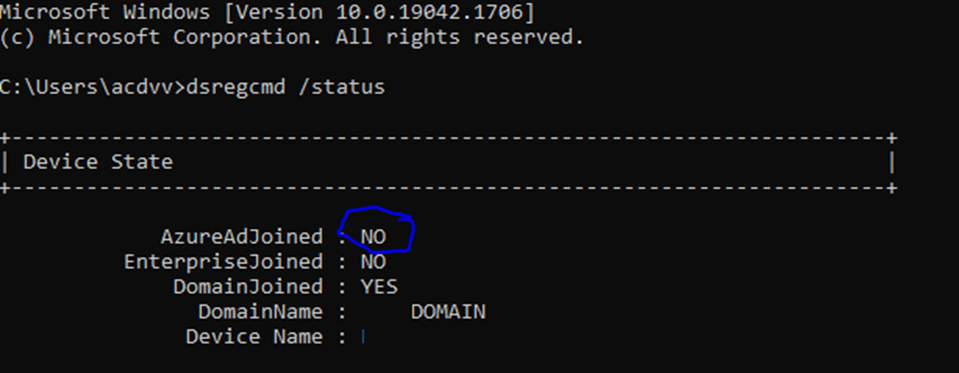
If see Azure AD joined as a “No” you will need to investigate further in the event view for errors. Namely, The user registration log:
Use Event Viewer logs to locate the phase and error code for the join failures.
- In Event Viewer, open the User Device Registration event logs. They’re stored under Applications and Services Log > Microsoft > Windows > User Device Registration.
- Look for events with the following event IDs: 304, 305, and 307.
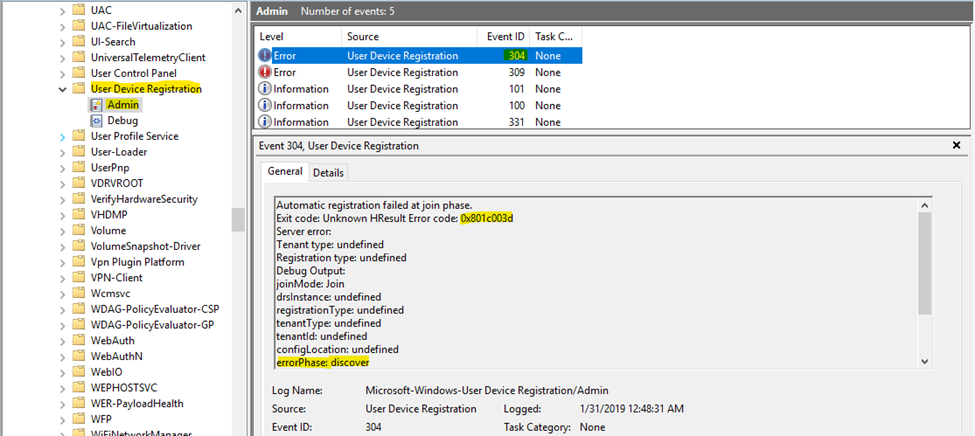
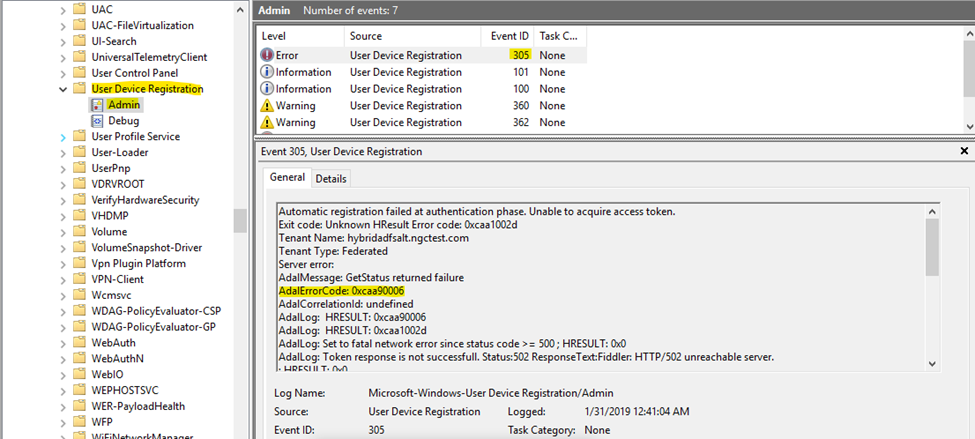
Please look at the links listed above for further troubleshooting.
Configure Hybrid Join a Windows Computer
You can manually configure working on the affected device. It is a few steps but your can Configure Hybrid Joinquickly.
Unregister the device from Azure AD
Follow this procedure:
- On the machine to unregister, launch a Command Prompt as an administrator and type the following command:
dsregcmd /leave
- Make sure the certificates issued by “MS-Organization-Access” and “MS-Organization-P2P-Access [xxxx]” have been deleted from the local machine Personal certificate store:

- Type the command dsregcmd /status in a Command Prompt, and make sure the following parameters have the appropriate values:
dsregcmd /status
+———————————————————————-+
| Device State |
+———————————————————————-+
AzureAdJoined : NO <—–
EnterpriseJoined : NO
DomainJoined : YES <—–
Re-register the device as a Hybrid Azure AD Join
Follow this procedure:
- On the machine to re-register, run the Task Scheduler as an administrator.
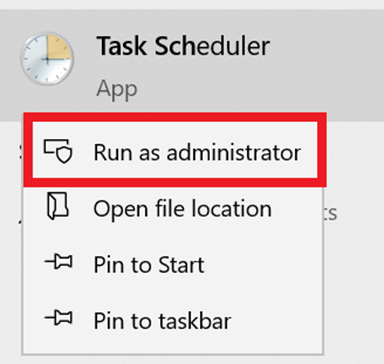
- Go to Task Scheduler Library > Microsoft > Windows > Workplace Join and manually start the task “Automatic-Device-Join“.
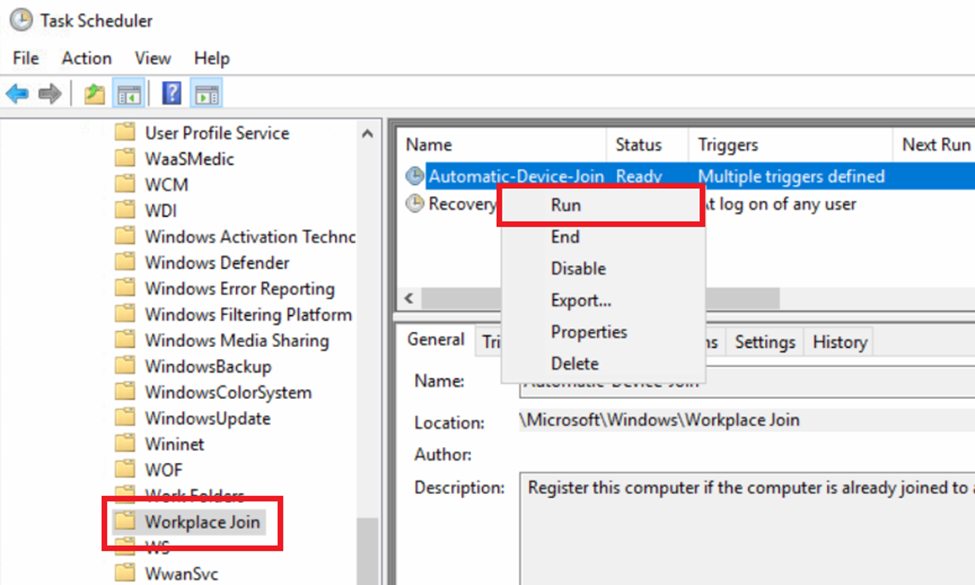
- Make sure the certificates issued by “MS-Organization-Access” and “MS-Organization-P2P-Access [xxxx]” have been created in the local machine Personal certificate store:

- Type the command dsregcmd /status in a Command Prompt, and make sure the following parameters have the appropriate values:
dsregcmd /status
+———————————————————————-+
| Device State |
+———————————————————————-+
AzureAdJoined : YES <—–
EnterpriseJoined : NO
DomainJoined : YES
- Reboot the PC.
- Start an Azure AD Connect delta synchronization.
If you follow these two steps you will configure Hybrid Join in no time!
MS Teams Does Not Update….3 Fixes
MS Teams Does Not Update
Teams is not very good at updating information from the cloud. Simply put, MS Teams Does Not Update. At least not very well. Frustrating as it might be there are 3 ways to fix this.
What Causes MS Teams Does Not Update
MS Teams acts very similar to a web browser in that it caches a lot of data locally to your computer. It can take anywhere from several hours to up to 28 days to update. It could become corrupt in that time and it might not up date at all. Items like profile pictures, which are updated in Exchange or SharePoint but not in MS Teams, is an indication of that. Other examples are chat threads that do not update or Speed Dials that do not show up. If it is had only been about a day or so I would wait. If it has been longer it is time to clean out the cache. Other fixes may be to just refresh your session. I will now go through the fixes…..
Clearing The MS Teams Cache When Teams Does Not Update
If you use the Desktop Version of MS Teams this will definitely help when MS Teams Does Not Update. Depending on whether or not you are using Teams Classic or the New Teams for Work and School the location of the cache will be different.
Teams Classic
- Quit MS Teams
- Type %AppData% into Windows Search. It will bring up your AppData Folder
- Navigate to the Microsoft / Teams Folder and delete everything in it
- Restart Teams, the cache will be rebuilt
New Teams for Work and School
- Quit MS Teams
- Change your Explorer view to show hidden files
- Navigate to C:\Users\<username>\AppData\Local\Packages\MSTeams_8wekyb3d8bbwe
- Delete everything in this folder (For files that are open while delete just check “do this for all items” and click skip
- Restart Teams, the cache will be rebuilt
Log out and Log back Into MS Teams
Sometimes all that is needed is a refresh of your session. All you need to do is log out of teams and log back in:
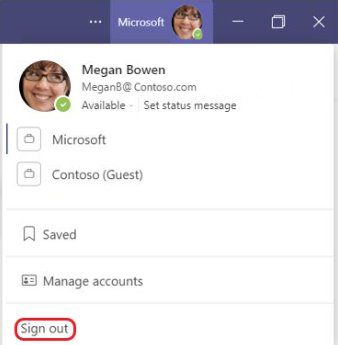
You will be immediately presented with a MS Teams login screen with your account listed. Just click your account name to log back in. All of your teams information should be refreshed. If not, try the steps above for clearing the cache out.
Use MS Teams Online
If MS Teams Does Not Update continuously and your are frustrated to no end, Just use the online version. Go to teams.microsoft.com and login. You will be using the online version which is in the cloud. It updates a bit faster. It is not perfect but it can be used as a last resort to get access to your newest information in teams.
Bottom Line…
MS Teams has come a long way from its humble beginnings but it still has a way to go. At least Contact Provisioning has been fixed.