
Using Remote Help on Android Devices
Sometimes you have a scenario where you need to Get M365 Devices to Stay Logged in with Conditional Access. And that is a multiuser device that is enrolled in Intune but also can’t use MFA. Using Remote Help when the device eventually logs out will be extremely helpful.
You need to get that device to stay logged in. Having it logged out would not be good since you might have to tell the user (one of many) what the password is to log back in. A password that could be easily shared. Not the best for security.
Using Remote Help
Using remote help on the android device is good, because it enables you to remote to the device and help the user with configuring or troubleshooting programs. There is no need to walk them through instructions over the phone or have them hold up the phone over a web cam (like in Teams) so you can see the screen as you help them. In this case, telling them a password that you don’t want them to know!
What is Remote Help
Remote help is an application that is available in any of the app stores. We are going to focus on Android devices. As an administrator of Intune, you probably have a company google play store for enrolled devices. Just add the app to your store like you would do normally for any other app.
Configure Using Remote Help
** Note ** – this is EXTREMELY important!!!! If you plane on using this feature with enrolled devices, there is only one enrollment profile that works with the Remote Help App!!!
When using remote help, this is a problem. The profile is the Corporate Owned Dedicated Devices. It works with unenrolled devices, but you need to enable that in Intune. I think Microsoft needs to do better. There are devices that use different profiles (i.e., Corporate Owned With Work Profile) that could benefit from Using Remote Help. But here is how you set it up.
Configure Remote Help on the Tenant
Task 1: Enable Remote Help
Sign in to Microsoft Intune admin center and go to Tenant administration > Remote Help.
- On the Settings tab:
- Set Enable Remote Help to Enabled to allow the use of remote help. By default, this setting is Disabled.
- Set Allow Remote Help to unenrolled devices to Enabled if you want to allow this option. By default, this setting is Disabled.
- Set Disable chat to Yes to remove the chat functionality in the Remote Help app. By default, chat is enabled and this setting is set to No.
- Select Save.
- Note: When you purchase licenses or start a trial, it could take a while to become active (anywhere between 30 minutes to 8 hours). When you try to create a Remote Help session you may continue to see messages indicating that Remote Help isn’t enabled for the tenant even if you enabled Remote Help in the tenant after activation.
Task 2: Configure permissions for Remote Help
Remote Help uses Intune role-based access controls (RBAC) to set the level of access a helper is allowed. Through RBAC, you determine which users can provide help and the level of help they can provide.
To protect the privacy of users who may be using the sharer device, helpers should use the minimum level of privilege required to remotely assist the device. Only request an Unattended session if you know that there’s no user at the sharer device to accept the remote help session.
The following Intune RBAC permissions manage the use of the Remote Help app. Set each to Yes to grant the permission:
- Category: Remote Help app
- Permissions:
- Elevation : Yes/No
- View screen : Yes/No
- Take full control : Yes/No
- Unattended control : Yes/No
Note
If the Take full control permission is set to Yes, then by default, the user will have additional permission to View screen, even if the user’s View screen permission is set to No. If the Elevation permission is set to Yes, then by default, the user will have additional permission to View screen and Take full control, even if the user’s View screen and Take full control permission is set to No. If the Unattended control permission is set to Yes, then, by default, the user will have additional permission to View screen, Take full control, and Elevation, even if the user’s View screen, Take full control, and Elevation permissions is set to No.
- Category: Remote tasks
- Permissions:
- Offer remote assistance: Yes/No
By default, the built-in Help Desk Operator role sets all these permissions to Yes. You can use the built-in role or create custom roles to grant only the remote tasks and Remote Help app permissions that you want different groups of users to have. For more information on using Intune RBAC, see Role-based access control.
Task 3: Assign user to roles
After creating the custom roles that you can use to provide different users with Remote Help permissions, proceed to assign users to those roles.
- Sign into Microsoft Intune admin center and go to Tenant administration > Roles > and select a role that grants Remote Help app permissions.
- Select Assignments > Assign to open Add Role Assignment.
- On the Basics page, enter an Assignment name and optional Assignment description, and then choose Next.
- On the Admin Groups page, select the group that contains the user you want to give the permissions to. Choose Next.
- On the Scope (Groups) page, choose a group containing the users/devices that a member is allowed to manage. You also can choose all users or all devices. Choose Next to continue.
Important
If a sharer or a sharer’s device isn’t in the scope of a helper, that helper cannot aid.
On the Review + Create page, when you’re done, choose Create. The new assignment is displayed in the list of assignments.
Configure Using Remote Help for the User
Prerequisites for Remote Help on Android
For general prerequisites, go to Prerequisites for Remote Help
- Set up Managed Google Play for your tenant. For more information, go to Connect your Intune account to your Managed Google Play account
- Install the Intune app on devices with a version higher than 5.0.5541.0
- Devices must NOT have device configuration policy set to block Screen capture
- The helper must be licensed to use the Remote Help add-on. For more details on licensing, go to Use Intune Suite add-on capabilities – Microsoft Intune
- The helper must have appropriate RBAC permissions to use Remote Help on Android:
- Category: Remote Help app
- Permissions:
- Take full control: Yes (required for control)
- View screen: Yes (required for screen share)
- Unattended control: Yes (required for unattended control)
- If the user doesn’t have the correct RBAC permissions for a particular mode, the corresponding options are disabled when attempting to start a Remote Help session.
Setting up Remote Help for Android
To set up Remote Help for Android, you need to complete the following steps:
- Deploy the Remote Help app.
- Grant permissions.
- Configure camera permissions.
- Configure permission setup for Samsung devices.
Deploy Remote Help app
- Using Managed Google Play, add the Remote Help app from Microsoft.
- On devices that you want to use Remote Help, assign the app as Required. This setting allows automatic installation of the app on those devices.
Grant permissions
To protect user privacy on the device, both the Android OS and device OEMs require certain permissions to be granted to the Remote Help app.
Camera
The Remote Help app requires Camera permissions.
Note: Remote Help does not store camera input. These permissions are only used to initiate a remote help session between the device and the Intune service.
You can auto-grant them through app configuration policy:
- Go to Apps > App Configuration Policies > Add a new policy for Managed devices.
- Create the policy for Android Enterprise with type Fully managed, Dedicated, and Corporate-Owned Work Profile Only. Target the policy to the Remote Help app that you approved earlier.
- Under Permissions, add CAMERA permissions. Then, set the permission state to Auto grant.
- Assign the profile to the devices on which you want to use Remote Help.
Using Remote Help for Android
- In the admin console, navigate to the device you would like to remotely assist.
- On the device actions toolbar, select New remote assistance session then select the session mode.
- On the device, the user sees a prompt displaying a request to grant screen share or control of the device.
- If starting an attended screen sharing or full control session, the user must select Accept to allow the session to begin. If the user doesn’t accept within 5 minutes, the session times out.
- If starting an unattended control session, the session will begin automatically after 30 seconds.
4. During the session, the sharer device displays a floating End Session button. This button can be repositioned on the screen. Tap the button to end the session from the sharer device.
5. During a control session, use the buttons on the menu bar, keyboard or mouse input to interact with the sharer device. You can also long-press on the Power button in the menu bar to simulate a long press. This can be useful, for example, to open the power options menu on some devices.
6. At the end of the session, select Leave to end the session from the admin console.
Note: On Android 13 devices, the device unlock UI (the PIN entry pad, or the pattern dot grid) cannot be displayed remotely. To unlock the device, you can still use keyboard input to enter a passcode. This is a security measure added by Android, not Remote Help, to protect the end user from a passcode or unlock pattern being captured if the device is unlocked while screen sharing.
Hopefully this will help you with using remote help on android. Once you realized that for enrolled device, you can only use the Corporate Owned Dedicated Devices profile you will be well on your way. Or you can spend several hours trying to get it work before you find out and have to write a blog article about!
Get M365 Devices to Stay Logged in with Conditional Access
Sometimes you have a scenario where you need to Get M365 Devices to Stay Logged in with Conditional Access. I can give you an example. Say you have a dedicated multiuser device that is enrolled in Intune but can’t use MFA.
You need to get that device to stay logged in. Having it logged out would not be good since you might have to tell the user (one of many) what the password is to log back in. A password that could be easily shared. Not the best for security.
Use Conditional Access for Device to Stay Logged in
One way that could help is to use conditional access. It allows you to target the users and devices that have multiuser access and allow them to stay logged in. If you are worried about security in this setup you can add another conditional access policy to enhance security
More importantly, for this article, we are going to configure browser persistence.
What is Browser Persistence
A persistent browser session allows the end-user to remain signed in after closing and reopening their browser window. The default configuration for browser session persistence, allows the end-user on a personal device to choose whether to persist the session by showing a “Stay signed in?” prompt after successful authentication.
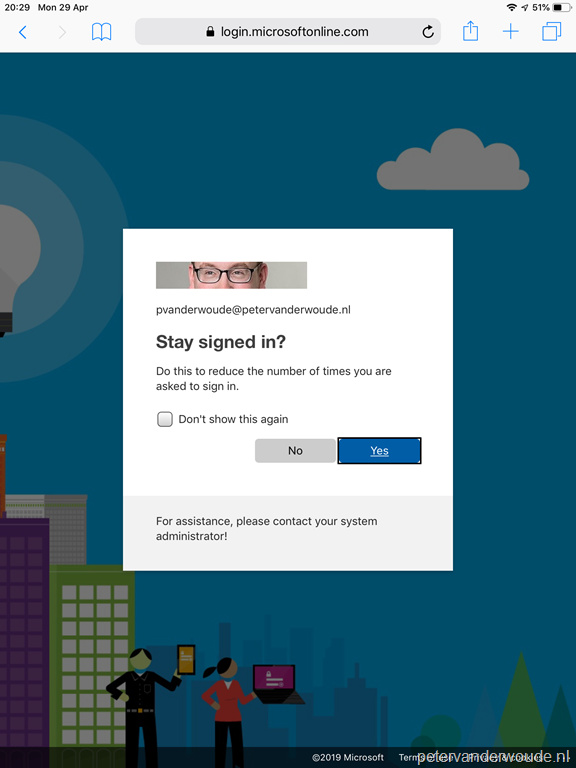
This is helpful for the multi-user devices we mentioned above need to stay logged in as long as possible.
Configure Conditional Access for Device to Stay Logged in
1. Go to Conditional Access in Microsoft Entra and Click The “plus sign” to add a new policy
2. Add the Users / Groups you want to include in this policy
3. Under target resources, choose All cloud Apps:
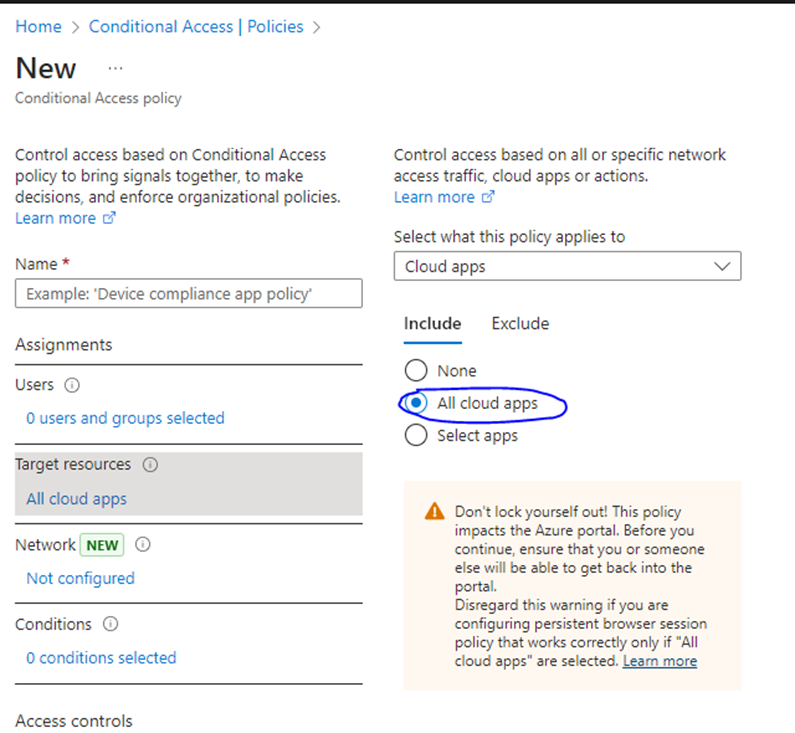
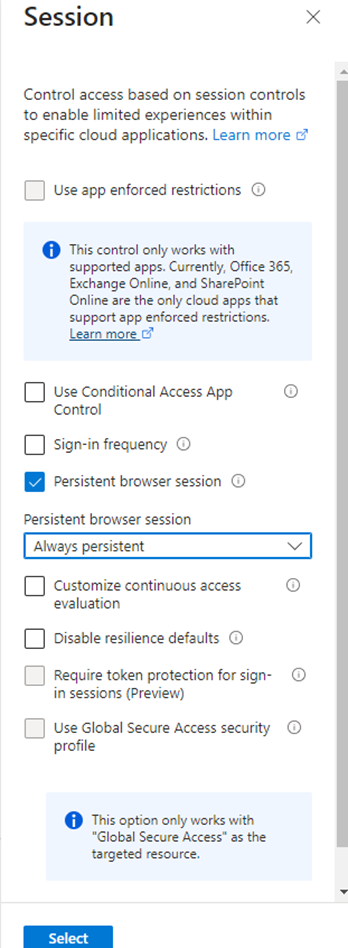
4. Choose persistent browser session and choose always persistent from the dropdown menu and Click Select:
5. Run the policy in “Report-Only” and click create:
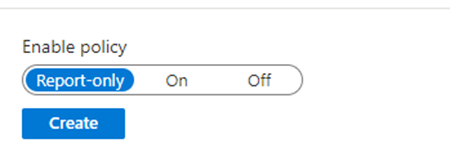
It is good to run the policy in report-only mode and make sure it operates as expected before you enable the policy.
This policy should help to keep those devices logged in as long as possible. In my next article, I will show you a way you can get the above mentioned devices logged in after they eventually log out, but the user will not have be told the password! I will show you in my next article how to sign them in without letting the user know the password.
Teams We’ve Run into an Issue Error
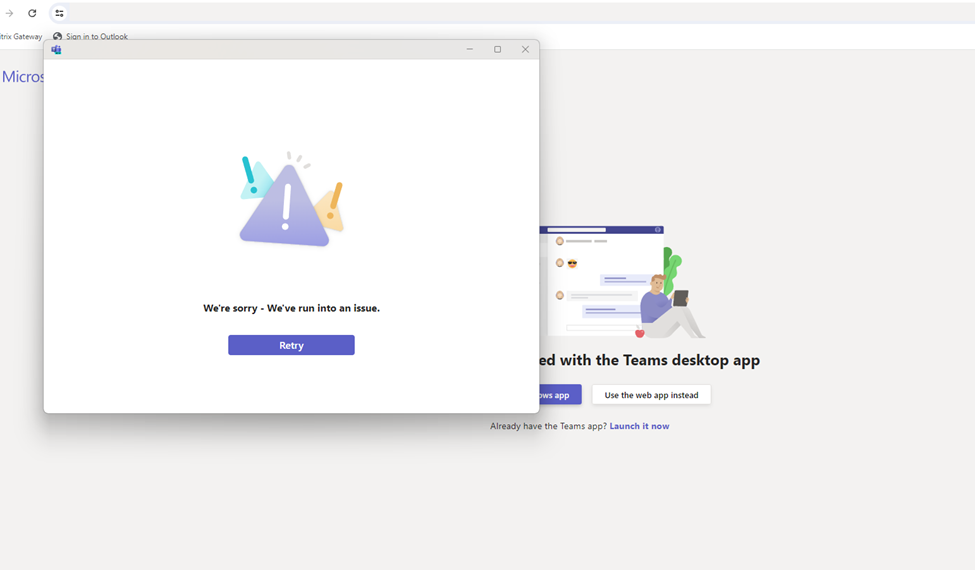
We have all had the Teams We’ve Run into an Issue Error. Something worked one day and then the next…it doesn’t. How frustrating! Most times, it happens with something as simple as logging in but there are other cases where you might get this error.
I will give you an example…
Accessing an External Team You Have Been Invited To
You may get the Teams We’ve Run into an Issue. In this case, the user was receiving errors trying to get into an external team he had been part of for a while. It showed the error message from the picture above. At first only the Teams web app worked, then nothing worked.
What Teams We’ve Run into an Issue Might have been…
First, I thought it was a mismatch between Teams policy settings between the user’s company and the external company. The policy to allow only Teams 2.0 clients was enabled on the user’s side in the Teams admin portal. We had moved to the new team’s client permanently as MS stopped supporting Teams Classic on July 1st.
If the external companies MS Teams policy was set to “Microsoft-controlled”, which allows the use of Teams Classic until next year, it could cause a conflict.
It was verified that the external organization was using the New Teams Policy, so it wasn’t that…
What it was and What fixed It
It turns out it was 2 things. One, the user had recently got a new mobile device and the external organization needed to reset his MFA. And two, his Teams Cache needed to be reset.
I have written a great post on how to delete Teams Cache (Classic and New) Here.
Android System Apps and Intune Enrolled Mobiles
You have just enrolled an Android mobile phone in Intune (Corporate Owned With Work Profile or Dedicated Work Profile) and Android System Apps and Intune behave differently. Like, they don’t work. They seemed to have disappeared or are asking for administrative permission to operate.
I will show you a simple trick that in two steps, you will have your user(s) up and running in no time.
Android System Apps and Intune use Package Manager
First you need to get a similar phone and install Package Manager on it. Whats really cool about this app is it gives the exact name of every single package that resides on your Android phone, even the system apps.
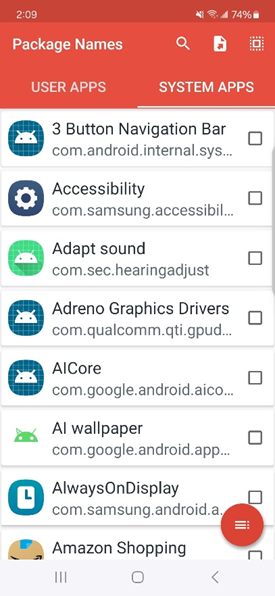
If you see from the illustration above all the applications start with a “com.” You can also use the search at the top to search by the package friendly name (i.e. Android Audio). You will need to take note of the “com.” Package name and the friendly name. You will need it for the next step.
Publish System App in Company Play Store
I have written some great articles on enrolling Android Devices here (Part1 and Part2).
If you are not familiar with a company Google Store and linking it to Intune, please check this video out . It shows you how to set one up.
One you have that done, you can go into Intune and the Android Apps section here.
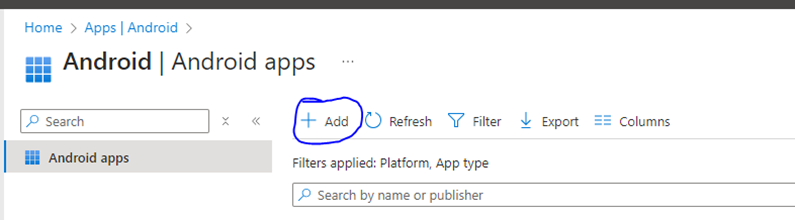
Click On “+ Add” to begin adding an android App.
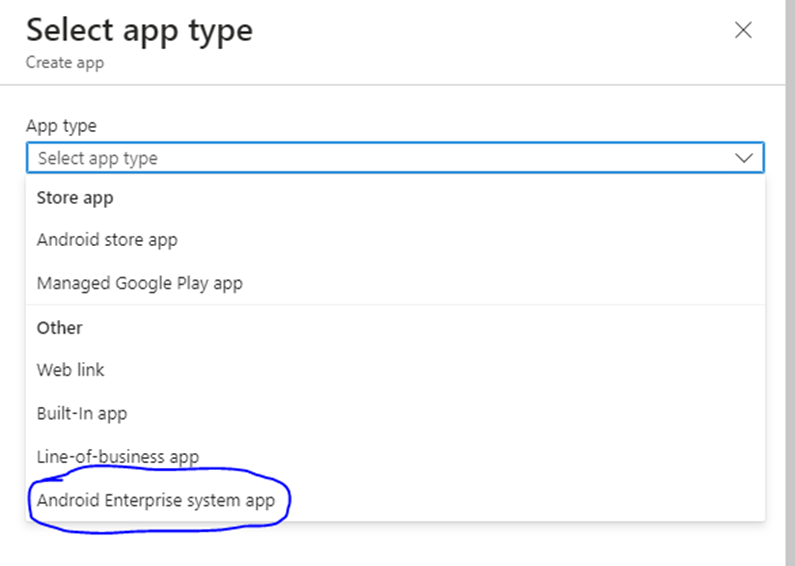

From the dropdown box, select “Android Enterprise System App” and click Select.
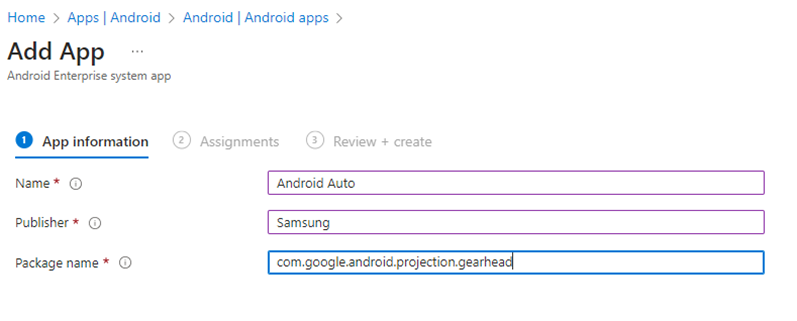
On the next screen I have given an example of what you should put. You can get this information from the previous step from the app Package Manager. Then Click Next
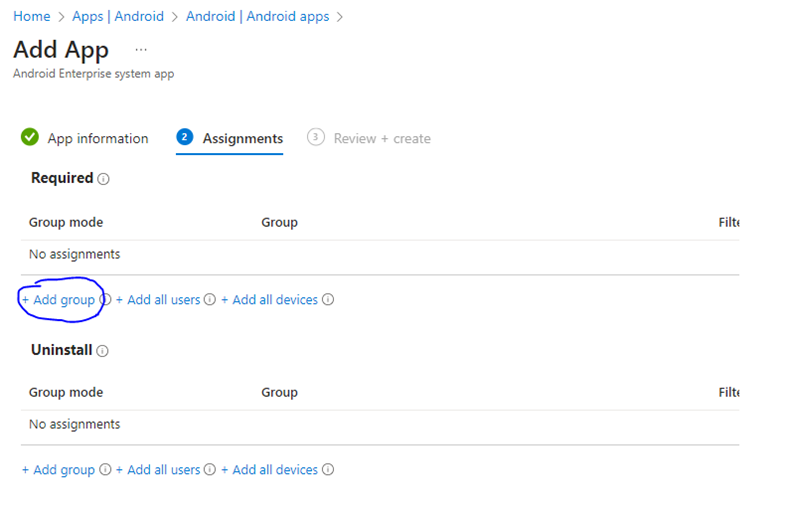

In this section, click on add group and pick which user group you would like to assign to this application too. You probably already have one set up for your mobile users. It can be assigend, dynamic user or dynamic device. The choice is up to you.
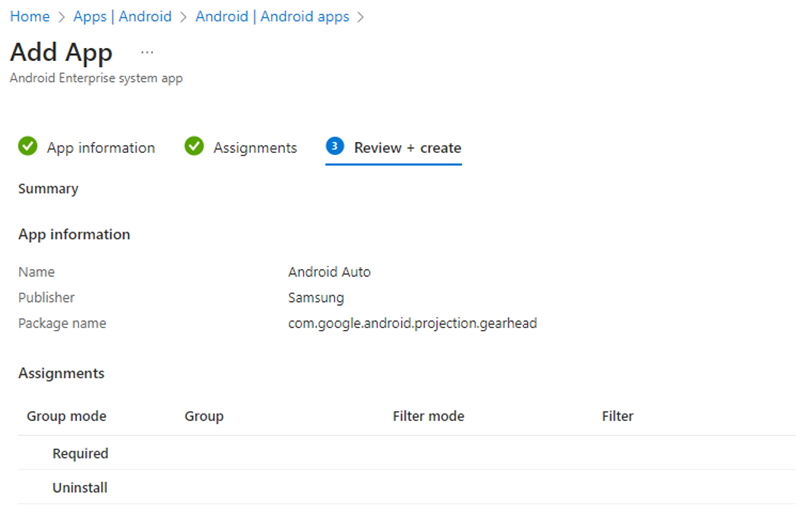

The last screen shows you the options you created in the previous screen. Click create to finish.
It won’t show up as an app available to download in your corporate Google Play Store but it will allow the system app to run now. The device just has to synchronize its Intune policies next time it checks in.
There you have it. A way to make sure Android System Apps and Intune work properly, especially if you use Corporate Owned With Work Profile or Dedicated Work Profile. If your users complains of an app not visible of requiring admin permission, this is probably why.
Put New Teams Icon on the Desktop in 3 Steps

If you have used older versions of Windows, you are used to the Program file folder. It was so easy to create shortcuts from there. It was even easy to put the MS Teams Icon on the Desktop. How about the new teams icon on the Desktop?
The problem is that MS Teams is always changing and the ability to add a shortcut to Windows has changed too. Fortunately, it can be done in just 3 steps. If you read further in the article you will see how you can add the new shortcut to a computer that is used by several users.
The Steps to put New Teams Icon on the Desktop
- Hit Win+r
- Type shell:appsfolder in the text box and hit enter.
- You will see all your aps in the apps folder.
- Right click on it and choose Create Shortcut. It will ask you if you want it to be placed on the desktop, say yes.
Search for Teams:
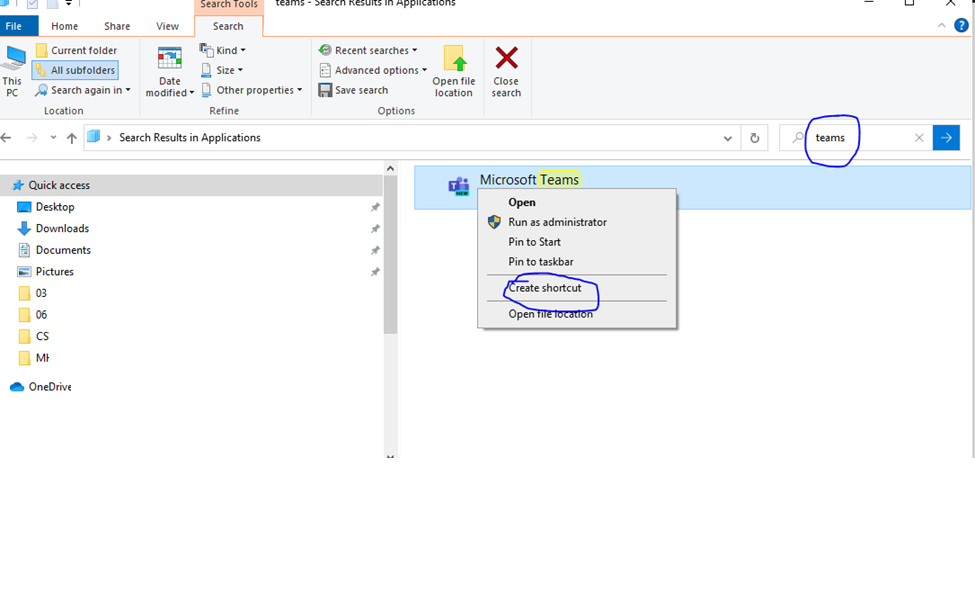
Voila, you now have the teams shortcut on your desktop.
Using the Shortcut on a Multiuse Computer
Sometimes you need to deal with a computer that is in use by a lot of users. Like a common room or presentation room computer. It is quite easy to accomplish.
- Copy the shortcut you created above.
- Navigate to the multi-use computer and go to it’s C:\Users\Public\Public Desktop folder.
- Paste the shortcut.
Now the users on that PC will have access to the New Teams Shortcut. Technically once the new teams are set up on their profile on the computer it runs at start up each time they login but it isn’t necessarily apparent.
Double-Clicking the icon will either bring the application to the front if they are already logged in or prompt for login credentials if it hasn’t already done so.
Either way, you will get MS Teams running and it will be the new teams form the shortcut!!!
How OneDrive Works – A Primer
Here is a good primer on How OneDrive Works. I have researched a few posts on how to install it. Still, since Microsoft has made a few significant improvements over the last few years, I would like to start from scratch and explain what OneDrive sync is and how to get the most out of it.
What is OneDrive Sync?
OneDrive sync is an application that you install on your computer that takes care of a two-way synchronization of files and folders between OneDrive and your computer (i.e., C: Drive).
Why do we need OneDrive Sync?
By making the files available on your computer, the idea is that you can access them without logging in to SharePoint Online. Moreover, you can access them without an internet connection (offline). OneDrive sync “remembers” the changes and synchronizes them automatically when the Internet connection is present, so you always get the latest and greatest copy of the files in either SharePoint Online or your computer.
How is OneDrive Sync related to OneDrive for Business?
OneDrive for Business is your personal storage place in Office 365, I show you how easy is to share here. OneDrive sync client is a separate application you install to synchronize the files and folders. They just happen to share the name “OneDrive”. And what adds to the confusion is that, as I described above, OneDrive sync client syncs files and folders from your private OneDrive for Business (within the company’s Office 365) .
How to install OneDrive sync client
Let’s describe to you how to install and configure OneDrive Sync client. Navigate to either your OneDrive for Business
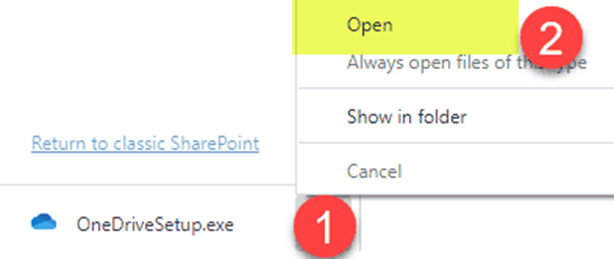
- You will get a pop-up that looks like this and OneDriveSetup.exe file downloaded to your computer automatically.
- In case if OneDriveSetup.exe does not start automatically, you might need to click get the latest version of OneDrive.
- Go ahead and run/open the executable file.
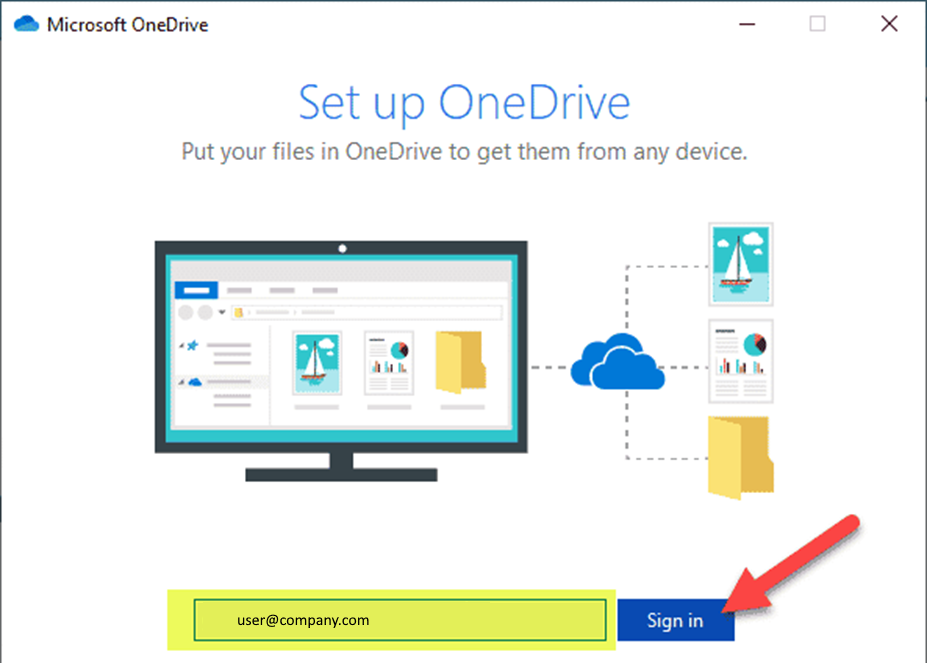
4. Next, it will prompt you to enter your email address. Please make sure to enter your Office 365 User D (email address) and click Sign In
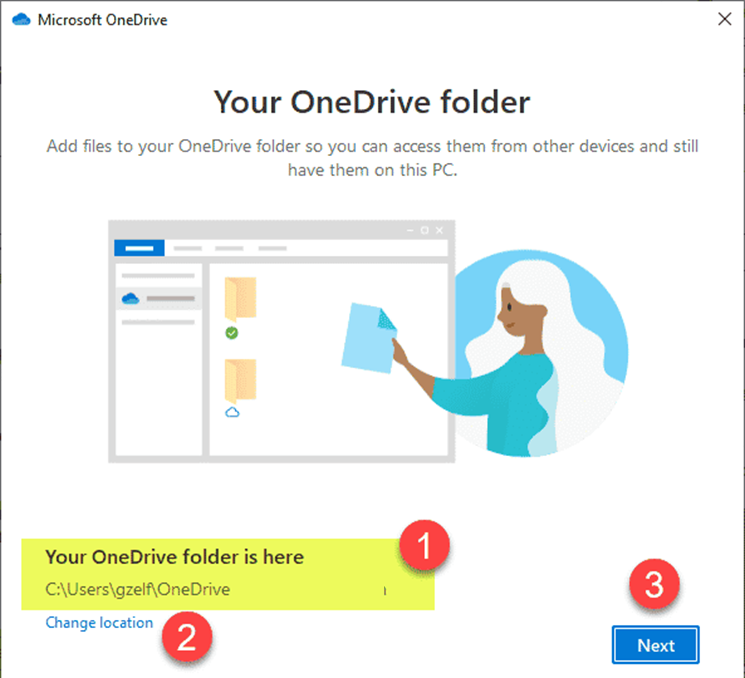
5. It will ask you the location where you want to store the synchronized files and folders. I suggest you leave as-is, but you can optionally change the location. Hit Next
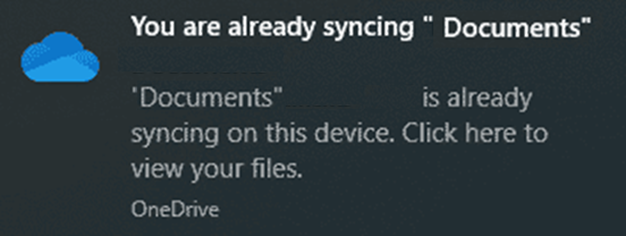
6. And that is it! You will now get a notification that the files and folders synchronized to your computer.
What does it look like in Windows Explorer?
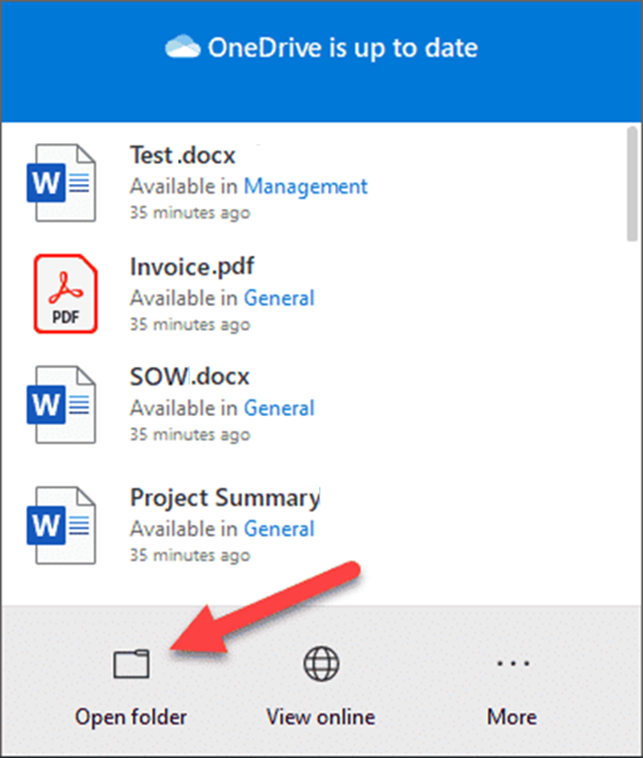
You can navigate to your synchronized files and folders by clicking on a blue cloud icon in the taskbar.

And then click Open folder.
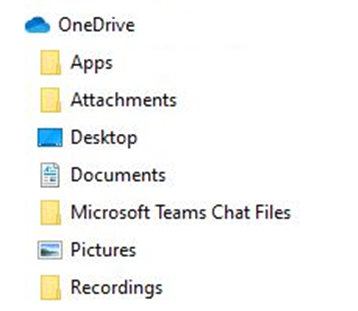
You will now notice all the synchronized files and folders. Your personal files from OneDrive will reside under OneDrive section, while all the document libraries will reside under the [Company Name] section, next to a building icon
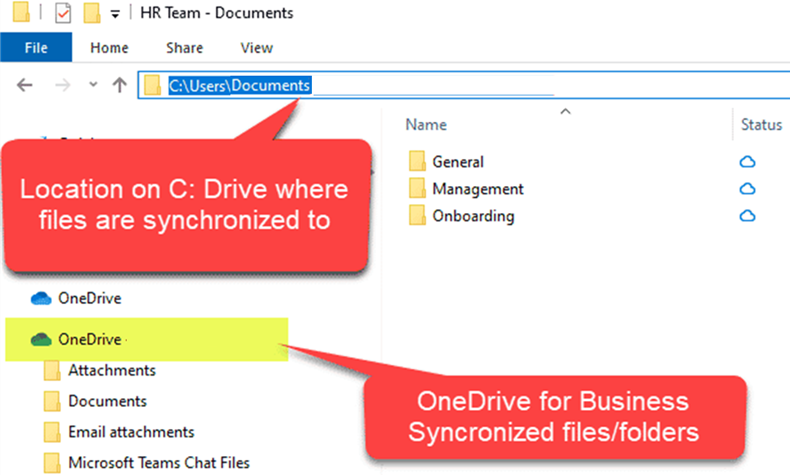
It is imperative to note the naming convention for the synchronized SharePoint Document libraries. The naming convention is as such: [Site Name] – [Document library name].
How to configure OneDrive Sync
Now that we installed OneDrive sync, it is time to configure it. You have a few options, depending on how you work.
Files On-Demand
Remember when I told you earlier that all the files are copied over to your C:Drive? Well, that is not 100% accurate. If you were to stop right here and not configure this any further, you would use what’s called the Files On-Demand feature. This is a new feature that was rolled out relatively recently. Its purpose is to save space on your hard-drive.
The idea is that it does not download the physical files and folders to your computer. Instead, it just downloads the names of files and folders as well as the hierarchy of folders. So it looks like you have them on your computer, but you don’t. It only downloads files and folders when you click on them.
In the image below, you can see the cloud icons next to all the files, except for one (green checkbox). This indicates that I opened the file on my computer, and it was physically downloaded to my computer at that time.
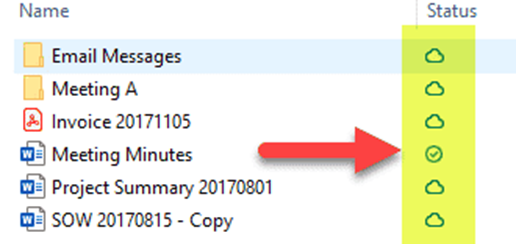
Files on your computer
The above setup works well when you want to save storage on your laptop, but if you do not have WiFi and need to access the files, it won’t work. In this case, you need to disable Files On-Demand. To do this:
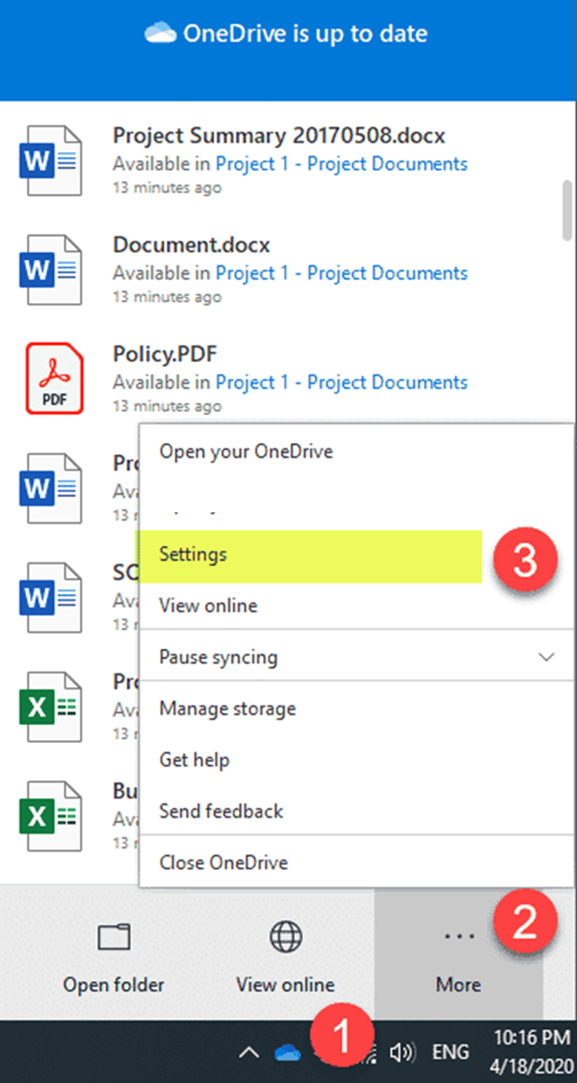
Click the Blue Cloud Icon > More > Settings
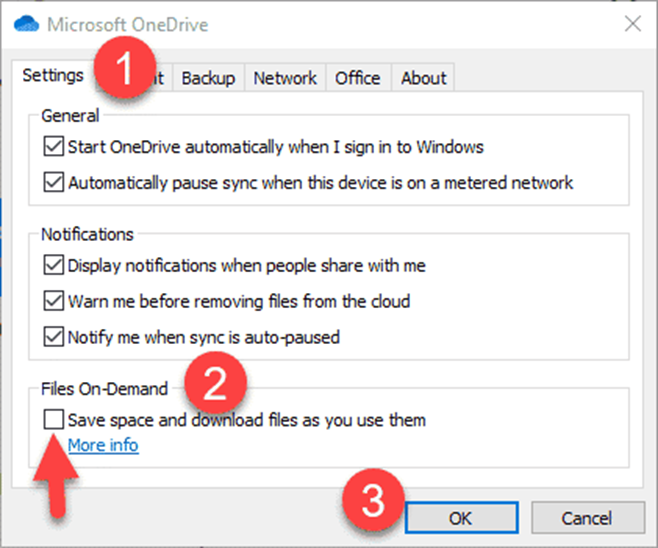
Under the Settings Tab, uncheck the box next to Save space and download files as you use them.
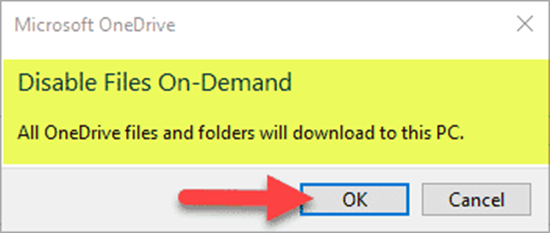
You will get a confirmation message, just hit OK.
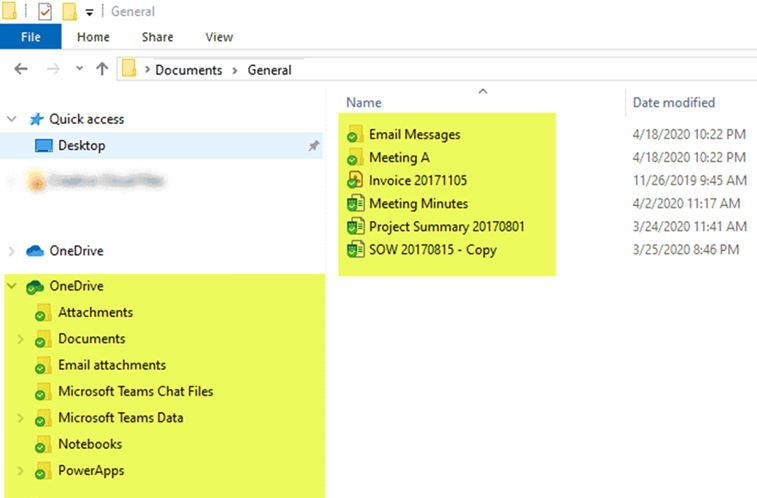
When you go back to Windows Explorer, you will now notice a bunch of green checkboxes, meaning that the files have physically been downloaded and synchronized to your computer.
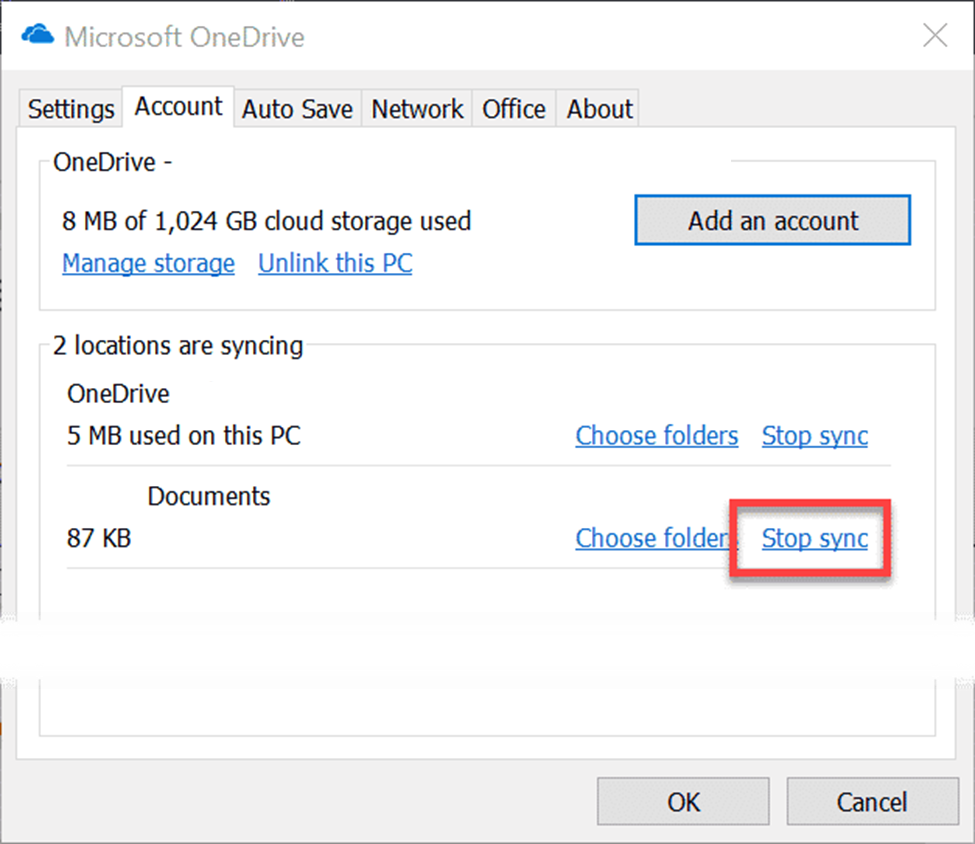
How to stop sync of files and folders
It is crucial to note that once you synchronize your OneDrive or SharePoint document libraries, it establishes a constant 2-way connection between OneDrive/SharePoint and your computer. So any change you make in one place (i.e., deletion) will immediately happen in the other location. If you need to break that link – you need to stop the synchronization.
Teams Meeting Settings in a Couple of Clicks
Here is a quick way to set your Microsoft Your Teams Meeting Settings in a couple of clicks. Keep these Teams settings handy so you will be able to set up meetings in the future quickly.
When you create a New Meeting in Teams you can choose options for the meeting. However, if the meeting is large (up to 300 attendees) you will want to customize the meeting even more. you need to go into “More Options”. From there, you will be able to set the following settings. Security, Audio and Video, Engagement, Roles, Recording and Transcript.
Security
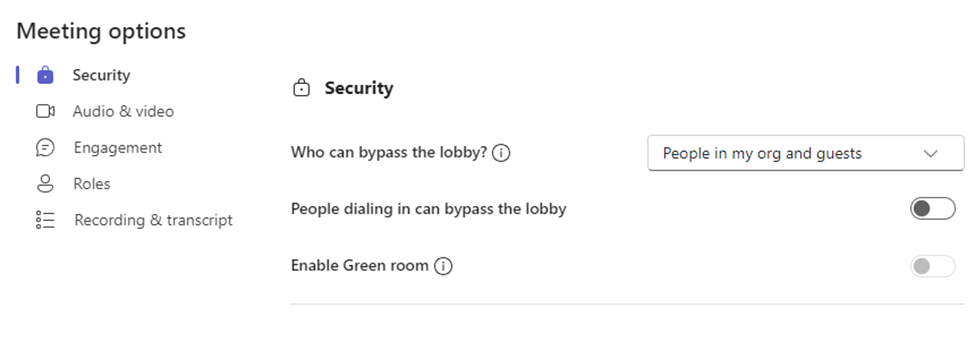
In this option you can specify who can directly enter the meeting. The lobby is sort of a waiting room and if you don’t set it, the organizer of the meeting (the one who created it or people they have specified as co-organizers) will have to manually admit everyone into the meeting.
The green room is like the lobby, but it lets the user test their audio and video before that are admitted.
Audio and Video
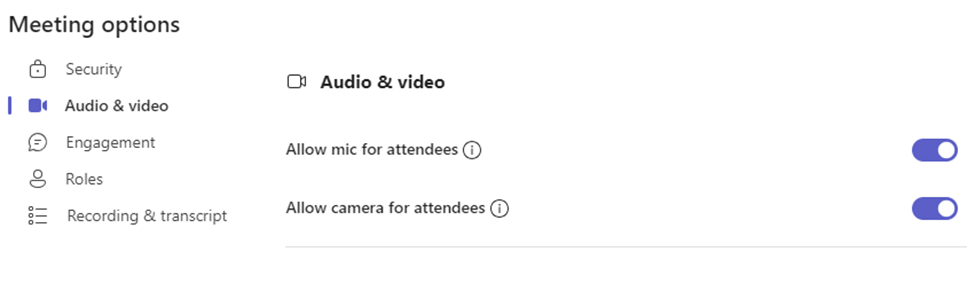
Thes settings can be switched on or off depending on your need. For large meetings it is better to have video and mic switched off to save bandwidth and prevent interruptions to the meeting.
Set Your Teams Meeting Settings Engagement
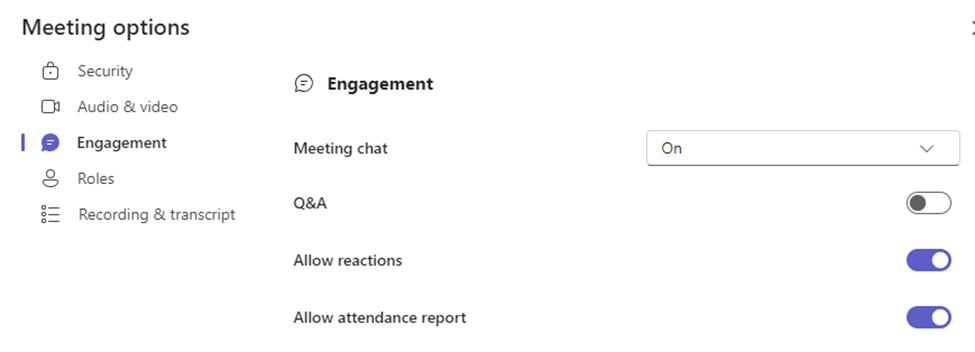
Thes settings have to do how the users interact with the meeting. You can turn the chat future on or off. Enable Q & A. This is a good feature because it allows you to moderate questions before they show in the meeting, and you can allow replies as well. Allow reactions is just if you want attendees to react to the meeting with emoji’s provided by Teams. The Attendance report toggle is used if you want users’ attendance to the meeting recorded. Something you might want to do in a large meeting.
Set Your Teams Meeting Settings Roles
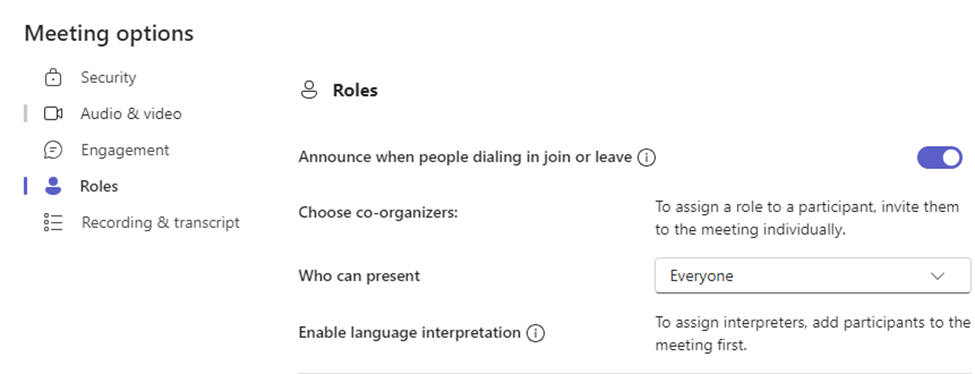
In larger meetings various users will have different roles in the meeting. The user who creates the meeting is the Organizer. They will be the one more than likely setting all the settings in the meet. Unless they choose some Co-Organizers. To do so all the organizers must do is change the role of one of the participants to Co-Organizer.
Enable language interpretation is a feature whereby you can assign a participant to translate the meeting in real time into another language.
Before you can assign anyone the role of Co-Organizer, Presenter or Language interpreter you must make them a participant first and assign one of the roles.
Like Organizers, participants can control their video and mic.
Recording and Transcript
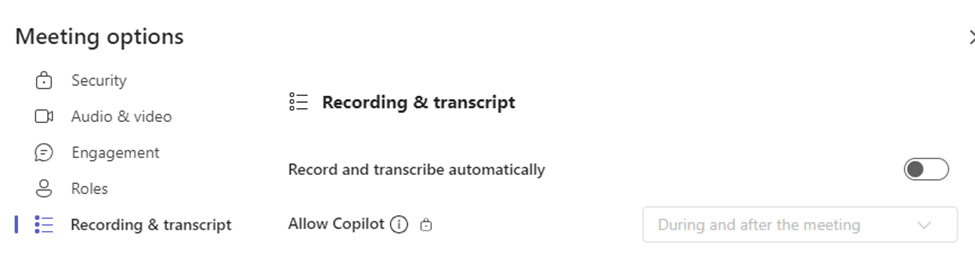
Here you can enable automatically recording the meeting, but I wouldn’t. It records everything. So, you have basic setup and a lot of noise before the meeting recorded which would need to be edited afterwards. It’s a pain. Have one of the Organizers manually record the meeting when it starts and stop recording when it ends so it is a nice clean recording. Allow Copilot in enable this feature into your meeting, It may help automate some of your tasks in the meeting.
This is how you Set Your Teams Meeting Settings in a couple of clicks. I would keep this info handy any time you need to set up a large team meeting. At least you won’t be running around setting things up when the meeting has already started. You will be prepared!
Export OneNote in One Step
I can show you how to Export OneNote in one step. You have a file in OneNote but not every user you need to share with has OneNote. You may have created this file or it was shared with you by another user in. In the case of it being a file being shared with you You Need Read / Write Access to the OneNote File
I also show you how to do this in another article.
How To Export OneNote in One Step
If the file is shared with you go here. Open it in the online version of One Drive By clicking on the link in your email:
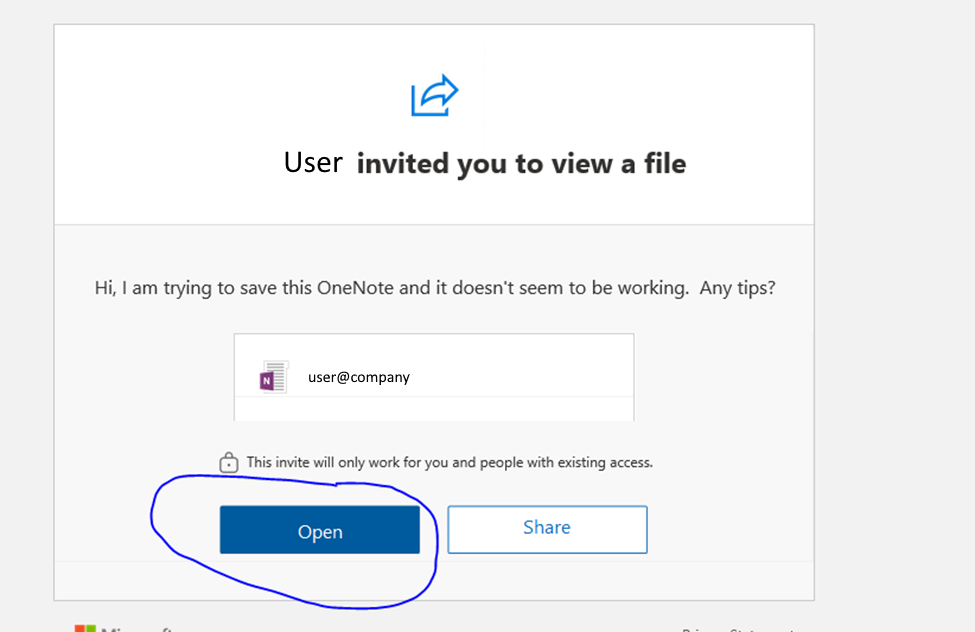
It will open:
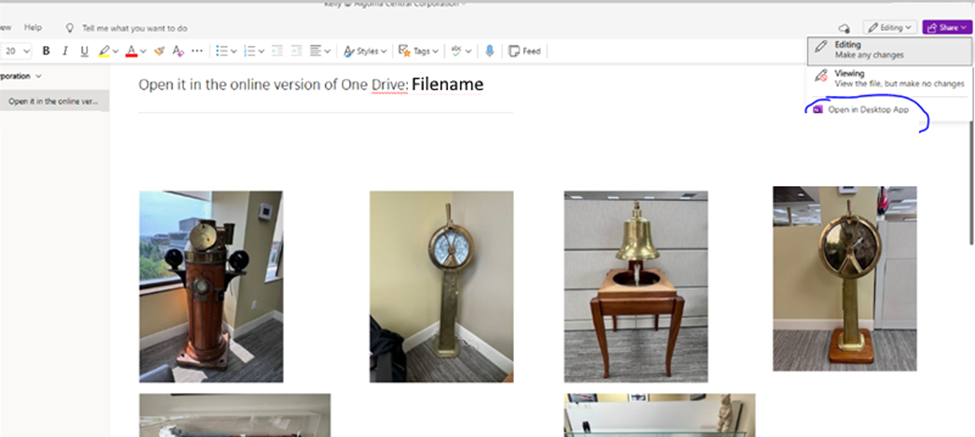
If you created the file , you can skip the first step. Click the Dropdown on the top right called “Edit” and choose “Open in Desktop App. It will open in the desktop version of OneNote:
Click File on the top left and choose export:
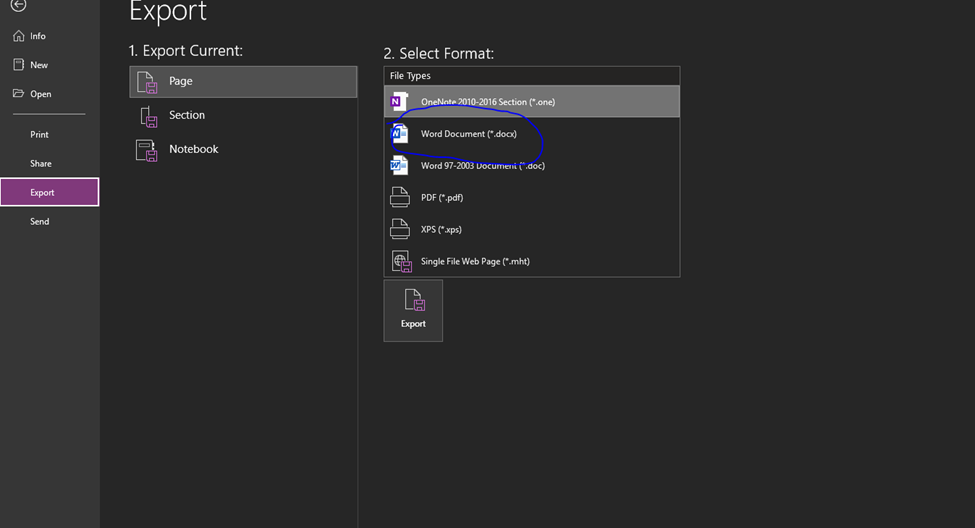
In this example the I Export OneNote in One Step to the computer locally as a word document. Now you are able to send the document to anyone who doesn’t have OneDrive as an application. They might have it but barely use it or are more comfortable with other formats other than OneNote.
Either way, it is an easy way to Export to OneNote in One Step.
By using this method you will be able to easily export OneNote content into various formats you desire either with a OneNote document you created or a OneNote document that was shared with you.