
Samsung S25 and Intune Enrollment Fails

Have you just tried to do this? Samsung S25 and Intune Enrollment Fails. It fails and for the stupidest reason. Read Below.
What is Supposed to Happen
With Intune enrollment, once you have created an enrollment profile all you need to do is take an Android phone, tap the screen five time and then scan the QR code to begin the process. Easy, right?
Why Samsung S25 and Intune Enrollment Fails
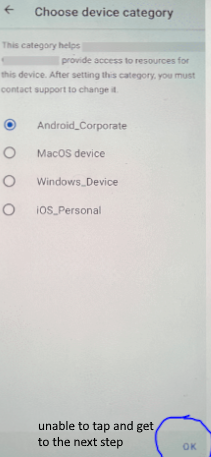
Well, all is fine and dandy in the process until you get to the screen where you must pick a Category for your devices. This is something you have set up beforehand to separate your devices (i.e. Office Mobiles, Office Computers, etc.…).
Samsung has done something with their UI where you can’t tap OK to get to the next screen. There is a grey bar or something that covers the OK button preventing you from tapping it.
How To Fix Samsung S25 and Intune Enrollment Fails
It is not a fix but a workaround. This is something Samsung needs to fix quickly. There is going to be a lot of fuss over this. In the meantime, you can work around it by doing the following.
Once you get to the screen above, you can go no further, Shut the phone off. It is already registered in Intune. You can finish the set up there.
And search for the device you were settings up. It starts with the username of whom your were enrolling in Intune.

Then click on the device, which brings it to its screen. Click Properties and give it a device category:
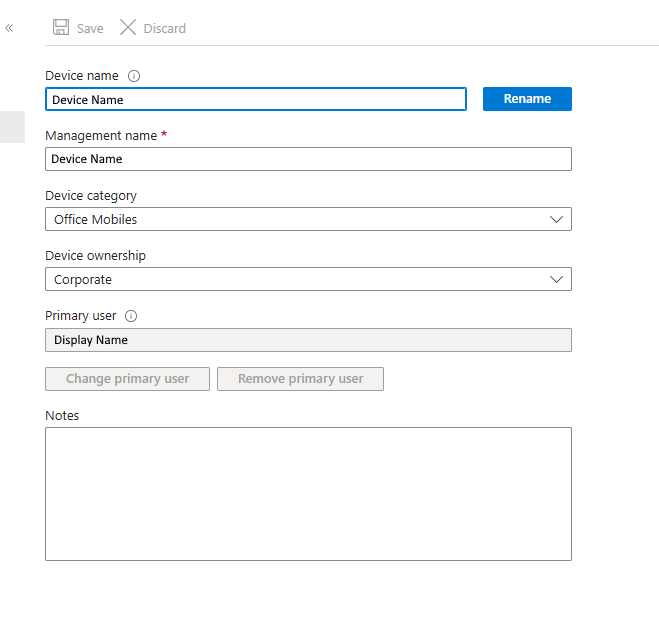
Save the entry and restart the Android Phone. You will then continue with the enrollment process as if nothing was wrong (But there was a lot wrong LOL).
Hopefully you haven’t got a huge batch of S25’s to enroll in your organization. Until Samsung fixes this (or Microsoft), it’s gonna be a long night!
Disable Per User MFA With MS Graph
You may not know this, but if you don’t Disable Per User MFA for your users before you start enforcing it with Conditional Access, it wreaks havoc with your policies. I found this out the hard way. I had to disable MFA for a group of users who were in a session that would make using MFA rather cumbersome.
What Happens when you have both Per User MFA and Conditional Access for MFA
Microsoft recommends that you completely disable Per User MFA. If you don’t use Per User MFA but it still enabled on some accounts, it takes precedence over conditional access. This is why some of your users get exempted from a conditional access policy for MFA and some do not. It makes it difficult to troubleshoot MFA issues. I know!
Why Disable Per User MFA With MS Graph
There are a couple of reasons why you would want to do this. One, you have users logging in from a single location that is trusted and secure. There is no need to have them constantly verifying their identity when all they are trying to do is work. Two, you have a temporary need, and it makes sense for your users to not have to use MFA for the work they are doing (i.e. software training).
I will discuss two ways you can fix this issue.
Note: the Ways I am about to describe require you to have at least the Authentication Policy Administrator Role to administer MFA Status.
Disable Per User MFA Through the Portal
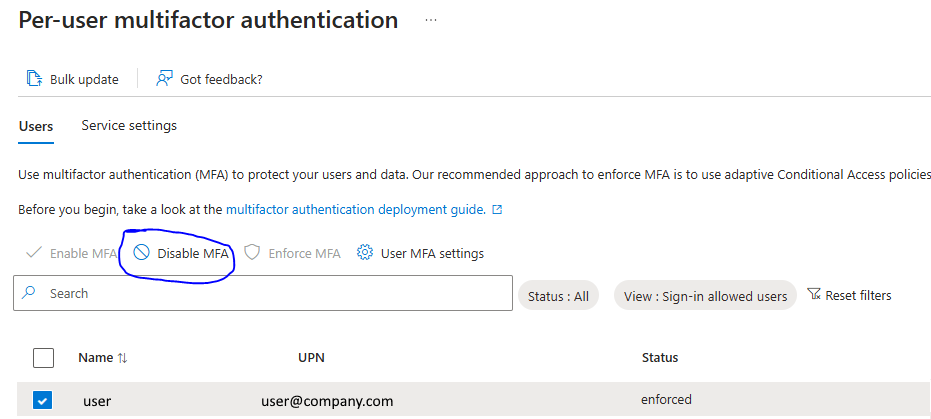
This way is simple. I would use it if you only had a few users to do. Go to the portal and in the Per User MFA section, check the user and then click disable MFA above:
Disable Per User MFA Using Microsoft Graph
This is the better way to go to disable per user MFA if you have several users. First you need to export users to a csv using the portal. From that CSV file, you need to take the Object ID column and put it in it’s own CSV with the Column heading ObjectID. Make sure the CSV file is named ObjectID.csv and it resides in the same folder as the script.
Here is the script:
# This Requires the PIM of "Authentication Policy Administrator". If you get a 403 error this is why.


Connect-MgGraph -Scopes "User.Read.All", "Policy.ReadWrite.AuthenticationMethod"


#Path to UPN File #


$CSVPathUPN = ".\ObjectID.csv"


##Run Script##


##Try import UPN CSV file##


Write-Host Importing CSV


try {

    $MFAUsers = import-csv $CSVPathUPN -ErrorAction stop

}

catch {

    throw "Error importing CSV: $($_.Exception.Message)"

    break

}


foreach ($MFAUser in $MFAUsers) {


# Fill in user ID

$userid = $MFAUser.ObjectID


# MFA status

$body = @{"perUserMfaState" = "disabled" }


# Invoke the request to update MFA status

Invoke-MgGraphRequest -Method PATCH -Uri "/beta/users/$userid/authentication/requirements" -Body $body


}


Write-Host All Users Per User MFA set to Disabled How To Setup Windows 11 Without Microsoft Account
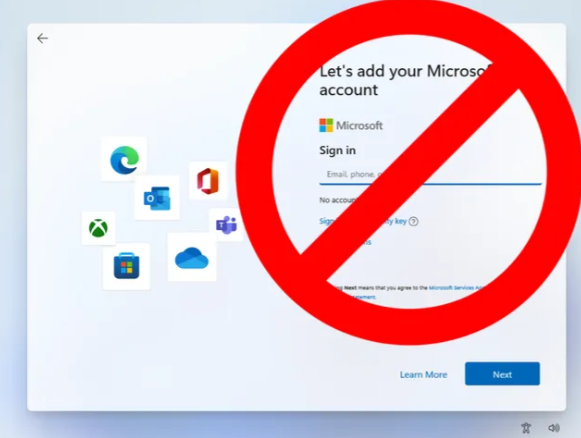
Microsoft is now making it virtually impossible Set Up Windows 11 Without Microsoft Account. It is frustrating to say the least. You know they are only doing it so they can collect even more information about you.
Windows has become more of a marketing machine than an Operating System. I miss the good old days when you could just set up a computer, install software and start working. This can still be done on Windows, but it is getting more difficult, and you need to know a little technical stuff to do it. Fortunately, you are here for a Quick Tip so I will give it to you.
Setting Up Windows 11 Without Microsoft Account
At “Let’s add your Microsoft Account” screen, asking to sign in:
Press Shift F10 (If you’re on a laptop that has Action Keys mode or something similar, you may need to Function Shift F10).
The command prompt appears.
Type into the command line.
ncpa.cpl
The Network connections screen appears.
Right click the Ethernet and or Wi-Fi whichever is connected.
Click Disable.
Close Network Connections.
Type into command line.
oobe\bypassnro
The computer will restart.
At “Let’s connect you to a network”, it should show it is Not connected
Then click I don’t have internet.
Microsoft will protest but check “Continue with limited setup”.
Enter the username you want to create and click next to continue Windows setup normally.
After setup, and you get to the desktop, there will be no internet.
Right click the world icon in bottom right taskbar.
Network and Internet Settings
Advanced Network Settings
Under Network adapters, for any that has a button labeled Enable, click Enable. They should all say Disable (Meaning they are Enabled, and you can Disable it)
Close Network & Internet settings
Proceed with configuration
Here is a great video to walk you through it if you are a more visual learner….
Why Set Up Windows 11 Without Microsoft Account?
This is a great question! As I mentioned before you just want to set up the computer and start working. You have no need to be constantly bombarded with advertisements and news about this and that. I am sure you have enough distractions and the las thing you need is to constantly slag off at work, that’s what solitaire is for! LOL
Or if you want, you could always go and try Linux……
Getting Your Signature in the New Outlook
So you are running a version of Outlook that does not store signatures in the cloud. Your company also does not use a cloud signature service like Code Two. You are moving to the New Outlook. How do you get your signature in the New Outlook. There are basically two ways to do this and I will show you both.
What has Microsoft Done?
Microsoft has decided that they want a more uniform experience across devices. So a better way to do this than by storing everything in the cloud (They are not there 100% but I guess they are trying). So, a lot of features that you had stored locally on the machine you were using will now be available to all devices that you have configured. Basically if you AD is Hybrid and you like to pull user info from your Domain controllers and store them locally and automatically, you won’t be able to do this anymore.
You Are Using a Really Old Version of Outlook – Signature in the New Outlook
In this case to get your signature in the New Outlook, when you go to File / Options / Mail / Signature you see only one option for for storing your signature. That is locally. There is no cloud option (You will see later in this article that there is an option where to store your signature). Your signature settings probably look like this:
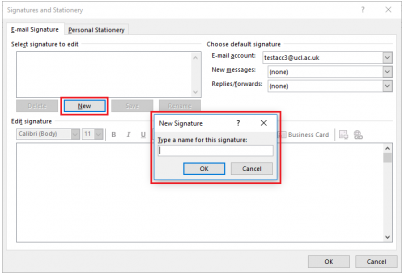
The pretty signature that you so painfully created is stored here:
C:\Users\<your user name>\AppData\Roaming\Microsoft\SignaturesSimply put, if you Hit Win-R, then in the search box type %AppData%, it will take you to your profile. Navigate to Microsoft\Signatures and you will see your signature as an HTML file. read the following steps to get it into the cloud.
Getting Signature in the New Outlook
Note: You can use these steps on Outlook on the web too.
- Please take the HTML file that has opened in your default browser and select all (Ctrl-A) .
- Then copy it to your clipboard (Ctrl-C). Open Outlook and while in your inbox, go to “View”.
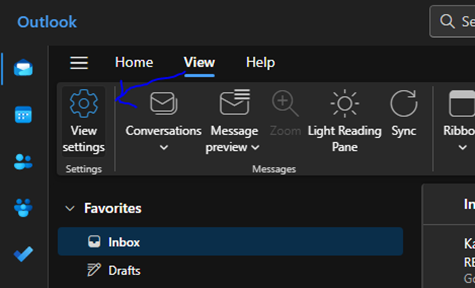
- At the top of the window and select “View Settings”.
- Type “email signature” into the search box you see at the top left and then click “+ New signature”.
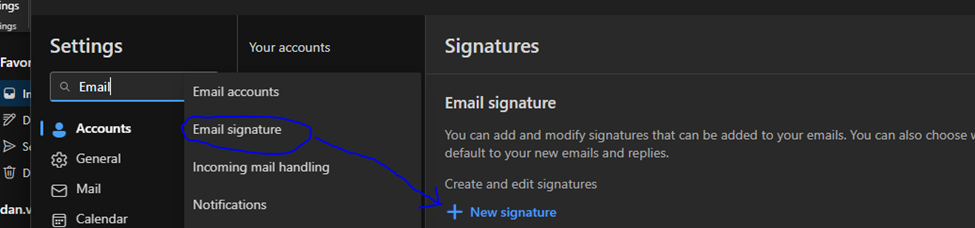
- Give the signature a name in the “Email Signature” text box.
- Click in the text box below and press Ctrl-v to paste the signature you copied from step #2
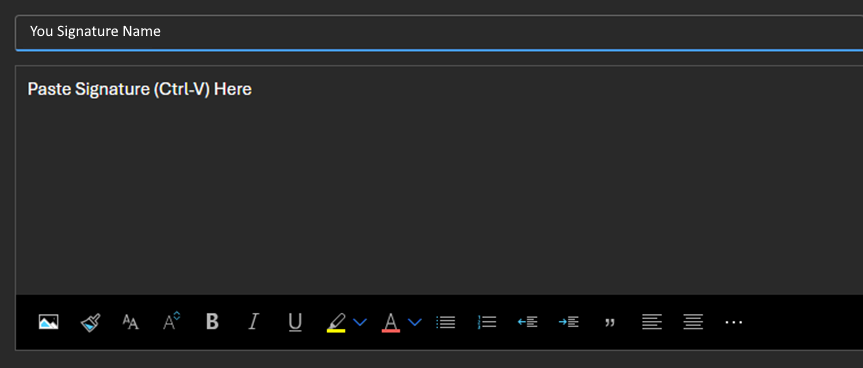
- Click Save and you are all done!
Your Version of Outlook is Newer – Signature in the New Outlook
In this case your version of Outlook is at least 2019. you will see a Signature Settings Windows similar to this:
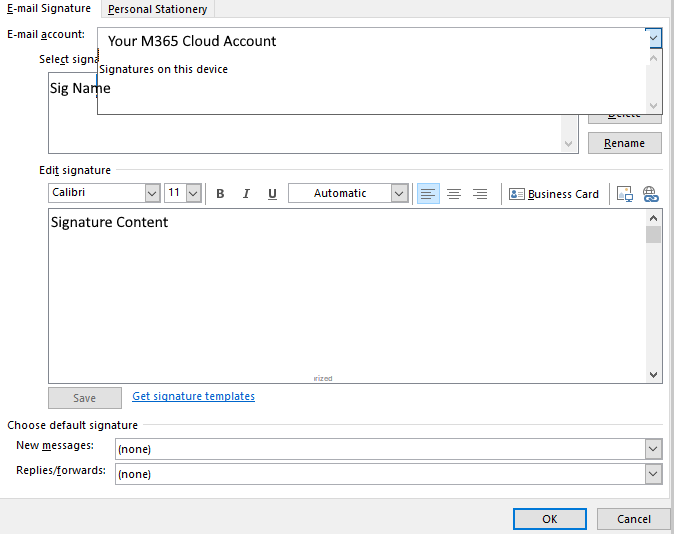
In this case you have a drop-down box for local and cloud signatures. This is Microsoft’s way to get you to move from local signatures to cloud ones. It is a hybrid way of storing signatures. But the new Outlook closes this loop hole and there is no option to do this. But I digress…..
In this case you take the content from “Signatures on this device” and copy it to the cloud signature (as noted by your Microsoft account in the drop down box). Paste it into the content text box and click save.
The New Outlook Way
Unfortunately there is no direct way. If you are lucky enough to be using an older version of Outlook before you switch, you can use one of the two methods above to get you signature into the cloud. If not you have to create it from scratch.
Match an M365 Cloud Account with Local AD
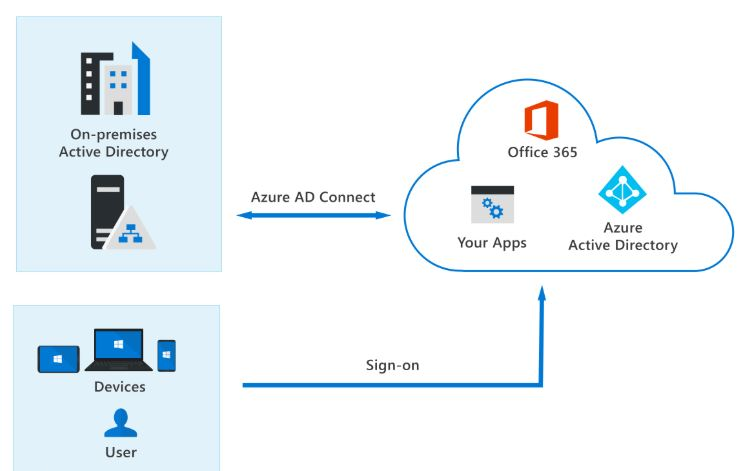
OK, so you need to Match an M365 Cloud Account with Local AD? You just realized you created a cloud only account for a bunch of users in your M365 tenant, but you need them to access local AD resources because you run a Hybrid environment.
You are just not ready yet to pull the trigger and go “Cloud Only”. Don’t worry, you are not alone. I am here to help.
Reasons to Match an M365 Cloud Account with Local AD
There are many reasons to do this. I can think of two. One, you are still running on on-premises Exchange Server and there are some email groups that the account(s) you created in the cloud need access that are only available locally.
The same goes for AD security groups and other attributes that can only be accessed through local AD.
The Easiest Way to Achieve This
The easiest way to Match an M365 Cloud Account with Local AD is to basically create an account in your local AD with the minimum attributes to make what is called a “soft match”. Local AD and the cloud will see them as the same record and synchronize them. Voila, they are both in the cloud and in local AD. Now you don’t have to rack your brain on how to do this anymore!!
One Way to Share Data from VB.Net to PowerShell

Sometimes you need to Share Data from VB.Net to PowerShell. It is not enough to use one to help the other. They need to go back and forth between each other, kind of like a good hockey pass! Sorry I couldn’t resist I was just watching the World Juniors. I won’t be any more though….
The good news is with the right coding and scripting you can easily pass data back and forth between PowerShell and VB.net. I am going to show you an example but by any means, this is not exhausting about what you can do. With a little research and practice I am sure you will find many ways!
High Level View on How Data is Shared
The example I am going to show you builds on an earlier post I had about using PowerShell and MS Teams. Here we will use VB.Net to generate a PowerShell Script based on inputs you put into the program. It then runs the script. The PowerShell script will send its output to a text file. The VB.Net program will read the content of the file and determine if the script ran successfully or not and inform the user through the VB.Net program.
Example on Sharing Data from VB.Net to PowerShell
For the purpose of this post, I am sampling the program and script. Be mindful of error checking and security when Sharing Data from PowerShell to VB.Net.
The VB.Net Code:
        Dim FILE_NAME As String = "setforwarder.ps1"
        Dim i As Integer
        Dim aryText(24) As String
        Dim creds As String
        Dim dlgr As DialogResult
        Dim objShell = CreateObject("WScript.Shell")
        Dim sps1 As String
        Dim myPrimary As String
        Dim mySecondary As String
        Dim firstChar As String
        Dim firstCharSec As String

        myPrimary = txtPrimary.Text
        mySecondary = txtSecondary.Text

        If myPrimary = "" Or mySecondary = "" Then
            dlgr = MsgBox("You did not specify a number as Primary and Secondary.", vbOKOnly)
        Else

            firstChar = myPrimary.First()

            firstCharSec = mySecondary.First()

            If Not IsNumeric(myPrimary) Then
                dlgr = MsgBox("Primary - Only Numbers are allowed.", vbOKOnly)
            ElseIf firstChar <> 1 Then
                dlgr = MsgBox("Primary - The first digit must be the number 1. Please follow the format 1XXXXXXXXXX.", vbOKOnly)
            ElseIf Len(myPrimary) <> 11 Then
                dlgr = MsgBox("Primary - The phone number must be exactly 11 digits. Please follow the format 1XXXXXXXXXX.", vbOKOnly)
            ElseIf Not IsNumeric(mySecondary) Then
                dlgr = MsgBox("Secondary - Only Numbers are allowed.", vbOKOnly)
            ElseIf firstCharSec <> 1 Then
                dlgr = MsgBox("Secondary - The first digit must be the number 1. Please follow the format 1XXXXXXXXXX.", vbOKOnly)
            ElseIf Len(mySecondary) <> 11 Then
                dlgr = MsgBox("Secondary - The phone number must be exactly 11 digits. Please follow the format 1XXXXXXXXXX.", vbOKOnly)

            Else
                creds = ".\creds.txt"
                aryText(0) = "try"
                aryText(1) = "{"
                aryText(2) = "# Define Credentials"
                aryText(3) = "[string]$Username = 'username@company.com'"
                aryText(4) = "[String]$Password = Get-Content " & """" & creds & """"
                aryText(5) = ""
                aryText(6) = "# Convert To secure String"
                aryText(7) = "[SecureString]$pass = ConvertTo-SecureString -AsPlainText $Password -Force"
                aryText(8) = "$SecureString = $pass"
                aryText(9) = "# Create credential Object"
                aryText(10) = "$MySecureCreds = New-Object -TypeName System.Management.Automation.PSCredential -ArgumentList $Username,$SecureString"
                aryText(11) = "Connect-MicrosoftTeams -Credential $MySecureCreds"
                aryText(12) = ""
                aryText(13) = "Set-CsUserCallingSettings -Identity username@company.com -IsForwardingEnabled $True -ForwardingType Simultaneous -ForwardingTargetType SingleTarget -ForwardingTarget " & Strings.Chr(34) & myPrimary & Strings.Chr(34)
                aryText(14) = "Set-CsUserCallingSettings -Identity username@company.com -IsUnansweredEnabled $True -UnansweredDelay 00:00:30 -UnansweredTargetType singleTarget -UnansweredTarget  " & mySecondary
                aryText(15) = ""
                aryText(16) = "Disconnect-MicrosoftTeams"
                aryText(17) = "Set-Content .\Exit.txt -Value '1'"
                aryText(18) = "}"
                aryText(19) = "catch"
                aryText(20) = "{"
                aryText(21) = ""
                aryText(22) = "Write-Output $_ | Set-Content .\Error.txt"
                aryText(23) = "Set-Content .\Exit.txt -Value '99'"
                aryText(24) = "}"

                Dim objWriter As New System.IO.StreamWriter(FILE_NAME)

                For i = 0 To 24

                    objWriter.WriteLine(aryText(i))

                Next

                objWriter.Close()

                'Clear Error file before writing And running PS Script
                Dim stream As New IO.StreamWriter(".\Error.txt", False)
                'stream.WriteLine("")
                stream.Close()

                'Clear Exit file before writing And running PS Script
                Dim stream2 As New IO.StreamWriter(".\Exit.txt", False)
                'stream.WriteLine("")
                stream2.Close()

                Dim ErrCode As String
                Dim ErrLen As Integer

                ErrCode = ""

                sps1 = ".\setforwarder.ps1"
                objShell.Run("powershell.exe -executionpolicy unrestricted -WindowStyle Hidden -noprofile -noexit -ExecutionPolicy Bypass " + sps1)

                Do Until ErrLen > 2

                    Threading.Thread.Sleep(1000)
                    ErrCode = System.IO.File.ReadAllText(".\Error.txt")
                    ErrLen = System.IO.File.ReadAllText(".\Exit.txt").Length
                    'MsgBox(ErrLen)

                Loop


                If ErrLen = 3 Then
                    MsgBox("Forwarding Has Been Confgured.")
                Else
                    MsgBox("The PowerShell command failed with Error: " + ErrCode + Chr(13) + ".")
                End If

            End If

        End If
The PowerShell Script
It was generated by VB.Net and Looks like this:
try
{
# Define Credentials
[string]$Username = 'username@company.com'
[String]$Password = Get-Content ".\creds.txt"

# Convert To secure String
[SecureString]$pass = ConvertTo-SecureString -AsPlainText $Password -Force
$SecureString = $pass
# Create credential Object
$MySecureCreds = New-Object -TypeName System.Management.Automation.PSCredential -ArgumentList $Username,$SecureString
Connect-MicrosoftTeams -Credential $MySecureCreds

Set-CsUserCallingSettings -Identity username@company.com -IsForwardingEnabled $True -ForwardingType Simultaneous -ForwardingTargetType SingleTarget -ForwardingTarget "<Phone Number set in VB.Net>”
Set-CsUserCallingSettings -Identity username@company.com -IsUnansweredEnabled $True -UnansweredDelay 00:00:30 -UnansweredTargetType singleTarget -UnansweredTarget  <Phone Number set in VB.Net>

Disconnect-MicrosoftTeams
Set-Content .\Exit.txt -Value '1'
}
catch
{

Write-Output $_ | Set-Content .\Error.txt
Set-Content .\Exit.txt -Value '99'
}
What holds this all together is Exit.txt and Error.txt that PowerShell writes to and VB.Net reads from. This gives VB.Net the info it needs to inform the user if an error occurred when running the PowerShell Script. This is one way to Share Data between VB.Net to PowerShell
The Bottom Line on Sharing Data from VB.Net to PowerShell
You may have to think a bit outside the box, but if you research enough accompanied by your programming and scripting skills, you will be able to share data from VB.Net to PowerShell. I know it has helped me with my day-to-day M365 administration tasks. It will help you!
Deactivate Entra PIM Roles with PowerShell

So, you would like to Deactivate Entra PIM Roles with PowerShell? Doing it through the admin portal is a manual procedure but it can be automated. I thought, “You should be able to do this in PowerShell”. You can do a lot of things, so why not do this?
Read on and I will show you who to create and run this script that can start your day without waiting for your currently activated PIM’s to expire.
You should read my previous post on activating Entra PIM roles with PowerShell
But first, what are Entra PIM Roles?
Entra PIM Roles Explanation
As Microsoft states, Privileged Identity Management (PIM) is a service in Microsoft Entra ID that enables you to manage, control, and monitor access to important resources in your organization. These resources include resources in Microsoft Entra ID, Azure, and other Microsoft Online Services such as Microsoft 365 or Microsoft Intune. The following video explains important PIM concepts and features.
Simply put, if your organization is big enough and takes security seriously, it won’t give Global Admin access to just anyone. It is like giving a kid keys to the candy store! Instead, it is better to be more granular with your organization’s admin access. If your roles are already activated, you will have to wait for the duration you set to expire. You can to the roles page and manually deactivate each role. But what if you don’t have to? What if you leave early and you don’t want to manually do it? Fortunately, there is a way to do it through PowerShell. Let me show you how….
Deactivate Entra PIM Roles with PowerShell: Prerequisites
Before you do this, you will need the following:
- You need to be licensed to at least MS Entra ID P2 or Enterprise Mobility + Security (EMS) E5 license.
- You need to have the MgGraph Module installed in PowerShell
- Your PIM Role administrator must assign you your PIM Roles (i.e Teams Administrator, Exchange Administrator etc.)
What the Script Does
Simply put, the script will iterate through a Role list you have created as a CSV file and deactivate each role. As your job changes you modify the CSV file for what roles have been added or taken away from your position. It is quicker than deactivating your PIM than doing it manually. It is all automatic. You can leave work knowing they have been deactivated!
Deactivate Entra PIM Roles with PowerShell: The Script
Make sure your roles.csv file is in the same directory as the script. Here is an example of its format:

The script looks like this:
$CSVPath = ".\roles.csv"

Connect-MgGraph -NoWelcome

$context = Get-MgContext

$currentUser = (Get-MgUser -UserId $context.Account).Id


##Try import CSV file

try {

    $Roles = import-csv $CSVPath -ErrorAction stop

}

catch {

    throw "Error importing CSV: $($_.Exception.Message)"

    break

}


# Get all available roles

$myRoles = Get-MgRoleManagementDirectoryRoleEligibilitySchedule -ExpandProperty RoleDefinition -All -Filter "principalId eq '$currentuser'"


 foreach ($Role in $Roles) {


$CurRole = $Role.role


#Get Role to deactivate

$myRole = $myroles | Where-Object {$_.RoleDefinition.DisplayName -eq $CurRole}


write Deactivating $CurRole


#Setup parameters for activation

$params = @{

    Action = "selfDeactivate"

    PrincipalId = $myRole.PrincipalId

    RoleDefinitionId = $myRole.RoleDefinitionId

    DirectoryScopeId = $myRole.DirectoryScopeId

    }


# Deactivate the role

New-MgRoleManagementDirectoryRoleAssignmentScheduleRequest -BodyParameter $params


   }


Write All Done!


Disconnect-MgGraph
For a continued explanation of this go here. I hope this quick tip can speed up your day. I know it did mine!!
Activate Entra PIM Roles with PowerShell

So, you would like to Activate Entra PIM Roles with PowerShell? Doing it through the admin portal is a manual procedure and it takes forever!! I couldn’t agree more. I couldn’t take it anymore so I thought to myself, “You should be able to do this in PowerShell”. You can do a lot of things, so why not do this?
Read on and I will show you who to create and run this script that can start your day off quicker. But first, what are Entra PIM Roles?
Entra PIM Roles Explanation
As Microsoft states, Privileged Identity Management (PIM) is a service in Microsoft Entra ID that enables you to manage, control, and monitor access to important resources in your organization. These resources include resources in Microsoft Entra ID, Azure, and other Microsoft Online Services such as Microsoft 365 or Microsoft Intune. The following video explains important PIM concepts and features.
Simply put, if your organization is big enough and takes security seriously, it won’t give Global Admin access to just anyone. It is like giving a kid keys to the candy store! Instead, it is better to be more granular with your organization’s admin access. If you need only user admin, exchange admin and team’s admin access, then that’s all you should have. However, if you have several more roles, going to the roles page and manually activating them can be time consuming. Fortunately, there is a way to do it through PowerShell. Let me show you how….
Activate Entra PIM Roles with PowerShell: Prerequisites
Before you do this, you will need the following:
- You need to be licensed to at least MS Entra ID P2 or Enterprise Mobility + Security (EMS) E5 license.
- You need to have the MgGraph Module installed in PowerShell
- Your PIM Role administrator must assign you your PIM Roles (i.e Teams Administrator, Exchange Administrator etc.)
What the Script Does
Simply put, the script will iterate through a Role list you have created as a CSV file and activate each role you need to be activated for your workday. As your job changes you modify the CSV file for what roles have been added or taken away from your position. It will take about as long to active your PIM as it did before but there is absolutely no manual clicking involved. It is all automatic, leaving you to start other tasks during your day while it is running in the background.
Activate Entra PIM Roles with PowerShell: The Script
Make sure your roles.csv file is in the same directory as the script. Here is an example of its format:
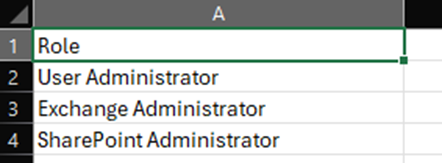
The script looks like this:
$CSVPath = ".\roles.csv"

Connect-MgGraph -NoWelcome

$context = Get-MgContext

$currentUser = (Get-MgUser -UserId $context.Account).Id


##Try import CSV file

try {

    $Roles = import-csv $CSVPath -ErrorAction stop

}

catch {

    throw "Error importing CSV: $($_.Exception.Message)"

    break

}


# Get all available roles

$myRoles = Get-MgRoleManagementDirectoryRoleEligibilitySchedule -ExpandProperty RoleDefinition -All -Filter "principalId eq '$currentuser'"


 foreach ($Role in $Roles) {


$CurRole = $Role.role


#Get Role

$myRole = $myroles | Where-Object {$_.RoleDefinition.DisplayName -eq $CurRole}


write Activating $CurRole


#Setup parameters for activation

$params = @{

    Action = "selfActivate"

    PrincipalId = $myRole.PrincipalId

    RoleDefinitionId = $myRole.RoleDefinitionId

    DirectoryScopeId = $myRole.DirectoryScopeId

    Justification = "Needed for work"

    ScheduleInfo = @{

        StartDateTime = Get-Date

        Expiration = @{

            Type = "AfterDuration"

            Duration = "PT8H"

        }

    }

   }


# Activate the role

New-MgRoleManagementDirectoryRoleAssignmentScheduleRequest -BodyParameter $params

}


Write All Done!

Disconnect-MgGraph
For a continued explanation of this go here. I hope this quick tip can speed up your day. I know it did mine a bit…
Unfortunately, there are a few roles that you get an error and will have to manually activate. For me, it is my company’s firewall that is the issue. The only info about it I dug up here. The issue has been around for over a year and is still not fixed. The roles I had issue activating through the script are as follows:
User Administrator
Exchange Administrator
Share Point Administrator
Security Administrator
Intune Administrator
Conditional Access Administrator
But when I went through an internet connection without out a restrictive firewall I was able to active all roles through PowerShell
If you want to learn how to Deactivate the roles with PowerShell, Go here.