
VB.Net and M365

It is funny but VB.Net and M365 go together like peanut butter and jelly. VB has been around for years, and I always seem to find a use for it when dealing with Microsoft products. I remember using it fresh out of school. I have worked with it so much I am going to add a dedicated section to the blog about it, I hope it will help you automate or improve some of your M365 Administration. First a little history…
VB used for Automation
Those were the days of pagers (I know I am dating myself here). But I developed a program where you could automatically page you when someone called your land line (If you know what a land line is, then you are old like me).

VB developed for the Internet
With VB6 and onward there was the ability to program for the internet. I thought Internet control was cool. So, I wrote a program that would check POP/IMAP email and let you know if you had mail. It seems basic now but back in the day it was an advantage. You didn’t have to load your large email program to see if you had mail. Just a little VB program saving tons of memory on your computer for other tasks. It doesn’t mean much now but it did back then, Fast forward a little later….Sorry No Screenshots!
VB becomes VB.Net and Databases
With the advent of visual studio MS changed the name to VB.net and became able to handle a lot of different things. I started using it as a front end for database. It makes a great front end to Access and SQL DB’s. I was able to incorporate this like data entry, reports, exports, print, security and auditing of a system to name a few.
VB.Net and M365 Administration
Now the part you all have been waiting for. Thanks for going down memory lane with me. What a trip. I can’t believe how much I have used VB over the years. It is no surprise that I would use it for M365 Automation. From creating JSON and CSV to ICS to files to be imported my M365 Apps to automating PowerShell scripts and MSGraph, it is quite versatile.
Stay Tuned for VB.Net and M365
So, adding it as a dedicated section to the blog like the sections I have made it a no brainer. Stay tuned for information on using VB.Net and M365!
Configuring Location Services in Intune

You have set up an enrollment profile that uses Location Services in Intune for your Android devices. Great. It can be very useful when you need to locate a lost or stolen device in Microsoft Intune Admin.
Here’s the thing though, if you do not allow the Intune app permission to access the devices’ location all the time, it won’t work.
Follow these steps.
Steps to Configure Location Services in Intune
- Swipe down from the top of the phone screen and tap settings in the top right of the screen.
- Search for location:
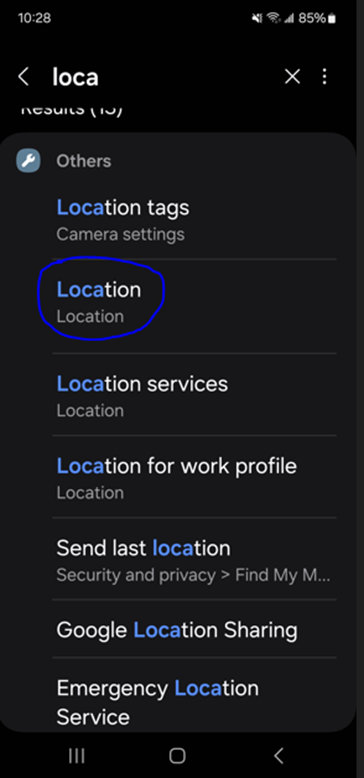
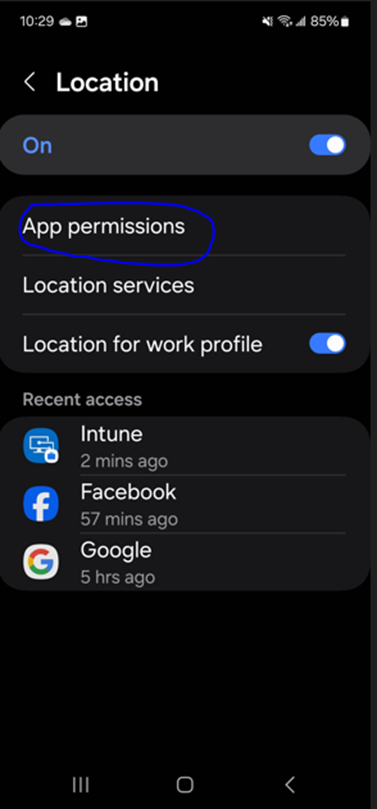
3. Once in Location, tap “App Permissions”:
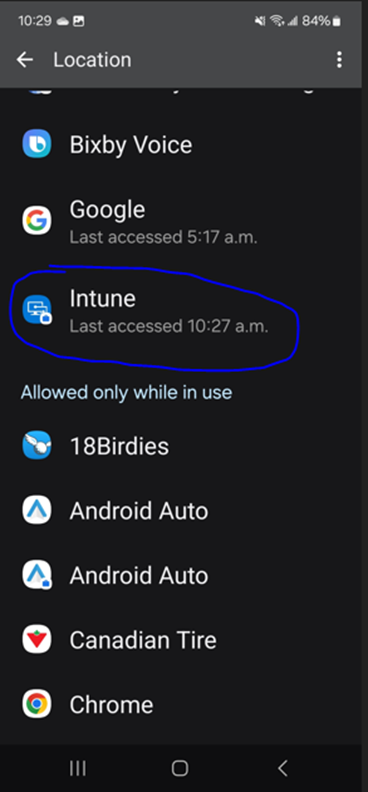
4. Once in App permissions, scroll down until you see the Intune app. Since it is among the apps not allowed to access location data, it will be further down the screen. When you find it, tap it.:
5. In the Intune App permissions screen, make sure “Allow all the time” is chosen. Then tap the back arrow.
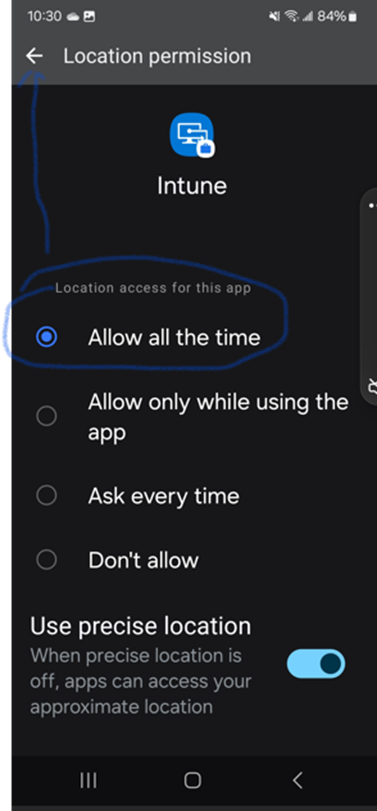
Locations services are now configured for your phone. It would be foolish to choose “allow only while using this app” or “Ask Every time”. Nobody knows when or how they are going to have their phone lost or stolen LOL.
One Consideration when Configuring Location Services
When I configured a usage policy for a group of mobiles, I had another group of mobiles excluded from this policy. They had to be configured slightly differently. The problem was location services were not enabled in their policy. Never assume it will always work. I had to go into the second policy and enabled it.
Follow these steps to Location Services on Intune and you will be good to go!
One Way to Stop Auto-Archiving Outlook
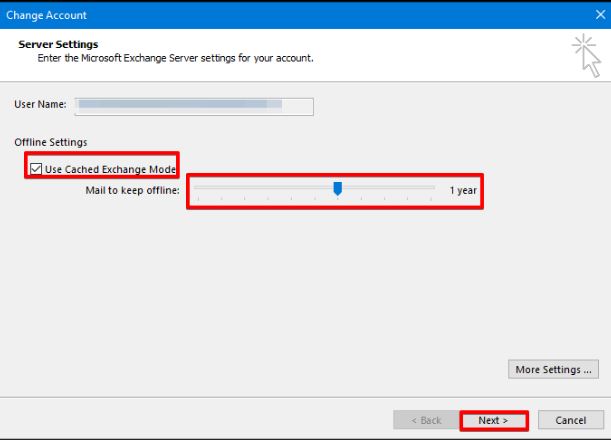
So, you are stuck in the old ways of Outlook, and you feel the need to Auto-Archive your emails when you think that your storage is being all user up. What if I could show you how to Stop Auto-Archiving Outlook.
If you are using Outlook through an M365 subscription you have a minimum of 50GB Storage for your email. Depending on your license you could have up to 100 GB storage. I don’t know about you but that is a lot.
Back in the day 2-10 GB storage was considered a lot, so you would have to use Auto Archive a lot. I would try not to use it at all if you can. It really is a pain as it creates another storage location for your mail, and I like to keep it all in one place.
How to Stop Auto-Archiving Outlook
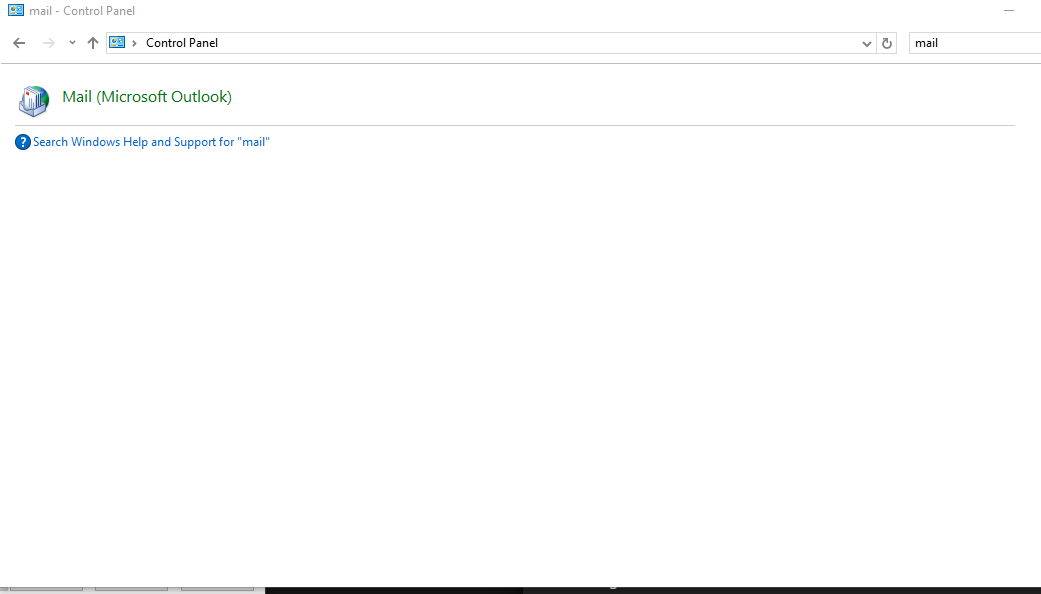
Go to the control panel and search for mail:
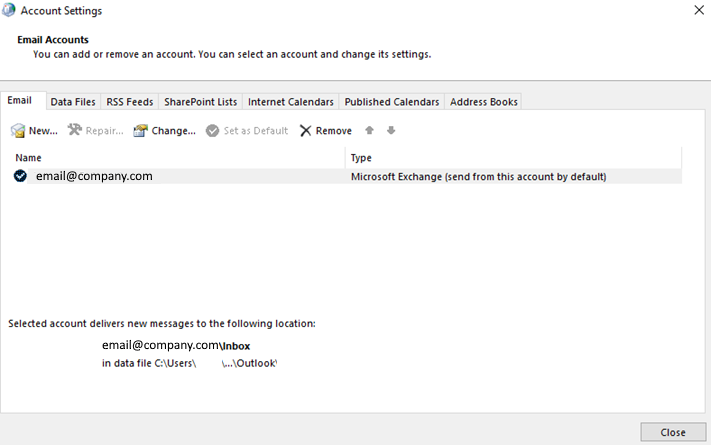
When you click mail, go to your account settings:
Double click your account, it will take you to your cache settings:
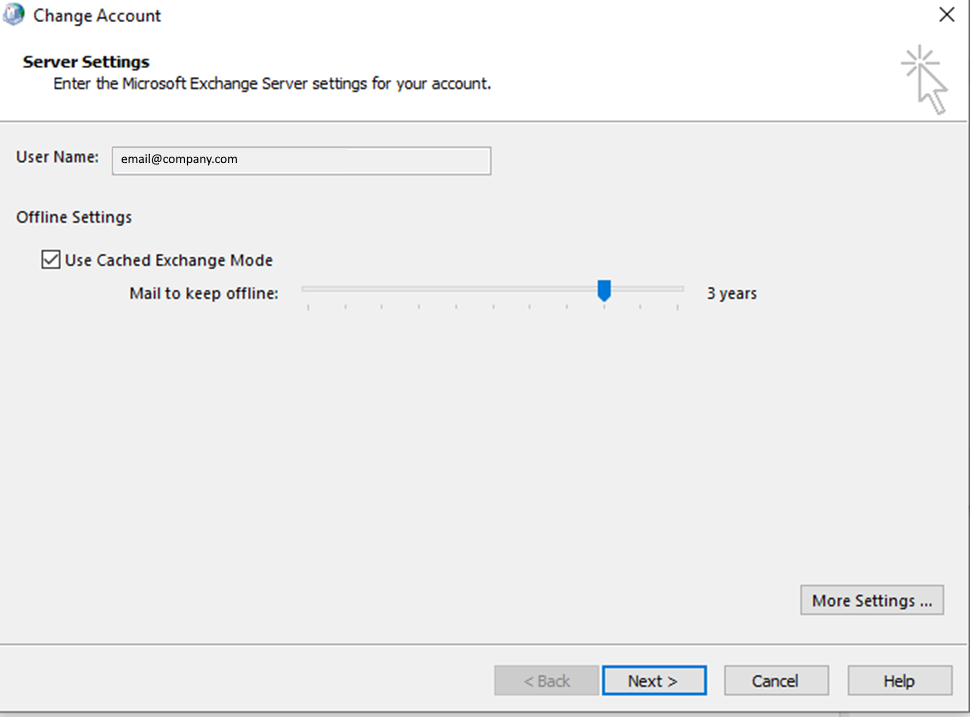
In this example I am keeping 3 years of mail cached. Anything older will be in the cloud, accessible by going to https://outlook.office.com/mail/ . This will reduce the size of the mail being stored on your computer.
Benefits of Not Auto-Archiving Outlook
The benefits are twofold:
- It reduces the storage space on your computer. This is helpful if you are using a device with limited storage space (Surface Tablet or any computer with a smaller hard disk)
- You only have one storage location for all your mail. If you need to retrieve mail from outside your cached timeframe all you must do is go to the cloud.
What you can see here is that users forget that Outlook is always updating and Auto-Archive is an ooutdated concept. Storage is no longer the precious commodity it once was!
The Evolution of Information Rights Management

A user brought this functionality to my attention. Unfortunately, the Evolution of Information Rights Management put me onto a wild goose chance. Sometimes, trying to keep up with Microsoft’s changes are a bit dizzying to say the least.
I try not to be too editorial on this blog. I just want to give Quick M365 Tips so you can admin your M365 tenant so you can go along your merry way. Sometimes, it is more difficult than it has to be. This is where the frustration lies.
What I will give you is an account of where I started and where I ended up…..
The Problem
A user of mine has several spreadsheets that contain macros and queried data. Most users who need these sheets need to be only able to view and filter the data. Currently, the only way it can be done is manually locking and unlocking the spreadsheets, thereby reducing its functionality. This is very cumbersome.
He was looking for a solution that will allow the users to have the limited functionality without the need to manually lock and unlock the sheets. Enter IRM (Information Rights Management).
What IRM Was
IRM used to be quite simple. You Configure it using SharePoint, install an IRM client on your computer and viola, start protecting Office documents (in this case, excel) and limit certain functions of the document depending on the user that is accessing it.
But something happened and IRM changed… a lot. Now you must configure a whole bunch of things and remember acronyms like AARM, RMS and AIP. Do not forget Azure, SharePoint and Exchange Online. This article tries to explain it.
What IRM is Now (Evolution of Information Rights Management)
It seems the Evolution of Information Rights Management is now mostly a cloud service. It cannot be used until you activate the Rights Management Service. So you will need to go to Azure Admin first and then SharePoint Admin. Also, do not forget to install the AIP Service in PowerShell.
You are going to get a lot of errors trying to get all of this set up. There will be several calls made to Microsoft support. They might be able to help you, maybe not. It really depends on when you installed it and configured your tenant and who you get when you call MS support!
If you are an old pro with O365/M365 Admin you will probably look at this article and think “It is really not that hard” but you have evolved with the technology over the years.
It you are trying to get IRL installed and configure on a relatively new tenant then you are going to have to do some research. The problem is, you must piece it together from several loosely related articles on MS’s site or various other forums and blogs, etc.
And there is a very good chance you will not get it right the first time. Microsoft, you must do better than this. If you aren’t going to slow down whatever changes you make at least make better documentation!
Oh, and just so you know, I still haven’t got IRL fully setup. Results pending…
Set up Auto Attendant for Teams After Hours Call Forwarding

You may have a need to Set up Auto Attendant for Teams After Hours Call Forwarding. An example is a department that supports after business hours, and you have an on-call person who answers the call and a secondary person who answers if the first one cannot. In this post I can show you how to set up an auto attendant to do this.
So read on and I will show you step by step how to achieve this.
Prerequisites to Set up Auto Attendant for Teams
You will need the following elements before you get started.
- A resource account (With Teams Resource Account license) and a Telephone number assigned for the Auto Attendant.
- A Telephone number for each Teams Account for each option in the Auto Attendant (i.e. #1, #2) with a Microsoft Teams Phone Standard license.
- The phone numbers of the on-call users who will be answering requests. It is usually their mobile numbers.
Step one – Set up Auto Attendant
For this, you will need to go into Microsoft teams’ administration and go to Voice / Auto Attendants. Click Add:
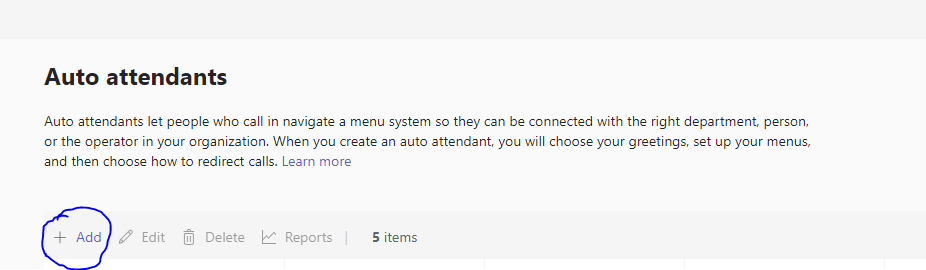
It will start a wizard and all you need to do is go through the steps:
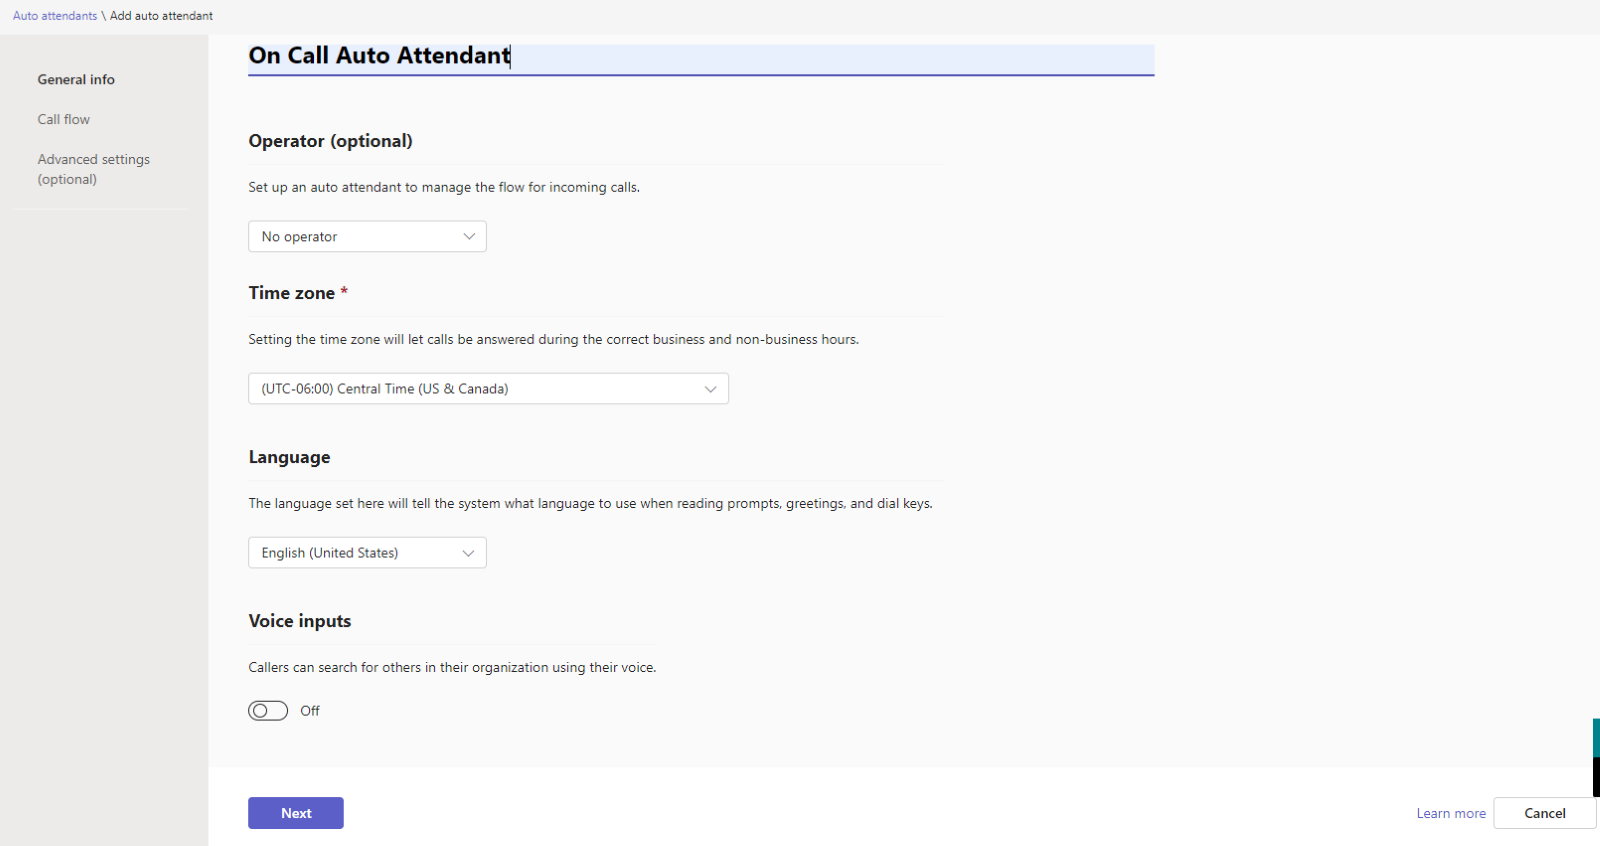
- Name your Attendant. It is un-personed so I have chosen no operator. I have also set the time zone and the language. Voice input is disabled. Click “Next”’
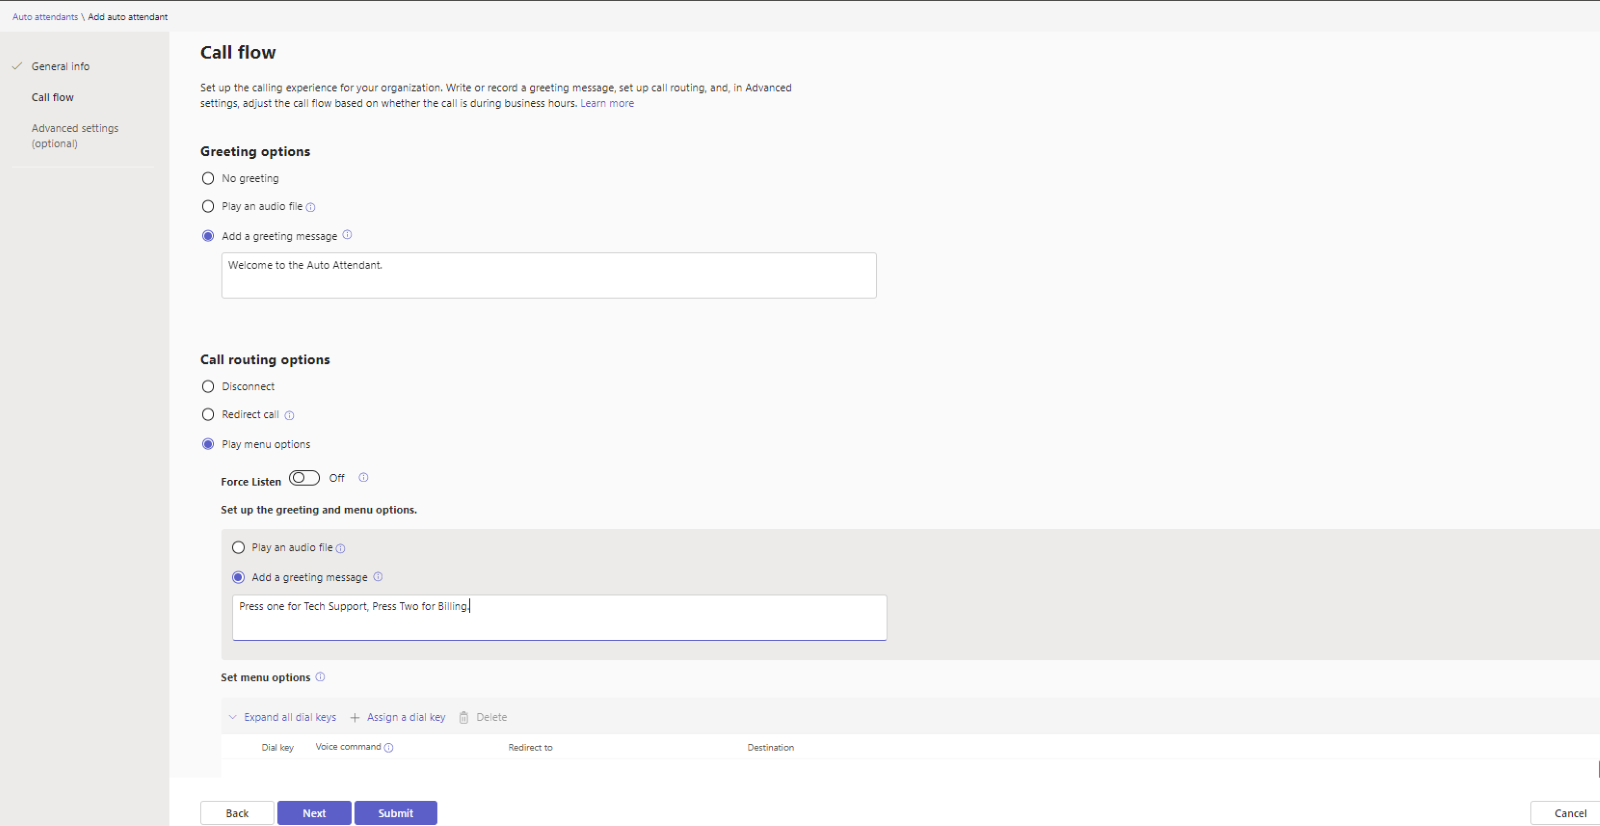
In the next section you set the call flow. Here we specify the initial greeting and then specify the options the attendant has to the user:
- Further down the screen, we specify how each option is routed by assigning dial keys to a user. Click “Assign a Dial key” and assign it to a “person in the organization”. Note: the user(s) picked MUST HAVE A TELEPHONE NUMBER ASSIGNED TO THEM! The telephone won’t be used but Teams admin needs it in order to use the forwarding feature on the account:
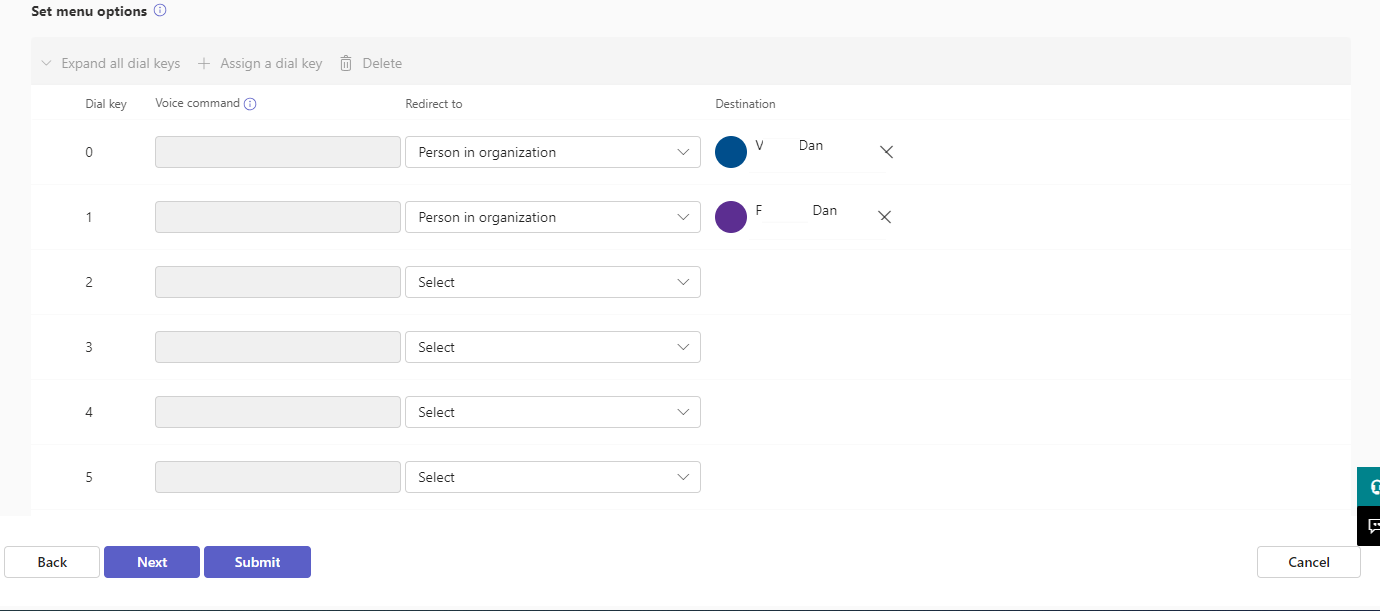
Click “Next”
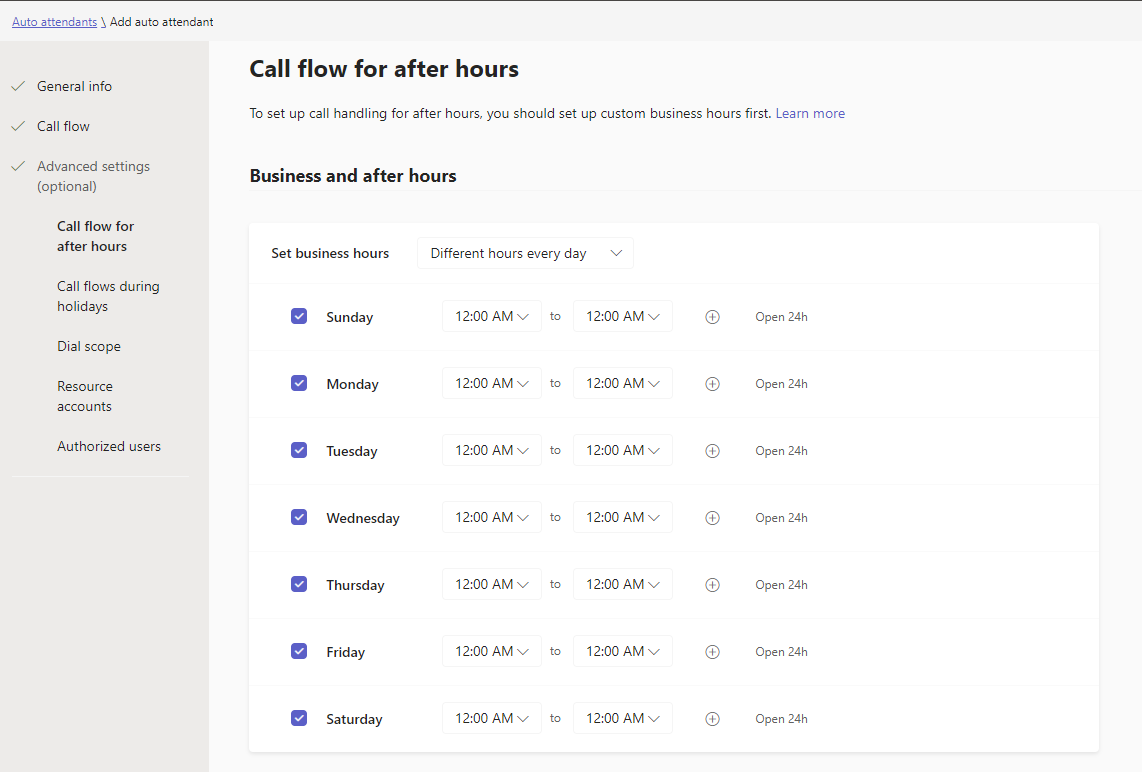
- In the next step you can assign hours for the queue and set up an after-hours queue so effectively you would have another section like the previous step. However, for this illustration the first queue is set up to be running 24 hours, so we only have one:
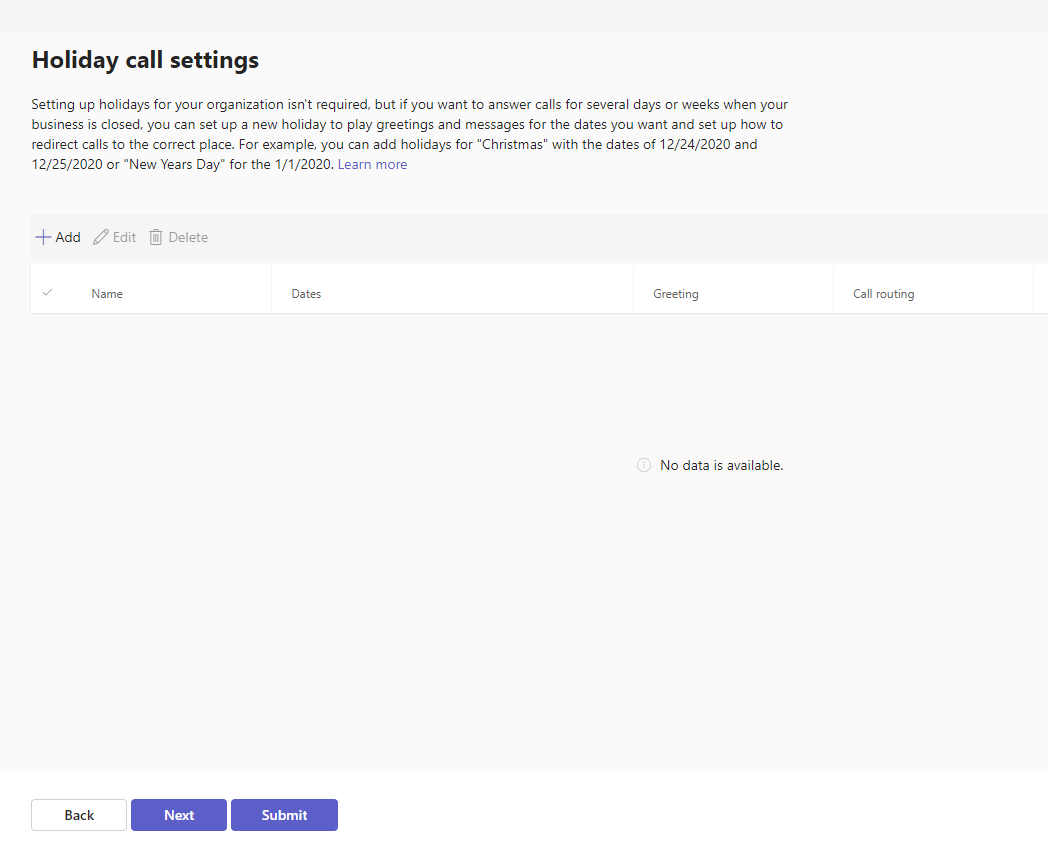
- There are no holidays for the Auto Attendant, so we just click Next:
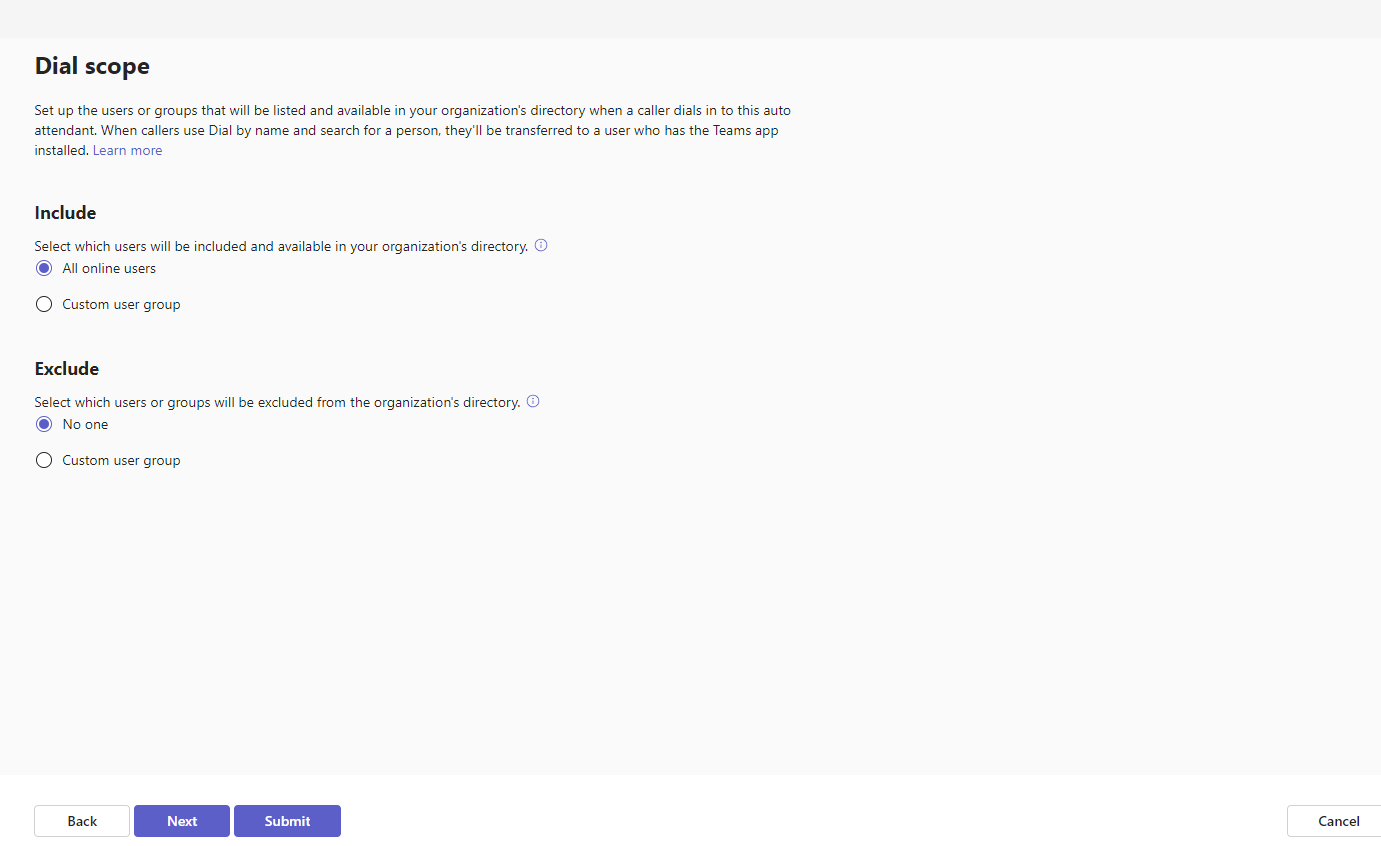
- Also, we just click next for the dial scope:
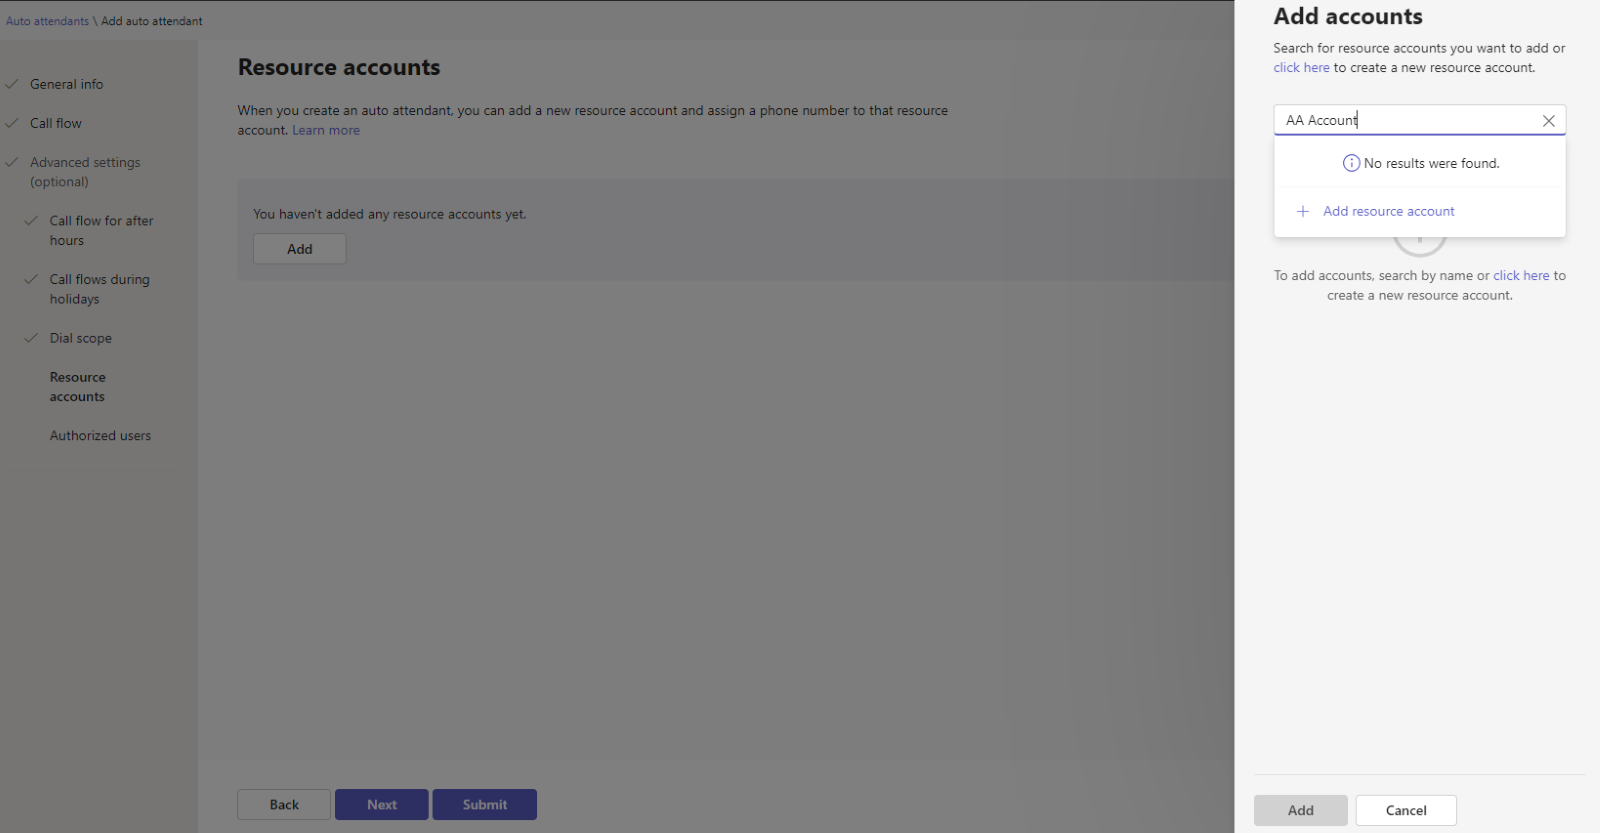
- In this step you need to add a resource account. Search for the Resource Account you created as part of the prerequisite above, and the click Add:
- Click “next” and finally Submit:
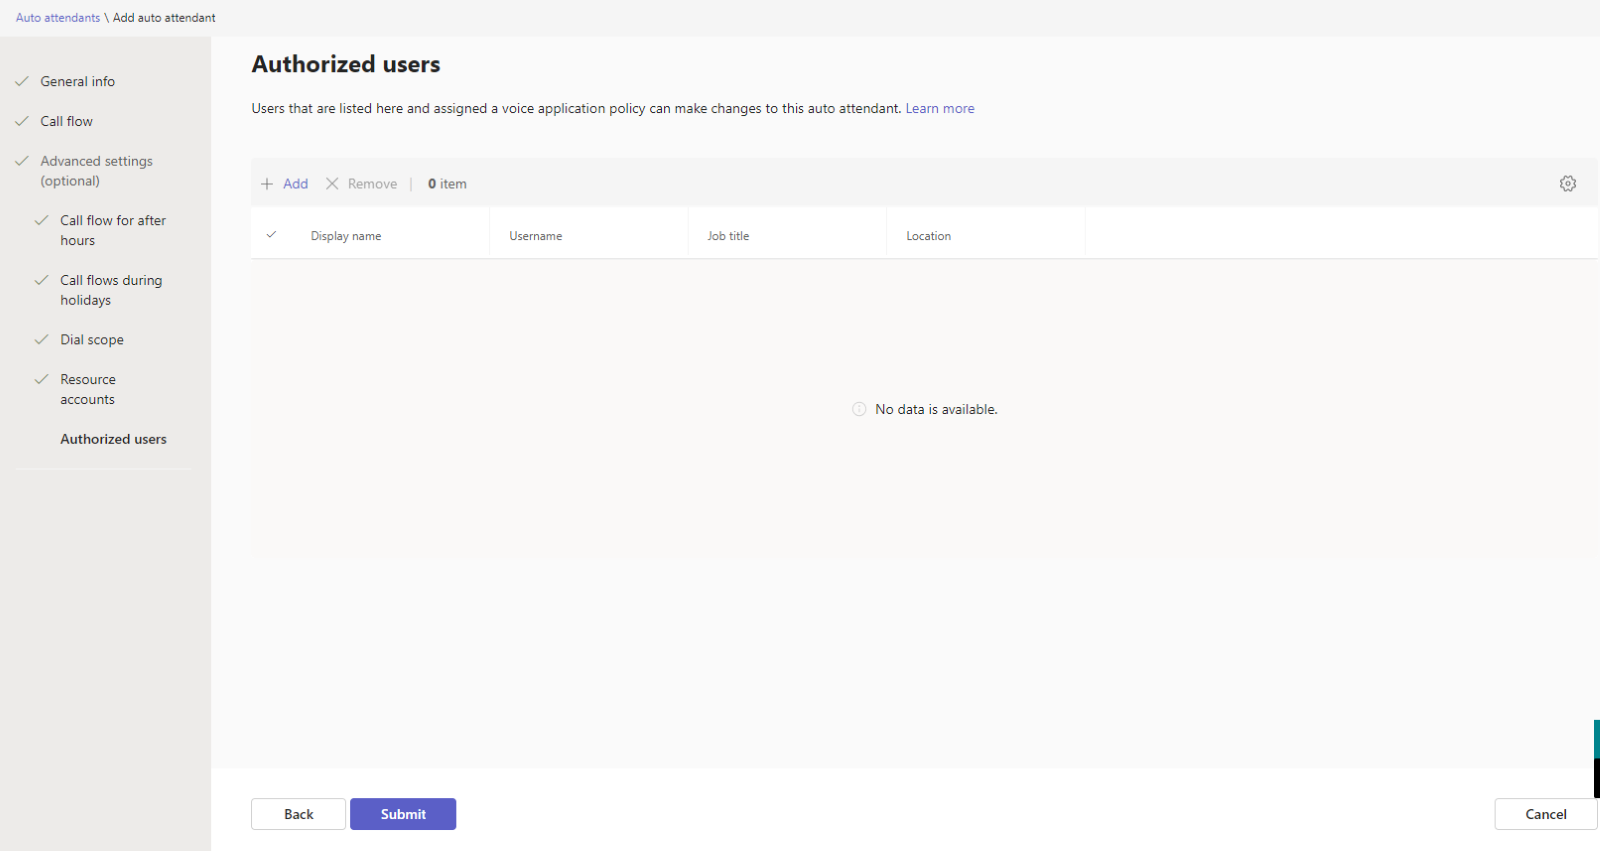
You now have an Auto Attendant set up! But before you can test it you need to set up the forwarding options for the dial key options you set up in step #3.
Step Two – Set up the Forwarding Option for Assigned Dial Keys
To properly Set up Auto Attendant for Teams After Hours Call Forwarding, you need to go through each user you assign a dial key to and set up forwarding options in their individual account.
For this, you need to go to Users in Teams Admin, search for the user and then change the following options:
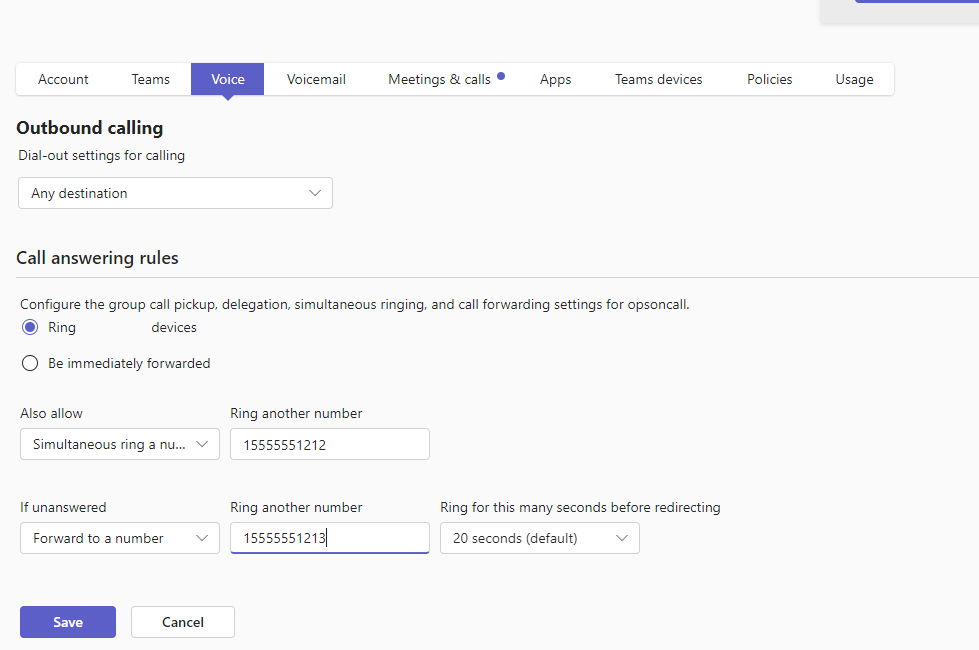
The options are “ring the accounts devices”, Also “allow simultaneous ring” on 15555551212 (primary number) and “if unanswered” for 20 seconds, forward to 15555551213(secondary) .
If you would rather user PowerShell to accomplish this, you issue the following command:
Connect-MicrosoftTeams

Set-CsUserCallingSettings -Identity userid@domain.com -IsForwardingEnabled $true -ForwardingType Simultaneous -ForwardingTargetType SingleTarget -ForwardingTarget "15555551212"

Set-CsUserCallingSettings -Identity userid@domain.com -IsUnansweredEnabled $true -UnansweredDelay 00:00:20 -UnansweredTargetType singleTarget -UnansweredTarget  15555551213
Expected Behavior for Set up Auto Attendant for Teams
All right, we now have everything set up, it is time to test. Now when you test you should get the following behavior:
- A call is received by the auto Attendant
- You are greeting and, in this case, presented with 2 options (press #1 for Tech Support, #2 for Billing).
- Whichever one you pick goes to the team’s account assigned that dial key.
- The account has forwarding set up to ring the first forwarder and if not picked up in 20 second it will then ring the second forwarder.
There you have it. This is how to achieve a Set up Auto Attendant for Teams for Teams After Hours Call Forwarding. If you are an organization with a capable IT department, this could be an option to go with instead of a third-party service.
Reset MFA for a User

Sometimes you need to reset MFA for a user. It may be because they have switched to a new mobile device, lost or damaged a previous mobile device or they have switched from Text to number matching as there preferred method of MFA. Either way, it is a simple process.
Steps to reset MFA for a user – Admin
On the admin side, log into https://admin.microsoft.com
Click on Identity / Users / All Users / Per-user MFA
Search for the user you need to reset.
Once you find the user, check the check box next to them and click User MFA Settings just above.
You will see the following display:
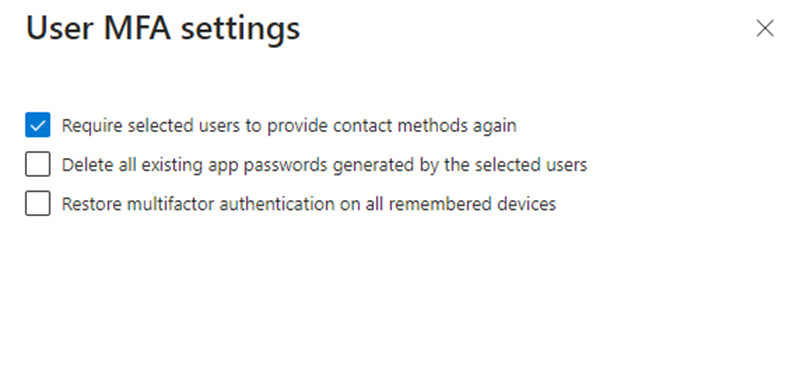
Make sure you check “Require selected users to provide contact methods again”.
Steps to reset MFA for a user – User
When the user logs in to any M365 app they will get this prompt:
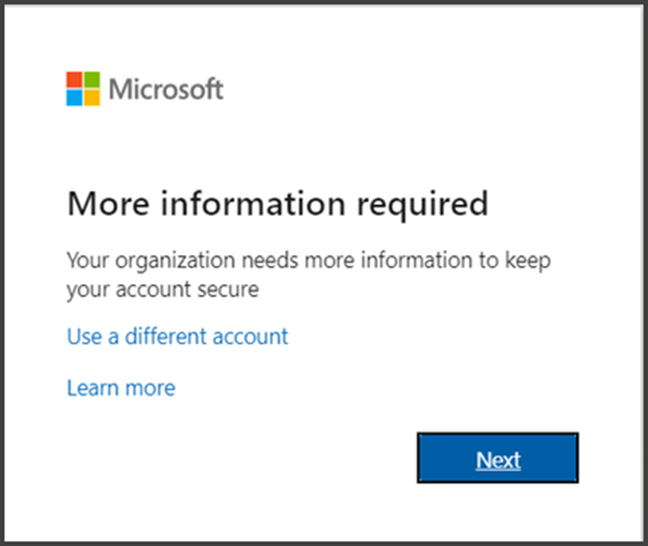
Mae sure the user has the Microsoft Authenticator app installed on their phone. Click on” Next”
Click Next
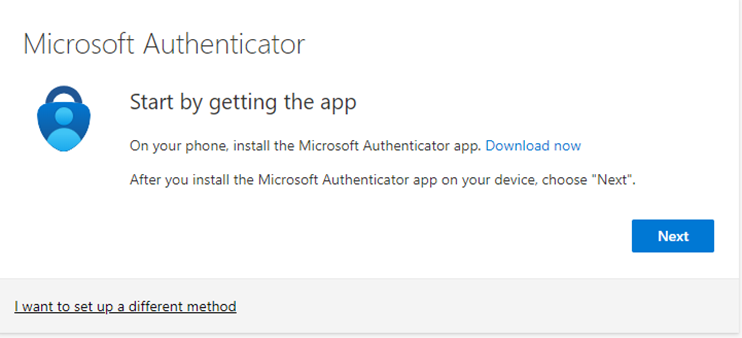
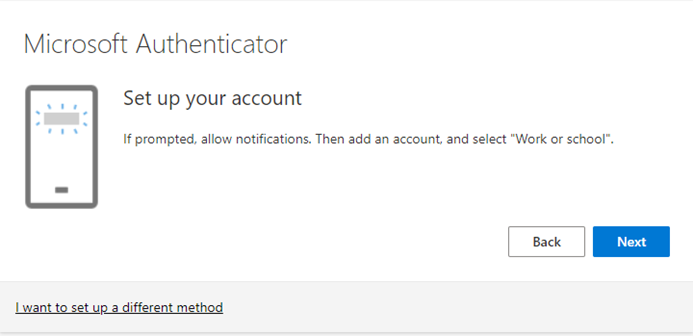
Click Next
Open your Authenticator App and Click the “+” button to add an account.

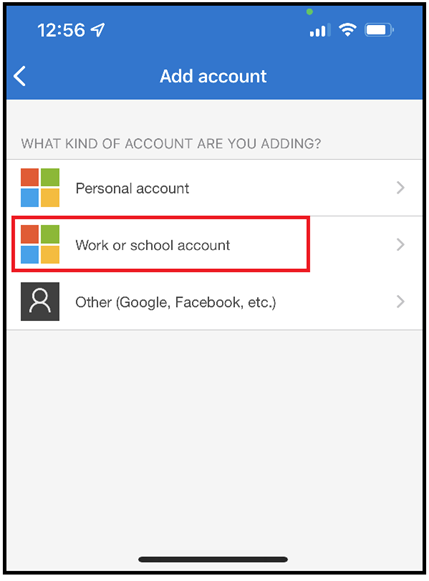
In this case it is a business account we are setting up. Choose Work or School Account
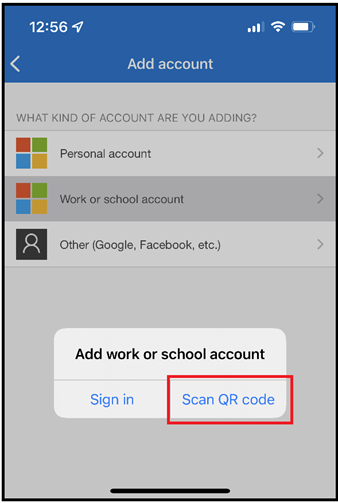
Choose Scan QR Code
Go back to your computer screen. You will see the code to scan:
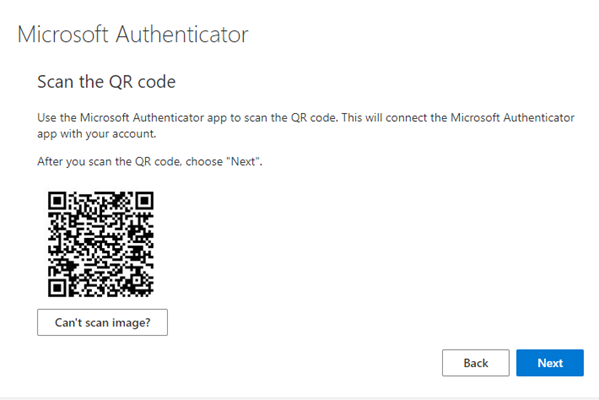
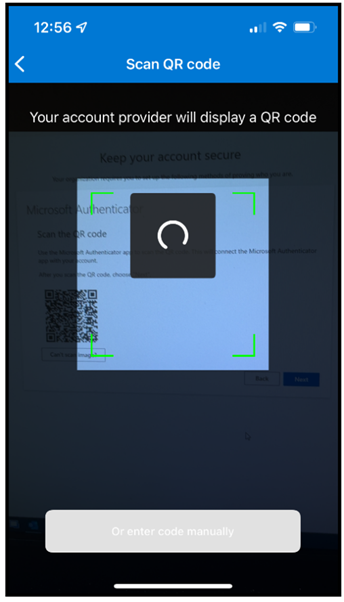
Use your phone to Scan the QR Code:
The computer screen will send you a two-digit number as a test code. Enter that number into the waiting prompt on your mobile screen.
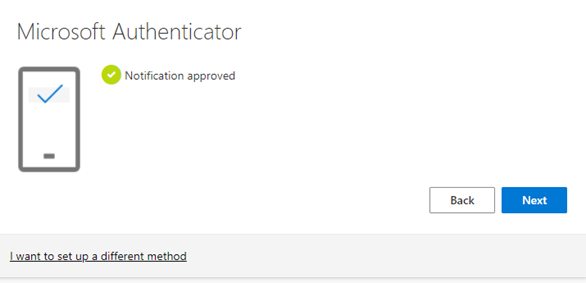
The test number will have succeeded. Click Next.
You can set up an App password if you want. In this example, we are not.
If you have followed this steps to reset MFA for a user, you will have it done in no time. It is a much more secure way to authenticate a users. I would suggest you always uses this way unless you have no other option!
Translate Documents in Word in Two Steps

You can do so much with Office 365. For example, you can easily Translate Documents in Word. Most documents will more than likely come in one of two formats. It will be either a PDF or a Word Document. These steps will help you translate it from another language to English (i.e. French) without it having to leave the security of our organization.
There are Translation Services out there but if you don’t want the added cost this is a good way to go.
If you receive the resume in PDF format you will need to do it in two steps. In the case of a Word document, you will only need the second step.
Step One – Open the PDF file using Word
- Open Word to Translate Documents in Word.
- Click “Open” in Word.
- Click “Browse” to navigate to the PDF document.
- From the drop-down box, choose “PDF”:
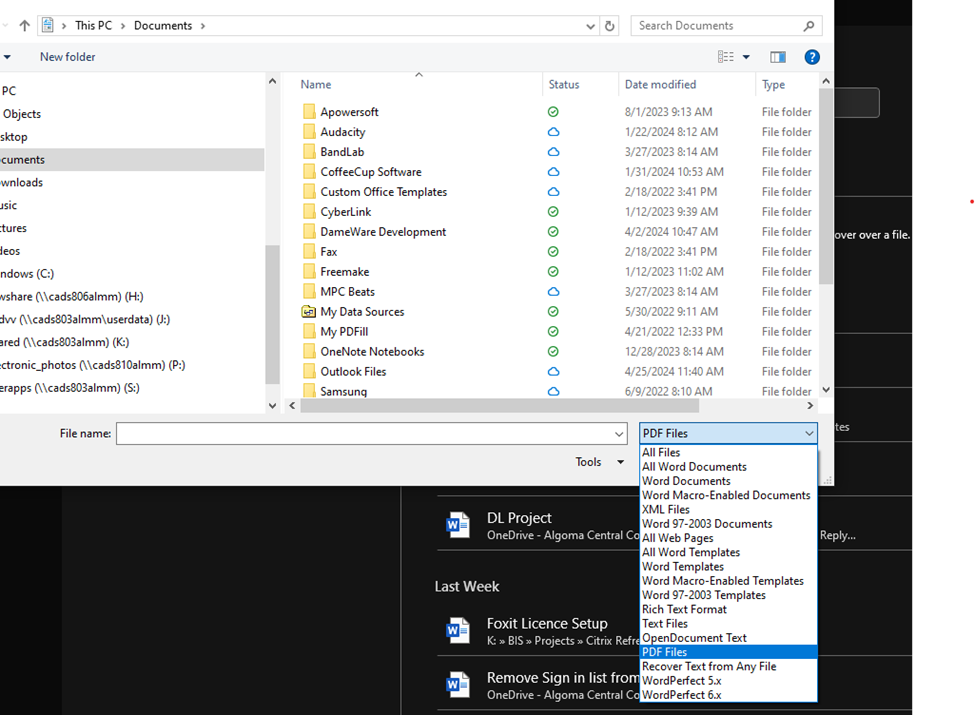
- Choose the PDF file you want to open in Word.
- You be asked if you want to convert to Word:

- Click OK and the PDF will be converted to Word.
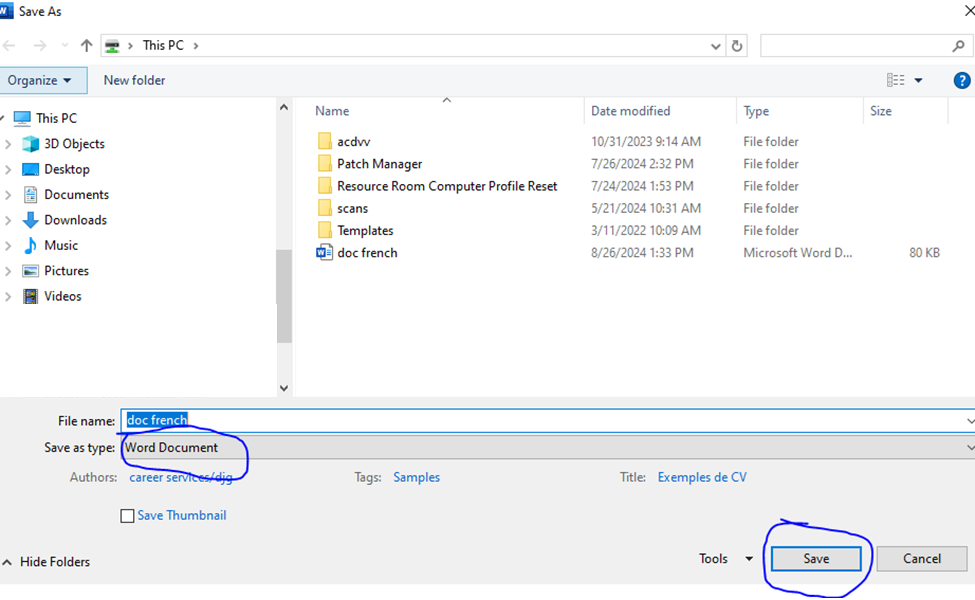
- You will need to save the document before can translate it.
- Save it as a word document:
Step Two – Translate Document in Word
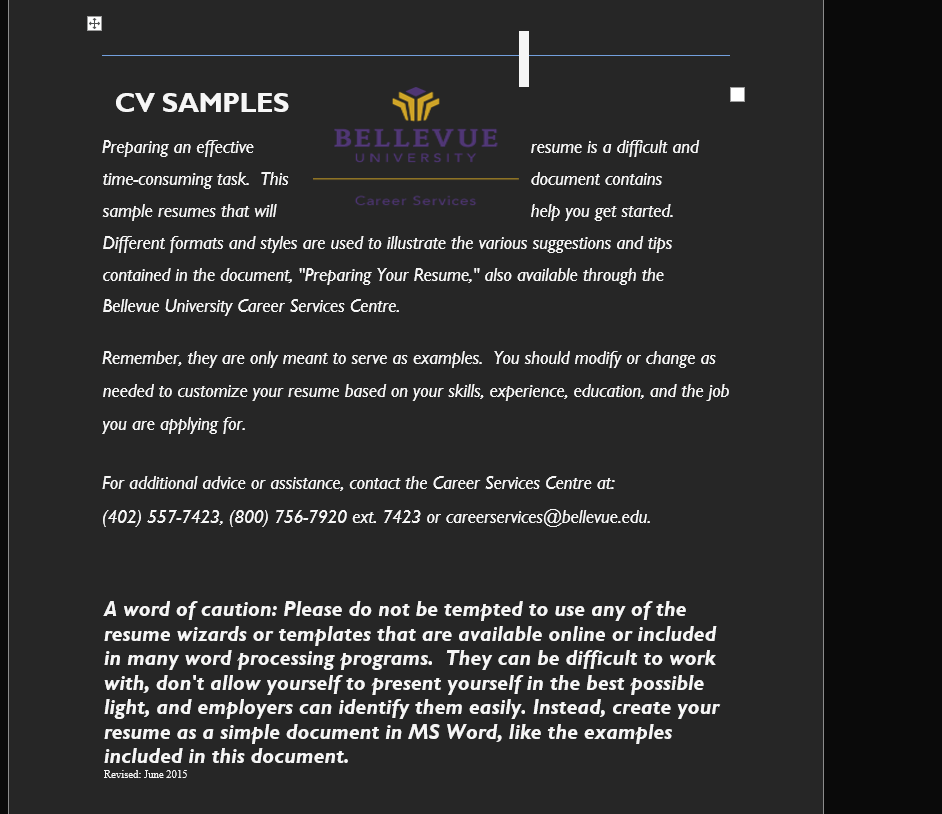
- Once the document is saved, go to the Review tab and choose “Translate Document”:
- It should auto-detect the language but if you want, you can choose the language the document is in, the “To” language should be set to “English”:
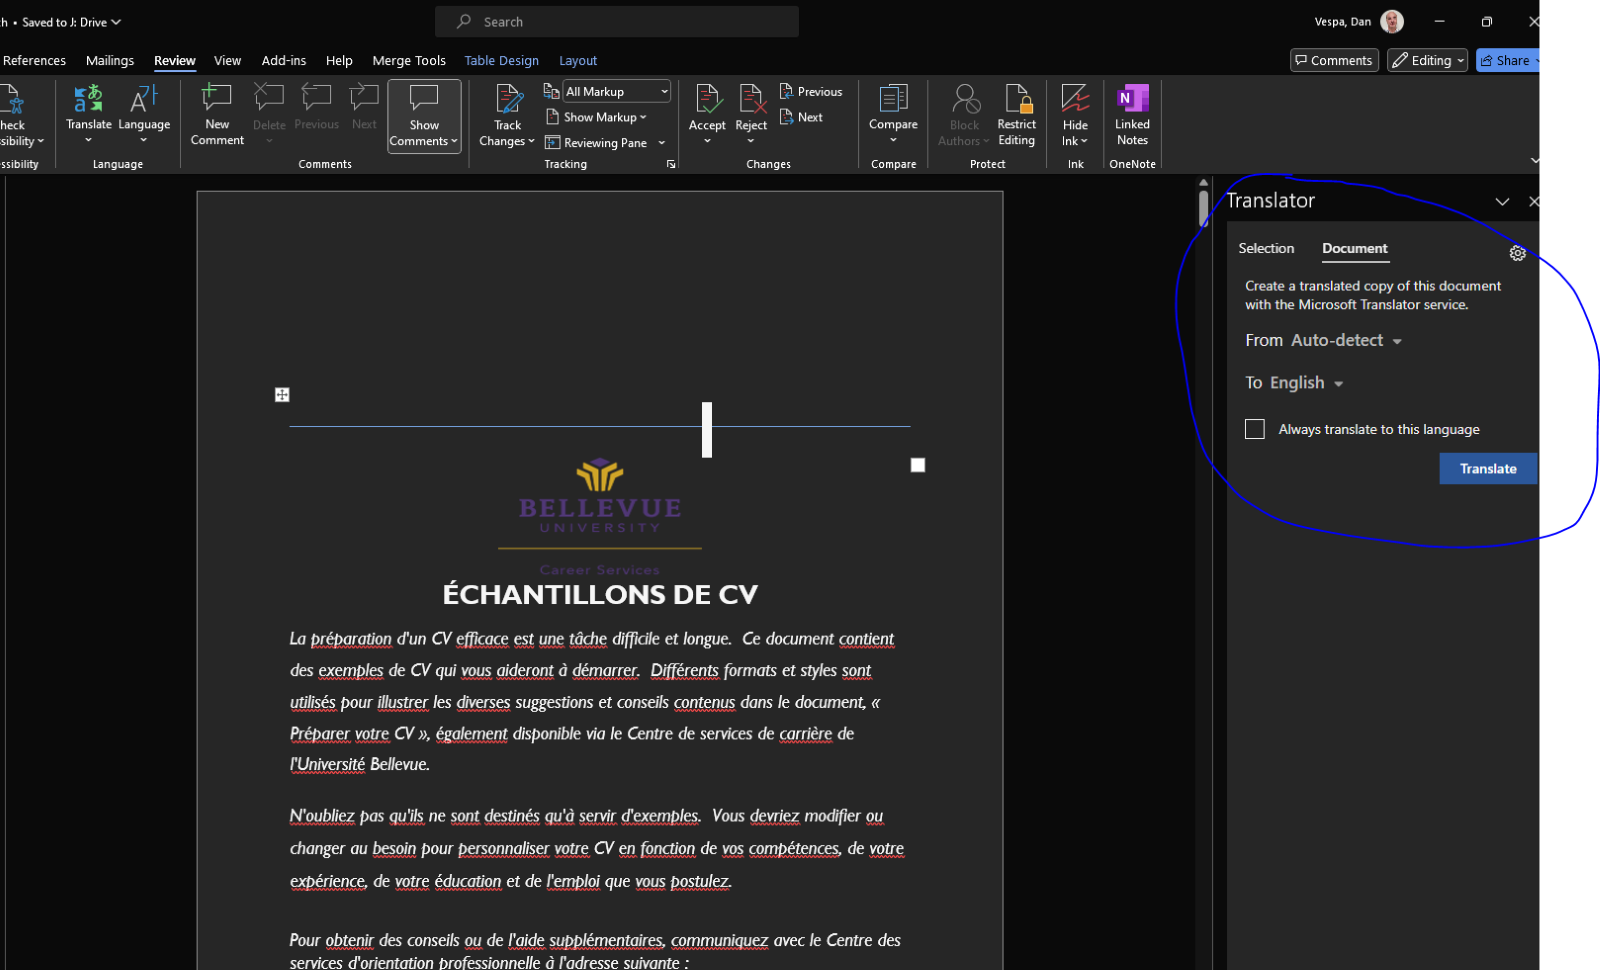
- Click Translate.
- The translation will open in a new document:
- From here you can save it to anywhere on the server.
Note: Translate Documents in Word and Formatting won’t be perfect, but it will do most of the heavy lifting!
Remove Sign-In List from MS Teams
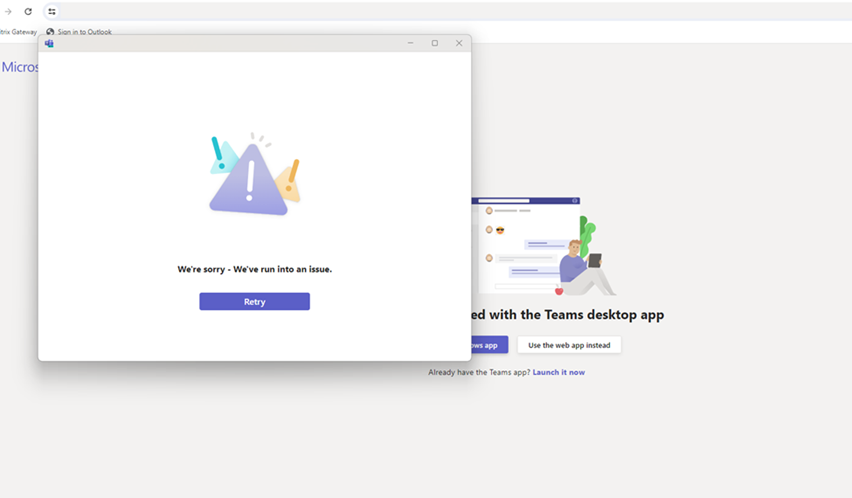
We have all had shared computers in our organization. It probably has a Sign-In List from MS Teams on it if you use it (you probably do). What if you would like to clear that list so subsequent users who sign into the computer do not see a large list of names when they sign into Teams.
I can show you how to do this quickly….
Steps to Remove Sign-In List From MS Teams
It is quite simple really. Just hit Win+R and type %AppLocalData%.
Delete the following folders:
Delete:
%LocalAppData%\Packages\MSTeams_8wekyb3d8bbwe
%LocalAppData%\Packages\Microsoft.AAD.BrokerPlugin_cw5n1h2txyewy
%LocalAppData%\Microsoft\OneAuth
%LocalAppData%\Microsoft\TokenBroker
%LocalAppData%\Microsoft\IdentityCache
Once that is done, restart the computer. And voila! Your sign-in list will be empty the next time you start MS Teams! It would be good do to do this from time to time as general housekeeping on a shared computer. This is one of many ways to keep your shared computers running smoothly with Teams. In my experience, it can be a bit of a chore but if you keep on top of it, it is not so bad.